background image


jetventfans.com 


 JetVent is a Registered Trademark 

WARNING:

  Stay alert and use common sense when installing, operating and servicing fans.  Do not operate, install, or service 

fans if tired or under the influence of drugs, alcohol, or medication. 


CAUTION:   

Only operate the fan within the ranges specified on the motor’s type plate. 


WARNING:

  Do not flex or bend the blades or fan brackets when installing, adjusting, or cleaning the fan.  Do not insert foreign 

objects in between rotating fan blades. 


CAUTION – HOT SURFACE.  

Avoid being burned.  When fan is turned off use caution when touching motor surfaces to be sure 

they have cooled sufficiently. Temperatures of 185°F (85°C) can occur, especially on the controller housing.   


CAUTION – AUTOMATIC RESTART:  

The fan/motor may switch on and off automatically for functional reasons.  After power 

failure or disconnection of main power, an automatic restart of the fan takes place when power is restored.  Wait for the fan to 

come to a complete stop before approaching it and be sure it is disconnected from power to avoid accidental restart. 


CAUTION:

  The Zoo Fans product warranty will not cover equipment damage or failure that is caused by improper installation, 

operation or use.   


ATTENTION – Intended Use: 


The fans are only intended for the conveyance of air or mixtures similar to air. 


Other uses which do not coincide with, or which exceed those specified will be deemed unauthorized unless 

contractually agreed in advance.  Damages resulting from such unauthorized uses will not be the liability of the 

manufacturer—the user will assume sole liability.


The fans must not be used in hazardous areas for the transfer of gas, mist vapors or mixtures, nor may they be 

used for the transfer of solid components in the transfer medium.


ATTENTION – Improper Use: 


Conveyance of aggressive and explosive gaseous media 


Use in an explosive atmosphere


Operation with iced-up, obstructed, or improperly operating fan impellers


Conveyance of abrasive or adhesive media


Conveyance of liquid media


Use of the fan and add-on parts as a resting surface or climbing aid


Blocking or braking of the fan by inserting objects


Loosening of fan blade, impeller and balancing weight


All applications not listed in the intended use


Summary of Contents for JVEC-HP

Page 1: ...JetVent is a Registered Trademark Installation Guide Models JVEC LP JVEC SP JVEC HP May be covered by the following United States and International Patents D631148S 138172 001790452 001 338608 and other patents pending ...

Page 2: ...ral framing member that has sufficient strength to support at least three times the hanging weight of the fan If uncertain a certified engineer or architect should conduct an analysis of the installation prior to purchasing the fans While Zoo Fans provides guidelines for installation it is the sole responsibility of the owner to ensure the safety of the installation and that it complies with all r...

Page 3: ... disconnected from power to avoid accidental restart CAUTION The Zoo Fans product warranty will not cover equipment damage or failure that is caused by improper installation operation or use ATTENTION Intended Use The fans are only intended for the conveyance of air or mixtures similar to air Other uses which do not coincide with or which exceed those specified will be deemed unauthorized unless c...

Page 4: ... de trois minutes s est écoulée depuis le débranchement de cela AVERTISSEMENT Pour réduire le risque d incendie de choc électrique ou de blessures corporelles montez le ventilateur directement sur un élément de charpente structural qui a une résistance suffisante pour supporter au moins trois fois le poids de suspension du ventilateur En cas d incertitude un ingénieur ou un architecte certifié doi...

Page 5: ... une panne de courant ou un débranchement de l alimentation principale un redémarrage automatique du ventilateur se fait lorsque l alimentation est restaurée Attendez que le ventilateur arrive à un arrêt complet avant de l approcher et assurez vous qu il est déconnecté de la puissance pour éviter le redémarrage accidentel PRUDENCE La garantie du produit pour les ventilateurs du zoo ne couvrira pas...

Page 6: ...NSTALLATION 3 JetVent Fans Do s and Don ts 4 STEP 2 WIRING FAN MAINS 5 STEP 3 WIRING FAN SPEED CONTROL SIGNAL 5 OPTION 1 Wiring 10k Ohm Potentiometer 6 OPTION 2 Wiring 0 10 Volt DC Analog Signal 6 OPTION 3 Wiring 4 20mA Current Signal 7 OPTION 4 Wiring MODBUS Control Signal 7 Fieldbus Modbus Communication Cabling Error Bookmark not defined STEP 4 SENSOR WIRING 10 SENSOR 1 10 SENSOR 2 10 STEP 5 FIN...

Page 7: ... requirements may vary depending on the location and application of the equipment The elements of a successful installation consist of 1 Good layout of fans wiring and controls 2 Hanging the fans where they ll be most effective and convenient to control 3 Completing the electrical hook up 4 Start up and commissioning 5 Conducting all work in a safe manner consistent with all relevant codes and reg...

Page 8: ...hich are Ceiling height as well as the overall volume of air the fans need to move in order to achieve the targeted level for turnover of air in the facility every hour The availability of a sturdy and secure anchor point for attaching the fan Obstructions The location of existing HVAC supply and returns Ask the electrician who will do the wiring for the fan s to review the following section to be...

Page 9: ...ounts close up of yellow box Illustrated on the right STANDARD INSTALLATION METHOD For standard installation use an 8mm Lag bolts directly to the mounting points SOUND SENSATIVE INSTALLATION For sound sensitive installations such as the first level under a residential complex additional anti vibration mounts are available For anti vibration mounts the following parts are required Front Mounting Po...

Page 10: ...Page 4 JETVENT FANS DO S AND DON TS ...

Page 11: ... must be made according to Illustration 8 the wiring diagram below Illustration 8 Wiring Fan Mains Diagram STEP 3 WIRING FAN SPEED CONTROL SIGNAL The JetVent Fans are factory programmed with one of the following speed control options 10k Ohm Potentiometer 0 10 Volt DC Analog Signal 4 20 mA Current Signal MODBUS RS 485 Digital Signal WARNING Never apply line voltage to the digital input Contact ZOO...

Page 12: ...een Red 24 VDC 10 VDC Din1 Din2 RSA D RSB D GND Ain1 0 10V Ain1 4 20m A Ain2 0 10V Ain2 4 20m A Aout GND Fault NO Fault COM Brown Red Grey Pink Black White Turquoise Yellow Green Violet Red Black Orange Blue Red Blue Green Red 24 VDC 10 VDC Din1 Din2 RSA D RSB D GND Ain1 0 10V Ain1 4 20m A Ain2 0 10V Ain2 4 20m A Aout GND Fault NO Fault COM 10VDC GND Output 0 10VDC GND Input 0 10VDC ...

Page 13: ...ed Blue Green Red 24 VDC 10 VDC Din1 Din2 RSA D RSB D GND Ain1 0 10V Ain1 4 20m A Ain2 0 10V Ain2 4 20m A Aout GND Fault NO Fault COM Brown Red Grey Pink Black White Turquoise Yellow Green Violet Red Black Orange Blue Red Blue Green Red 24 VDC 10 VDC Din1 Din2 RSA D RSB D GND Ain1 0 10V Ain1 4 20m A Ain2 0 10V Ain2 4 20m A Aout GND Fault NO Fault COM Input 4 20mA GND ...

Page 14: ...R WIRING CONFIGURATION END OF LINE X3 END OF LINE X8 Maximum communication wiring length is 500m before a Modbus repeater is required Separate conduit should be used for power and communications cable Keep communications cable away from devices that generate EMC interference such as powered antennas transformers contactors and neon lights Low capacitance 100 pF m twisted pair cable with shield and...

Page 15: ...sive length 20cm The shield must NEVER be connected to an electrical protective earth point Termination Communication cables must be terminated with 120 ohm watt resistors connected between A and B terminals at the first and last device NOTE Failure to follow these guidelines can result in communications errors and some fans not responding ...

Page 16: ...e Turquoise Yellow Green Violet Red Black Orange Blue Red Blue Green Red 24 VDC 10 VDC Din1 Din2 RSA D RSB D GND Ain1 0 10V Ain1 4 20m A Ain2 0 10V Ain2 4 20m A Aout GND Fault NO Fault COM Brown Red Grey Pink Black White Turquoise Yellow Green Violet Red Black Orange Blue Red Blue Green Red 24 VDC 10 VDC Din1 Din2 RSA D RSB D GND Ain1 0 10V Ain1 4 20m A Ain2 0 10V Ain2 4 20m A Aout GND Fault NO Fa...

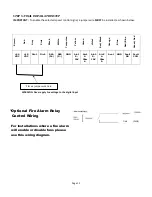
Page 17: ...ions where a fire alarm will enable or disable fans please use this wiring diagram Brown Red Grey Pink Black White Turquoise Yellow Green Violet Red Black Orange Blue Red Blue Green Red 24 VDC 10 VDC Din1 Din2 RSA D RSB D GND Ain1 0 10V Ain1 4 20m A Ain2 0 10V Ain2 4 20m A Aout GND Fault NO Fault COM WARNING Never apply line voltage to the digital input Place a jumper wire here 24VDC PINK DIN2 ...

Page 18: ...Copyright 2018 ZOO Fans Inc All Rights Reserved Rev 20192901 BROUGHT TO YOU BY THE FAN EXPERTS AT 1650 38th St Suite 201W Boulder CO 80301 303 557 1852 zoofans com ...

Reviews: