background image

ESAO Method 

Gyppy rapid camera 

Ref : 
451 462 

ENGLISH

 16 

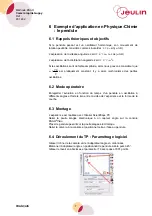
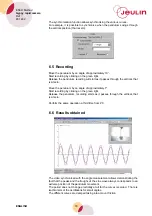
Parameter the camera at 59 images a second in the adjustment menu. 


5.5 Recording 

- Check the foot and ankle are in the zone captured by the camera. 
 
- Start recording by clicking on the green light. 
 
- Do not move the foot for 4 seconds, then clearly move the foot for 4 seconds, 

then repeat the cycle until the end of recording. 


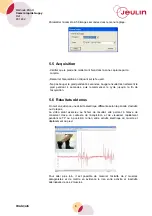
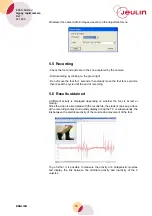
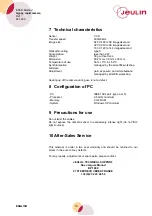
5.6 Results obtained 

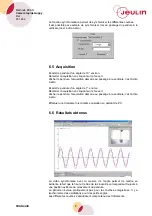
A different activity is displayed depending on whether the foot is at rest or 
moving.   
Since the video is associated with the results file, the student can keep a trace 
of the recording context and quickly display during the TP or subsequently, the 
link between the electrical activity of the muscle and movement of the foot.


To go further, it is possible to measure the activity of 2 antagonistic muscles 
and display the link between the alternate activity and inactivity of the 2 
muscles. 

Summary of Contents for 451 462

Page 1: ...Méthode ESAO Camera Rapide Guppy ESAO Method Guppy Rapid Camera Ref 451 462 Français p 1 English p 11 Version 7009 Camera Rapide Guppy Guppy Rapid Camera ...

Page 2: ...ent La camera Guppy F033B avec capteur CCD Un objectif 6 mm monture type C monté sur la caméra Un câble IEEE 1394 et synchro pour relier la caméra à l interface ESAO Visio Un CD d installation du driver La présente notice 3 Utilisation L utilisation de cette caméra requiert un port IEEE type a ou b sur votre ordinateur Si votre ordinateur n en dispose pas veuillez contacter notre support technique...

Page 3: ... 3 2 Connexion de la camera Eteindre votre ordinateur et débrancher l alimentation de votre console En plus de la connexion USB raccorder votre console fig 1 au port IEEE 1394 de votre ordinateur à l aide du cordon nécessaire cf tableau Fig 1 Port IEEE de votre PC Type de cordon nécessaire Bande passante type a 6 points a vers b 400 Mb s type b 9 points b vers b 800 Mb s Port IEEE 1394 type b ...

Page 4: ...mple de votre caméra Celle ci apparaît dans la liste des capteurs présents sur l interface Glisser la caméra sur l axe des ordonnées puis cliquer sur l icone vous disposez alors des menus de réglage En cochant affichage vidéo l image de la caméra apparait dans l atelier Régler le focus de l objectif en tournant la bague de celui ci afin d obtenir une image nette Régler la lumière en tournant la ba...

Page 5: ...aitez ultérieurement lire le fichier sur un autre PC il est nécessaire que celui ci possède le codec utilisé lors de l acquisition Le codec MPEG 4 donne des résultats satisfaisants Votre caméra est prête à l emploi 4 2 Acquisition vidéo avec ou sans démarrage synchronisé Dans le cas d un départ de l acquisition sur une synchro électrique vous pouvez souhaitez démarrer la vidéo avant la mesure Dans...

Page 6: ...e posture 5 2 Mode opératoire L enregistrement synchronisé de la vidéo du mouvement du pied et de l activité électrique musculaire permet de mettre en évidence la relation entre l activité mécanique et électrique du muscle 5 3 Montage Connecter un adaptateur electrophy 2 sur votre console régler le potentiomètre de l adaptateur dans une position médiane Coller les 3 électrodes en triangle sur la p...

Page 7: ...cer le cycle jusqu à la fin de l acquisition 5 6 Résultats obtenus On met en évidence une activité électrique différente selon la période d activité ou de repos La vidéo étant associée au fichier de résultat elle permet à l élève de conserver trace du contexte de l acquisition et de visualiser rapidement pendant le TP ou à posteriori le lien entre activité électrique du muscle et déplacement du pi...

Page 8: ...tites oscillations 6 2 Mode opératoire Enregistrer l évolution en fonction du temps d un pendule en oscillation à différents angles et faire le lien entre la vidéo de l expérience et la forme de la courbe 6 3 Montage L expérience est réalisée avec l Atelier Scientifique PC Relier la poulie étagée électronique à un capteur angle sur la console ESAO Visio Placer le pendule pesant sur la poulie étagé...

Page 9: ...le pendule d un angle de 7 environ Démarrer l acquisition en cliquant sur le feu vert Lâcher le pendule l acquisition démarre au passage à la verticale c est à dire à zéro Effectuer une troisième fois la même opération en partant de 4 C 6 6 Résultats obtenus La vidéo synchronisée avec la mesure de l angle permet de mettre en évidence le fait que le haut et le bas de la sinusoïde correspondent touj...

Page 10: ...balance des blancs gérés par l atelier scientifique L échauffement de la caméra en cours d utilisation n est pas une anomalie 8 Configuration du PC PC port IEEE 1394 type a ou b Processeur 2 5 GHz minimum Mémoire 2 Go de RAM Système Windows XP minimum 9 Précautions d emploi Ne pas tordre les câbles Ne pas exposer le capteur de la caméra à une lumière trop intense ne pas filmer des sources de lumiè...

Page 11: ...Méthode ESAO Camera rapide Guppy Ref 451 462 FRANÇAIS 10 NOTES ...

Page 12: ...ins The F033B Guppy camera with CCD sensor A 6 mm lens type C mounting assembled on the camera An IEEE 1394 cable and synchroniser to link the camera to the ESAO Visio interface A driver installation CD The instruction for use 3 Use Use of the camera requires an IEEE type a or b port on your computer If your computer does not have one please contact our technical support services 3 1 Installation ...

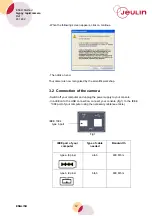
Page 13: ...p 3 2 Connection of the camera Switch off your computer and unplug the power supply to your console In addition to the USB connection connect your console fig 1 to the IEEE 1394 port of your computer using the necessary cable see table Fig 1 IEEE port of your computer Type of cable needed Bandwidth type a 6 pins a to b 400 Mb s type b 9 pins b to b 800 Mb s IEEE 1394 type b port ...

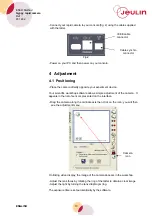
Page 14: ... allows simple adjustment of the camera It appears in the list of sensors presented on the interface Drag the camera along the ordinate axis then click on the icon you will then see the adjustment menu On ticking video display the image of the camera appears in the workshop Adjust the lens focus by rotating the ring of the latter to obtain a clear image Adjust the light by turning the lens diaphra...

Page 15: ...ou want to read the file on another PC it must have the codec used at the time of recording The MPEG 4 codec gives satisfactory results Your camera is now ready to use 4 2 Video recording with or without synchronised start up In the case of start up of recording with electrical synchronisation you may wish to start up the video before taking the measurements In this case you must tick the box If t...

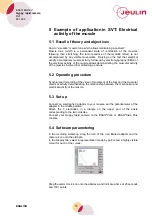
Page 16: ... 2 Operating procedure Synchronised recording of the video of movement of the foot and the muscular electrical activity demonstrating the relationship between the mechanical and electrical activity of the muscle 5 3 Set up Connect an electrophy 2 adaptor to your console set the potentiometer of the adapter in the middle position Attach the 3 electrodes in a triangle on the upper part of the ankle ...

Page 17: ... cycle until the end of recording 5 6 Results obtained A different activity is displayed depending on whether the foot is at rest or moving Since the video is associated with the results file the student can keep a trace of the recording context and quickly display during the TP or subsequently the link between the electrical activity of the muscle and movement of the foot To go further it is poss...

Page 18: ... 6 2 Operating method Record the evolution versus time of a pendulum while oscillating at various angles and establish a link between the video of the experiment and the form of the curve 6 3 Set up The experiment is performed with the PC Scientific Workshop Link the electronic stepped pulley to an angle sensor on the ESAO Visio console Place the pendulum on the electronic stepped pulley Connect t...

Page 19: ...Move the pendulum by an angle of approximately 7 Start recording by clicking on the green light Release the pendulum recording starts as it passes through the vertical that is at zero Perform the same operation a third time from 4 C 6 6 Results obtained The video synchronised with the angle measurement allows demonstrating the fact that the peaks and the troughs of the sine wave always corresponds...

Page 20: ...osure and white balance managed by scientific workshop Heating up of the camera during use is not a defect 8 Configuration of PC PC IEEE 1394 port type a or b Processor 2 5 GHz minimum Memory 2 Gb RAM System Windows XP minimum 9 Precautions for use Do not twist the cables Do not expose the camera sensor to excessively intense light do not film light sources 10 After Sales Service This material is ...

Page 21: ...ESAO Method Gyppy rapid camera Ref 451 462 ENGLISH 20 NOTES ...

Page 22: ...une information technique Vous souhaitez un conseil d utilisation Vous avez besoin d un diagnostic urgent Nous prenons en charge immédiatement votre appel pour vous apporter une réponse adaptée à votre domaine d expérimentation Sciences de la Vie et de la Terre Physique Chimie Technologie Service gratuit 33 0 2 32 29 40 50 Hors coût d appel Aide en ligne www jeulin fr Rubrique FAQ Rue Jacques Mono...

Reviews: