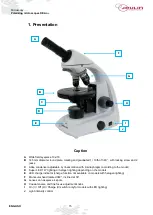
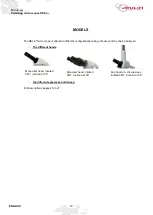
background image

Microscopy 

Polarizing microscopes DELio

® 


ENGLISH 


21 

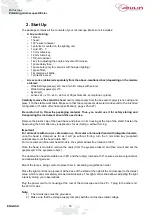
3)  Once your observations are done, the power cord can be wrapped in its housing at the rear of 

the microscope 


3. 

Initiating – Battery Charge 

3.1 Polarizing microscope DELio

®

 with halogen lighting 

 
Unlike its version with LED lighting, the DELio

®

 polarizing microscope with halogen lighting does not 

have a battery. Connect the microscope to the mains, make sure that the light intensity diaol is at the 
minimum level and activate the on button. 
 

3.2 Polarizing microscope DELio® with LED lighting 

 
For the first time using the DELio

®

 microscope, it is recommended to fully charge the battery. To do this, 

a charge LED indicator present in front of the light box is provided. 


Charge verification: 

Plug the microscope into the mains. Switch to « Charge » position by pressing the switch (position 
II)  at  the  right  of  the  stand.  In  this  position,  the  blue  power  On  indicator  LED  at  the  rear  of  the 
microscope is then turned off as well as the light. 

2 possibilities: 

i.  the LED charge indicator is green: the microscope is sufficiently charged. 

ii.  the  LED  charge  indicator  is  red:  the  microscope  needs  to  be  charged.  In  this  case,  let  the 

microscope charge until the LED becomes green. 

The maximum charge time if the battery is completely discharged is 7 hours and the operating life of 
your microscope allows conducting PWs continuously for a day. 


Initiating: 

Once  your  microscope  is  charged, remove  the  power  cord  from  the  outlet  and  wrap  it  in  its  housing 
behind the microscope. 

Toggle the switch forward to position I « Start ». In this case: 

the LED charge indicator is turned off, 

the blue power On indicator LED at the rear of the microscope is then turned on, 

the lights work. 


Important: 

It is recommended to use the DELio

®

 microscope in its wireless mode. In fact, the battery choice was 

made  for  this  purpose.  Power  connection  implies  that  the  battery  remains  continuously  charging.  Its 
useful life is thus altered. 


Battery specifications: 

Rechargeable battery Lithium-Ion 

3.7 V 

– 2200 mAh / 8.14 WH 

Charge time: 7 hours 

Average  time  of  microscope  use  on  batteries:  at  least  1  day  continuously  (under  conditions  of 
normal use) 


Do not disassemble, cf. paragraph 8. 


Your microscope is ready. Get to know the mechanics by gently handling each element to see how it 
behaves and its effect. 
 

19 

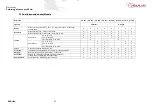
Summary of Contents for DELio 601 871

Page 1: ...Microscopie Microscopes polarisants DELio Observation Microscopie Observation Microscopy Fran ais p 1 English p 16 Version 0206 Microscopes polarisants DELio Polarizing microscopes DELio...

Page 2: ...od les binoculaire ou trinoculaire 6 4 3 Les objectifs 6 4 4 Le r glage de la but e de protection des lames 6 4 5 La platine 6 4 6 La mise au point 7 4 7 Le r glage de la duret de la vis macrom trique...

Page 3: ...hragme iris selon mod le D clairage Super LED 1 W ou halog ne selon les mod les E LED t moin de charge fonction charge non disponible sur les mod les avec clairage halog ne F T te monoculaire orientab...

Page 4: ...iff rentes configurations prenant en compte le choix parmi les diff rentes t tes les diff rents oculaires et objectifs Descriptifs complets pages 9 11 T te binoculaire orientable sur 360 inclin e 30 T...

Page 5: ...e mise sous tension non disponible sur les mod les quip s d clairage halog ne C Range c ble d alimentation Vous venez de faire l acquisition d un microscope de la gamme DELio et nous vous en remercion...

Page 6: ...r vue cf tableaux des caract ristiques techniques pages 9 11 Veiller ne pas jeter le mat riel d emballage Ainsi vous pourrez l utiliser pour stocker et transporter l instrument en toute s curit en cas...

Page 7: ...ns cette position la LED bleue t moin de mise sous tension l arri re du microscope est alors teinte et l clairage galement 2 possibilit s i la LED t moin de charge est verte le microscope est suffisam...

Page 8: ...glage dioptrique afin d obtenir une image nette Si vous portez des lunettes et qu elles ne vous g nent pas lors de vos observations gardez les cela limitera les r glages au minimum 4 3 Les objectifs...

Page 9: ...e v rifier que le changement de grossissement est r alis et que votre objectif est sur le trajet optique 4 7 Le r glage de la duret de la vis macrom trique Remonter la platine au maximum l aide de la...

Page 10: ...r le polariseur jusqu obtenir la position d extinction c est dire la position du polariseur ou la lumi re filtre le moins vous devez obtenir une teinte gris fonc Fixer le polariseur l aide de sa vis s...

Page 11: ...ur Objectifs Achromatiques 4x O N 0 10 10x O N 0 25 40x r tractable O N 0 65 Semi plans 4x O N 0 10 10x O N 0 25 40x r tractable O N 0 65 Tourelle 4 places orient e l arri re Protection But e de prote...

Page 12: ...vec pointeur Grand champ WF 10x Champ de vision 18 mm Objectifs Achromatiques 4x O N 0 10 10x O N 0 25 40x r tractable O N 0 65 Semi plans 4x O N 0 10 10x O N 0 25 40x r tractable O N 0 65 Tourelle 4...

Page 13: ...champ WF 10x Champ de vision 18 mm Objectifs Achromatiques 4x O N 0 10 10x O N 0 25 40x r tractable O N 0 65 Semi plans 4x O N 0 10 10x O N 0 25 40x r tractable O N 0 65 Tourelle 4 places orient e l a...

Page 14: ...laire et cam ra int gr e En mode utilisation l 180 x H 378 x P 375 mm En mode rangement l 180 x H 378 x P 278 mm Poids 6 kg environ 6 Entretien Protection contre la poussi re apr s usage recouvrir l a...

Page 15: ...t situ s derri re le microscope pr s de la connexion du cordon d alimentation N utiliser que des fusibles de type Temporis lent 500 mA 250 V 7 Service apr s vente La garantie est de 5 ans Le mat riel...

Page 16: ...4 2 Diopter Adjustment Binocular or Trinocular Models 20 4 3 Lenses 20 4 4 Blades Protective Buffer Adjustment 20 4 5 The Platinum 21 4 6 Fine Tuning 21 4 7 Adjusting the Coarse Screw Hardness 22 4 8...

Page 17: ...motion with iris diaphragm according to the model D Super LED 1 W lighting or halogen lighting depending on the models E LED charge indicator charge function not available on models with halogen light...

Page 18: ...n different configurations taking into account the choice between The different heads the different eyepieces and lenses Full descriptions pages 25 to 27 Binocular head rotated 360 inclined at 30 Mono...

Page 19: ...s with halogen lighting C Power cable tidy You have just acquired a DELio microscope and we thank you for that This high quality instrument is designed to perfectly meet the requirements of your teach...

Page 20: ...instrument should the need arise Remove the plastic cap of the head base and place it in its housing at the top of the stand Fasten the head using the 3mm Allen key supplied as far as it will go with...

Page 21: ...sufficiently charged ii the LED charge indicator is red the microscope needs to be charged In this case let the microscope charge until the LED becomes green The maximum charge time if the battery is...

Page 22: ...a sharp image If you wear your goggles and they don t bother you during your observations keep them this will limit adjustments to a minimum 4 3 Lenses 3 types of lenses can equip your DELio microsco...

Page 23: ...rry out macroscopic tuning quick adjustment using the coaxial control placed on each side of the microscope and then conduct the microscopic tuning fine adjustment so as to obtain a sharp image A comp...

Page 24: ...ightness is modified using the brightness adjustment button Two simple rules closing the diaphragm increases the contrast and the depth of focus but reduces the resolution the diaphragm opening should...

Page 25: ...scopes 4 To make an observation in LPNA polarized light not analyzed turn the analyzer to 0 To make an observation in LPA polarized light analyzed turn the analyzer 90 If you want to observe your slid...

Page 26: ...Microscopy Polarizing microscopes DELio ENGLISH 28 23 24...

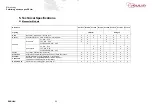
Page 27: ...pointer Lenses Achromatic 4x O N 0 10 10x O N 0 25 40x retractable O N 0 65 Semi planes 4x O N 0 10 10x O N 0 25 40x retractable O N 0 65 Turret 4 positions directed towards the rear Protection Integ...

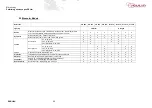
Page 28: ...of view 18 mm Wide field WF 10x Field of view 18 mm with pointer Lenses Achromatic 4x O N 0 10 10x O N 0 25 40x retractable O N 0 65 Semi planes 4x O N 0 10 10x O N 0 25 40x retractable O N 0 65 Turr...

Page 29: ...d WF 10x Field of view 18 mm with pointer Lenses Achromatic 4x O N 0 10 10x O N 0 25 40x retractable O N 0 65 Semi planes 4x O N 0 10 10x O N 0 25 40x retractable O N 0 65 Turret 4 positions directed...

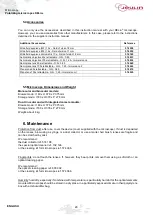
Page 30: ...ht Monocular and binocular models Browse mode l 180 x H 370 x P 375 mm Storage mode l 180 x H 370 x P 278 mm Duo trinocular and with integrated camera models Browse mode l 180 x H 378 x P 375 mm Stora...

Page 31: ...nt Unplug the microscope before any fuse replacement Fuses are placed at the rear of the microscope next to the power cord connection Only use fuses of type Time delay 500 mA 250 V 7 After Sales Servi...

Page 32: ...Microscopy Polarizing microscopes DELio ENGLISH 32...

Reviews: