background image


- 0 -


JGAURORA 3D PRINTER 

Model:A-8


Operation Instructions 


www.jgew3d.com 

Read it before printing and keep it properly.


Summary of Contents for A-8

Page 1: ... 0 JGAURORA 3D PRINTER Model A 8 Operation Instructions www jgew3d com Read it before printing and keep it properly ...

Page 2: ... 3D printer user manual 1 ...

Page 3: ...is is transmited by rolling linear guide Z axis is high accuracy rolling ball screw rod dual material feeding extruder structure hot bed coverd HBG Thus keep higher resolution more stable less shake easy to take off models Special notice 1 All content in this manual is strictly checked if have any printing errors or misunderstandings on the content Shenzhen Aurora reserves the rights of interpreta...

Page 4: ...nting in case of crushing The power supply use 110V 220V 50HZ alternating current the tripod socket must be grounded don t add another power in case of fire or electric shock We suggest you wear safety goggles when tear off supports of models Put the machine at a drafty room some smells from the material may let you uncomfortable especially ABS material Pls take consideration of the following belo...

Page 5: ...Packing size 700 570 680mm Z axis position accuracy 0 015mm Packing weight 36KG Material ABS PLA Build size 350 250 300mm Material tendency PLA LED Display yes Material diamater 1 75mm Offline printing support Software language English French Germany Italian ect File format STL G Code OBJ Function of support automatically OS windows linux mac Software Cura Working condition 10 30 Humidity 20 50 2 ...

Page 6: ...art A 1 3 bearing 1 4 turbofan 1 5 Heating block 1 6 40 40 fan 1 7 Metalsheet A 1 8 K Thermocouple 1 9 Temp sensor 1 10 Heating pipe 1 11 nozzle 1 12 Stepper motor 1 13 M6 nuts 1 16 heatsank 1 17 cover 1 18 gear 1 21 Machined B 1 22 spring 1 23 Winding mouth 1 24 Filament pipe 1 Pic 2 Pic 3 ...

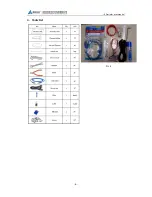
Page 7: ... 3D printer user manual 6 4 Tools list Pic 4 ...

Page 8: ...a a SD card b Download from website c Steps of installtion Where to find the Cura in the SD card 1 Connect your SD card to computer open SD card files Pic 5 Pic 6 Pic 7 2 Download from website Link https ultimaker com en cura software list Choose the corresponding OS to download it ...

Page 9: ... 3D printer user manual 8 3 Steps of installation Double click follow the steps to install it Pic 9 Pic 8 ...

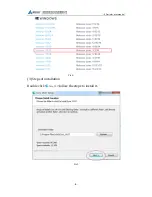
Page 10: ... 3D printer user manual 9 Pic 10 Pic 2 ...

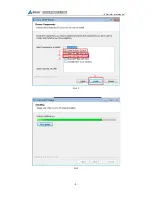
Page 11: ... 3D printer user manual 10 Pic 3 Pic 4 ...

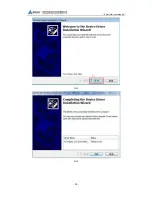
Page 12: ... 3D printer user manual 11 Pic 5 Pic 6 ...

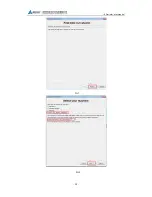
Page 13: ... 3D printer user manual 12 Pic 7 Pic 8 ...

Page 14: ... 3D printer user manual 13 Pic 10 Pic 9 ...

Page 15: ... 3D printer user manual 14 Click ok Configuration loading Choose Switch to full settings Pic 11 Pic 12 ...

Page 16: ... 3D printer user manual 15 Place of configuration file computer the file you saved software installation peizhiwenjian ini Pic 14 Pic 13 ...

Page 17: ... 3D printer user manual 16 After Loading the basic and advanced configuration will be changed to the A 8 regular printing configuration Set print all at once Pic 15 Pic 16 ...

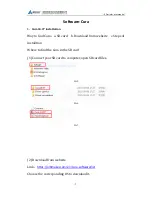
Page 18: ... 3D printer user manual 17 2 Settings of Cura Pic 17 Pic 18 ...

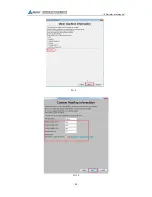
Page 19: ... 3D printer user manual 18 Pic 19 Pic 20 ...

Page 20: ... 3D printer user manual 19 Pic 22 Pic 21 ...

Page 21: ... 3D printer user manual 20 Pic 23 Pic 24 ...

Page 22: ... 3D printer user manual 21 Pic 26 Pic 25 ...

Page 23: ... 3D printer user manual 22 Pic 27 Pic 28 ...

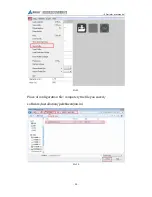
Page 24: ... 3D printer user manual 23 Basic setting of model in the software Pic 29 Pic 30 ...

Page 25: ... 3D printer user manual 24 Pic 31 Pic 32 ...

Page 26: ... 3D printer user manual 25 Pic 33 Pic 34 ...

Page 27: ... 3D printer user manual 26 3 Software expert mode Pic 35 Pic 36 ...

Page 28: ... 3D printer user manual 27 Pic 38 Pic 37 ...

Page 29: ... 3D printer user manual 28 Pic 39 Pic 40 ...

Page 30: ... 3D printer user manual 29 Pic 41 Pic 42 ...

Page 31: ... 3D printer user manual 30 Pic 43 ...

Page 32: ... Printer Operating 1 LCD display interface 2 Filament feeding Assemble the filament holder with M6 screw and allen wrench Pic 44 Pic 45 Pic 46 According to the instructions below to preheat the material we make PLA as a example ...

Page 33: ... 3D printer user manual 32 Pic 47 Pic 48 Pic 49 ...

Page 34: ... 3D printer user manual 33 Press the button to feed the filament Pic 51 Pic 50 Pic 52 Clockwise rotate the button of 14 circles The material will flow out freely ...

Page 35: ...e filament when length of filament remained is less than 15cm do change in time Pay attention to the end of filament entering into the feeding mouth totally 2 When filament change the extruder temp should be over 170 centigrade feeding is clockwise retraction is anticlockwise ...

Page 36: ... Adjust the platform at a suitable position and then spread glue on it Pic 53 2 Smooth the glue by a shovel blade the glue will solidify on the hot bed when preheating Pic 54 Spread some glue on the glass evenly before hot bed adjustment Show as Pic 62 ...

Page 37: ...he following steps Prepare a A4 paper and put it between the hot end and hot bed all around the corners make sure the paper cannot out of their that means it is the right distance Pic 56 Hot bed adjustment for trial printing steps as below ...

Page 38: ... 3D printer user manual 37 Pic 57 Pic 58 ...

Page 39: ... 3D printer user manual 38 Pic 59 4 Trial printing 1 SD card offline printing Pic 60 ...

Page 40: ... 3D printer user manual 39 Pic 61 Pic 62 Gcode generating ...

Page 41: ...ode The printer will be automatically heating up to the temp which has setted in the software then press the rotary button the printer will automaticlly work up The distance between nozzle and platform is one of the most important factor that effect the printing result Far distance Fine round uneven gap and tilt In this case printing Pic 63 ...

Page 42: ...t good and easy to move shown as picture Close distance the path is too flat and the side of path will upwrap what s more it will damage the nozzle show as pic 75 Right distance Flat skinning gapless shown as picture 76 Pic 65 Pic 66 ...

Page 43: ... 3D printer user manual 42 Pic 76 2 USB online printing Adjust as below Pic 68 ...

Page 44: ... 3D printer user manual 43 Modifying Serial port Number Serial port is according to computer and Baudrate setting 115200 Pic 69 Pic 79 Pic 80 Click print Extruder and hot bed is hearing up ...

Page 45: ... 3D printer user manual 44 FAQ and Solutions 1 To solve the plugging problem Pic 81 Pic 82 Printing now The progress of printing Open the upper cover ...

Page 46: ...ter user manual 45 Pic 83 Pic 84 Pic 85 Preheat the extruder first 1 Screw off the two screws 2 pull off the cover 3 pull off the fan and hearsank Press the joint down Pull off the filaments pipe by other hand ...

Page 47: ... 3D printer user manual 46 Pic 86 Pic 87 Use the 2mm allen wrench to pock the feeding nozzle Cut down the filament and pull it off ...

Page 48: ...ge a new one 4 Printing not at the right position Screw is loose Lock the screws 5 The model is warped The hot bed is not at a level Adjust hot bed 6 Cannot generate gcode Don t set the right setting or save as wrong save path Choose the right machine type and change the right path 7 Software cannot install OS difference Change computer and OS ...

Page 49: ...intenance drop some lubricating oil on thread rod polished rod and bearings to avoid fatigue wear e Do not let the fan and air condition blow to the hot bed when printing f Keep the working condition at Temp 10 30 Humidity 20 70 All products should be inspected and test strictly over 48 hours you can enjoy your printing work freely Contact information of maintenance service Contact information Tel...

Reviews: