background image


----3D Printer User Guide


  18


6. 3D printer maintenance


1. Daily maintenance 

1) Before using the machine to print, make observe the safety recommendations. 
2) Regularly clean and maintain the equipment. Clean the surface of the nozzle, print bed, moving parts and 
other parts, to help prevent wear caused by excessive dust. 
3) After each repair and maintenance, ensure all disassembled parts have been put back in their original place 
to avoid mechanical failures that may be caused by missing parts or incorrect re

-

assembly. 

2. Basic maintenance 

1) Before operating the 3D printer, it is necessary to inspect the printer, and perform maintenance before use:   


Inspect the nozzle for blockage or damage 


Check the printing platform is calibrated and clean. 


Check the printer is on a flat surface and is stable. 


Check that screws and nuts are tight, and that no parts of the printer are loose or wobbly. 


Check whether motion rails require cleaning or lubrication with oil. 


When parts or lines are damaged or worn out, you should replace them before printing. 

2) In the operation of the 3D printer, ensure not only that the design of each print model does not exceed the actual 
printable volume of the device, but also do not allow the machine to work in too high a temperature or under too 
much load. Otherwise, not only will it not print the object, but it can also damage the machine because of 
overloaded work. 
3) For best print results, please remove the filament remaining in the extrusion head after finishing printing. 
Seal filament in air-tight containers to prevent material from absorbing moisture, which can cause filament to 
become brittle and break during printing. 

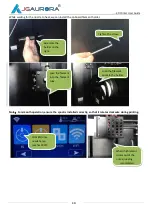
3. Maintenance of Moving Components 

If you notice the printer has become noisy, or vibrates excessively, you may need to clean the rail rods and add some 
lubricating oil to reduce friction. 
To Clean and Lubricate: first, with a clean dust cloth, clean the grease or dust from the moving parts. Then apply 
3-5ml (about 5-8 drops) lubricating oil along the motion rails. Brush the oil along the respective parts or rail axis, and 
move the moving parts along the rails back and forth, in order to distribute oil within the bearings and to lubricate 
the entire length of the guide rails and polished rods.

Summary of Contents for A8S

Page 1: ...JGAURORA 3D PRINTER MODEL A8S USER GUIDE ...

Page 2: ...box lists 5 3 About JGcreat software 6 3 1 Software installation 6 3 2 JGcreat introduction 7 4 Basic printing 11 4 1 Control menu introduction 11 4 2 Main menu introduction 12 4 3 Platform leveling 12 4 4 Filament loading 13 4 5 Trial printing 15 4 6 Filament replacement notes 16 5 Common problems and solutions 17 6 3D printer maintenance 18 6 1 Daily maintenance 18 6 2 Basic maintenance 18 6 3 M...

Page 3: ... local voltage is 230V then adjust it to 230V Similarly if the voltage is 115V then adjust it to 115V 4 Please be careful when removing prints The print bed is a glass sheet so to avoid damage please avoid using excessive force We recommend wearing protective glasses while removing prints If you are using a spatula or scraper to remove prints please wear gloves to protect your hands from serious i...

Page 4: ...m Build size 350 250 300 mm Hot bed temperature Room temperature to 110ºC Platform material Black Diamond Glass heated plate Support material PLA ABS WOOD PETG TPU LCD display 4 3 Touch Screen Filament diameter 1 75mm Connectivity USB cable USB stick Language English German French Spanish Japanese Support Formats STL OBJ G Code Environmental requirements Temperature 5 to 40ºC Humidity 20 to 50 OS ...

Page 5: ...m No Parts Name 1 Blower Cooling Fan 2 Heater block 3 Extruder PCB board 4 Thermistor 5 Heating tube 6 Cooling Duct 7 Extruder cover Item No Parts Name 8 Stepper motor 9 Extruder plate 10 Limit switch 11 Extruder gear 12 Extruder slider 13 Heat sink 14 Square Extruder Cooling fan ...

Page 6: ... 3D Printer User Guide 5 2 4 Tool box lists ...

Page 7: ... About JGcreat software 3 1 Software installation Copy the files in USB stick to your PC then double click the software installation icon Then follow the installation instructions as shown in the photos below Double click Double ...

Page 8: ... 3D Printer User Guide 7 After clicking the Finish icon the software is installed and ready for use 3 2 JGcreat introduction 1 Open the software JGcreat Double click to Open JGcreat ...

Page 9: ... 3D Printer User Guide 8 2 Choose the language you prefer English as an example ...

Page 10: ...lice it Load an stl or obj 3d file Select the appropriate print quality The lower right corner of the software shows Slicing which converts the 3D model file into the standard G Code instructions that the printer uses to run Choose the print quality you prefer ...

Page 11: ...e shows Save to file 5 Copy the G code to the USB stick and insert it into the USB port on the A8S printer Then select the gcode file to print through the touch screen interface Note Please refer to the JGcreat instructions document on the USB stick for how to operate the JGcreat software ...

Page 12: ...inting Choose model to print STOP PAUSE START PLA ABS Option Setting of hot end hot bed HOME X Y Z X HOME FILAMENT OUT FILAMENT IN Back WIFI LEVELING Y HOME Z HOME BACK SETTING X RIGHT LEFT Y FORWARD BACKWARD EXTRUDER TEMP HOT BED TMEP BACK IN OUT BACK CONFIRM CANCEL FAN SPEED Z UP DOWN LANGUAGE SWITCH ...

Page 13: ... leveling Click LEVELING in the main screen show as below WIFI USB STICK CONNECTION Select model file to print Leveling the hot bed Preheat hot end hot bed Move axis Extruder temp Hot bed temp Filament In Filament out Language transfer Wifi Point 2 Point 1 Point 3 Point 4 ...

Page 14: ... to the video demonstrating platform leveling that is found in the included USB stick 4 4 Filament loading Click PREHEAT to enter Preheat menu select the relative filament to preheat Here we are using PLA as an example Press point 1 the head move to right back Press point 4 the head move to right front Press point 3 the head move to left front Press point 2 the head move to left back front ...

Page 15: ...eration ensure the spool is installed correctly so that it rotates clockwise during printing Click IN once nozzle temp reaches 200ºC When the filament comes out of the nozzle loading is completed Assemble the holder on the right Tighten the screw Load the filament into the filament tube Load the filament spool to the holder ...

Page 16: ... lower right corner to save the file onto the USB stick with an appropriate file name 2 Insert the USB stick into the USB port on the A8S and then click PRINT on the Main Menu and then select the 3D Gcode file Click START and the A8S will being to preheat the nozzle and printing platform When the temperature of then nozzle reaches the temperature set in the slicer software the 3D printing of the m...

Page 17: ...stall a new roll of filament then click the IN icon until feeding is completed Once the filament reaches the nozzle as small amount of plastic should start to extrude from the nozzle in order to ensure the nozzle is primed for printing If this does not occur extrude plastic manually until the nozzle is primed d Click the Back button to enter into the model printing mode then click the RESUME butto...

Page 18: ...lips in extruder Filament is too thin or has been ground down by extruder gear Retract filament and cut out the thin filament section 3 Temperature is incorrect Temperature sensor is malfunctioning Contact support for advice on replacement of temperature sensor 4 Model is malformed Timing belts may be too loose Timing belt pulley may be loose Check and tighten the screw and belts 5 Model is warped...

Page 19: ...before printing 2 In the operation of the 3D printer ensure not only that the design of each print model does not exceed the actual printable volume of the device but also do not allow the machine to work in too high a temperature or under too much load Otherwise not only will it not print the object but it can also damage the machine because of overloaded work 3 For best print results please remo...

Page 20: ...for advice first before attempting any repair Shenzhen Aurora Technology Co Ltd Headquarter Address 5F Building 1 Longquan Technology Park Tongsheng community Dalang street Longhua district Shenzhen 518109 China Company homepage www jgaurora3d com Tel of after sales service center support team 0755 29735649 Email of support support zgew3d com or after sales 3derwo com Skype teresa jiguang QQ 28804...

Reviews: