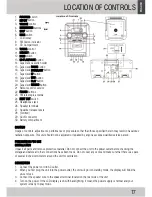
background image

TAPE DECK 

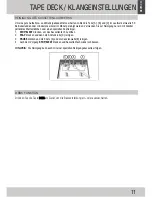
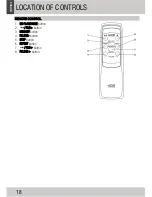
GENERAL OPERATION (Keys from left to right) 

RECORD


Press together with 

PLAY

 button to start tape recording. 

PLAY


Press to start playing tape. 

FAST FORWARD


Press to start the tape winding in a forward direction. 

FAST REWIND


Press to start the tape winding in a reverse direction. 

STOP/EJECT


Press to stop all cassette play operation. Press again to open the cassette door. 

PAUSE


Press to interrupt recording or playback. 


PLAYBACK  

1. Slide 

the 

FUNCTION 

switch to TAPE.  

2.  Insert a pre-recorded cassette tape. 
3. Press 

PLAY 

button to start playback. 

4.  Adjust the volume control to the desired listening level. 
5. Press 

PAUSE 

button when you want to stop playback temporarily. 

6. Press 

STOP/EJECT 

button to terminate the playing. 


RECORDING 

RECORDING FROM RADIO  
1. Slide 

the 

FUNCTION 

switch to RADIO.  

2.  Tune to the desired station and insert a blank cassette tape. 
3. Press 

RECORD

 and 

PLAY 

button to start recording. 

4. Press 

PAUSE

 button to interrupt the recording or the 

STOP/EJECT 

button when finished recording. 

 
RECORDING FROM  CD  
1. Slide 

the 

FUNCTION 

switch to CD.  

2.  Insert a blank cassette tape for recording. 
3. Press 

PAUSE

 and 

RECORD

 buttons together. The recording function is now on stand-by mode. 

4.  Activate the CD player, and then press the 

PAUSE

 button to start recording. 

5.  To stop recording, press the 

PAUSE

 button first and then press the 

STOP

 button on the CD player. 

NOTE: Pressing 

RECORD 

and 

PLAY 

together will automatically resume a paused CD playback 


GENERAL INFORMATION ON RECORDING 

• 

Recording is permissable in so far as copyright or other rights of 
third parties are not infringed. 

• 

This deck is not suitable for recording on CHROME (IEC II) or 
METAL (IEC IV) type cassettes. For recording, use NORMAL (IEC I) 
type cassettes on which the tabs have not been broken. The best 

recording level is set automatically. Altering the 

VOLUME 

will not 

affect the recording in progress. 

• 

At the very beginning and end of the tape, no recording will take 
place during the 7 seconds, when the leader tape passes the  
recorder heads. 

• 

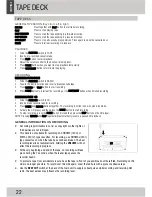
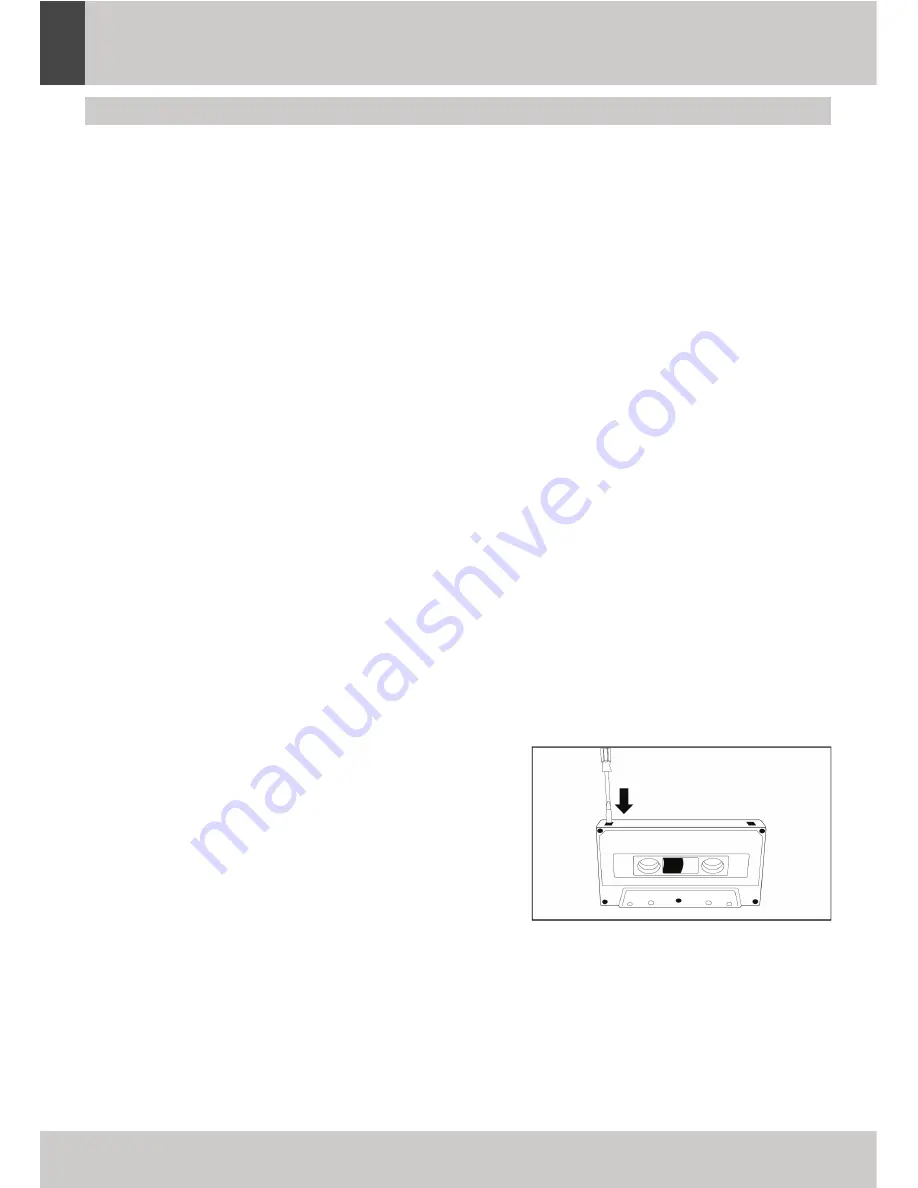
To protect a tape from accidental erasure, have the tape in front of you and break out the left tab. Recording on this 
side is no longer possible. To record over this side again, cover the tab hole with a piece of adhesive tape. 

• 

Use the 

BEAT CUT 

switch at the back of the main unit to suppress beat pulses while recording and receiving AM 

radio. the beat pulses may influence the recording level. 

22 

TAPE DECK 

ENGLISH 

Summary of Contents for RRMP-3400

Page 1: ...RRMP 3400 Mini Stereo System BEDIENUNGSANLEITUNG USER MANUAL ...

Page 2: ......

Page 3: ...ur Vermeidung von Feuer oder elektrischen Schlages das Gerät niemals Regen oder Feuchtigkeit aussetzen Erklärung der Warnsymbole Dieses Gerät verwendet einen Klasse 1 Laser mit niedriger Strahlleistung Das Blitzsymbol im Dreieck soll den Benutzer auf das Vorhandensein von gefährlichen Stromspannung innerhalb des Gerätes hinweisen Das Ausrufezeichen im Dreieck soll den Benut zer auf wichtige Bedien...

Page 4: ...s Gerät komplett vom Netz zu trennen ziehen Sie bitte den Netz Stecker Verwenden Sie das Gerät nur in aufrechter Position Kondensation In warmer feuchter Umgebung kann im Gerät Kondensation entstehen Bei Kondensation im Gerät wird die Funktion stark beeinträchtigt Die Kondensation kann verdunsten wenn das Gerät für 1 bis 2 Stunden in einer warmen trockenen Umgebung plaziert wird Sollte ein Problem...

Page 5: ...ben kann zum Austreten von Laserstrahlung führen Überlassen Sie Reparaturen einem qualifizierten Servicetechniker VOR DER VERWENDUNG INSTALLATION Packen Sie alle Teile aus und entfernen Sie die Schutzverpackungen Schließen Sie das Gerät erst dann an die Netz steckdose an wenn die korrekte Versorgungsspannung sichergestellt und alle anderen Zubehörteile angeschlossen wurden Lüftungsöffnungen dürfen...

Page 6: ...FERNBEDIENUNG 1 CD PLAY PAUSE Taste 2 FILE Taste 3 MEMORY Taste 4 FOLDER Taste 5 STOP Taste 6 REPEAT Taste 7 FILE Taste 8 FOLDER Taste 6 BEDIENFUNKTIONEN DEUTSCH ...

Page 7: ...UME Regler am Gerät auf den gewünschten Pegel UKW und UKW STEREO EMPFANG Mit dem Schalter FM MODE auf der Rückseite des Gerätes kann der Empfang zwischen Mono und Stereo umgeschaltet werden TIPPS FÜR GUTEN EMPFANG MW Die mitgelieferte MW Antenne kann gedreht oder an anderer Position aufgestellt werden um den Empfang zu verbessern UKW Die UKW Teleskopantenne auf der Rückseite sollte für besten Empf...

Page 8: ...abe oder Pause wird gedrückt springt der Player zum nächsten Titel und zeigt diesen im Display an dabei verbleibt der Player in Wiedergabe oder Pause 2 Während Wiedergabe oder Pause wird gedrückt springt der Player zum Anfang des aktuellen Titels zurück und zeigt diesen im Display an dabei verbleibt der Player in Wiedergabe oder Pause 3 Wird nach Schritt 2 die Taste nochmals gedrückt springt der P...

Page 9: ... können bis zu 20 Titel in beliebiger Reihenfolge wiedergegeben werden dabei können Titel auch mehrfach programmiert werden 1 Beenden sie eine laufende Wiedergabe mit STOP 2 Drücken Sie die Taste MEMORY um den Programmiervorgang zu beginnen P01 wird im Display angezeigt 3 Wählen Sie den gewünschten Titel mit den Tasten und und den FOLDER Tasten bei MP3 Wiedergabe 4 Drücken Sie nochmals die Taste M...

Page 10: ...in 3 Drücken Sie PAUSE dann RECORD und PLAY Das Gerät ist jetzt Aufnahmebereit 4 Starten Sie die Wiedergabe der CD und drücken Sie PAUSE zum Start der Aufnahme 5 Drücken Sie PAUSE zum Anhalten oder STOP EJECT zum Beenden der Aufnahme und dann STOP am CD Player HINWEIS Das drücken der Tasten RECORD und PLAY startet automatisch die Wiedergabe einer mit CD PLAY PAUSE angehaltenen CD ALLGEMEINE INFORM...

Page 11: ...TOP EJECT drücken um das Kassettenfach zu öffnen 2 PLAY drücken und dann die Andruckrolle C reinigen 3 PAUSE drücken und die Köpfe A und die Capstanwelle B reinigen 4 nach dem Vorgang STOP EJECT drücken und Kassettenfach wieder schliessen HINWEIS Die Reinigung kann auch mit einer speziellen Reinigungskassette erfolgen REINIGUNG DES KASSETTENLAUFWERKS DBBS FUNKTION Drücken Sie die Taste DBBS am Ger...

Page 12: ...elverhalten der Disk ein Reinigen Sie die Disk regelmäßig mit einem trockenen und fusselfreien weichen Tuch Verwenden Sie niemals Reinigungsmittel oder Scheuermittel um die Disk zu reinigen Wenn nötig kann zur Reinigung der Disk ein spezielles CD Reinigungskit verwendet werden Schreiben Sie niemals auf einer Disk REINIGUNG DES GEHÄUSES Staub auf dem Gehäuse kann mit einem weichen trockenen Tuch en...

Page 13: ...llen Netzkabel nicht richtig angeschlossen Schliessen Sie das Netzkabel richtig und sicher an Anzeige funktioniert nicht richtig Gerät reagiert nicht auf Bedienung Fehlfunktion evt durch statische Entladung Ausschalten und vom Netz trennen Nach ein paar Sekunden wieder in Betrieb nehmen Schlechte Tonqualität bei Wiedergabe von Kassetten Tonkopf ist verschmutzt Reinigen Sie den Tonkopf Falschen Kas...

Page 14: ...kHz TECHNISCHE ÄNDERUNGEN JEDERZEIT OHNE ANKÜNDIGUNG VORBEHALTEN Entsorgung von Elektrogeräten Die Europäische Richtlinie 2002 96 EC bezüglich zu Elektro und Elektronikmüll Waste Electrical and Electronic Equipment WEEE verbietet die Entsorgung von Elektro und Elektronikgerät über den normalen Hausmüll Altgeräte müssen separat gesammelt werden um die Wiederverwertung dem enthaltenen Materialien zu...

Page 15: ...ion due to electrostatic discharge just reset the product reconnect of power source may be required to resume normal operation WARNINGS To reduce the risk of fire or electric shock do not expose this appliance to rain or moisture EXPLANATION OF GRAPHIC SYMBOLS This product contains a low power laser emitter 15 SAFETY PRECAUTIONS ENGLISH ...

Page 16: ...arm damp atmosphere The product may not operate correctly if condensation forms inside it Leave the product in a warm dry room for 1 to 2 hours to allow the condensation to evaporate In the event of a problem unplug the power cord and contact a qualified repair technician Warning Ventilation Your personal CD player has ventilation holes which should never be obstructed Liquid warning Never allow l...

Page 17: ...ecified herein may result in hazardous radiation exposure This unit should not be adjusted or repaired by anyone except a qualified service person PRECAUTIONS FOR USE INSTALLATION Unpack all parts and remove protective material Do not connect the unit to the power outlet before checking the voltage and before all other connections have been made Do not cover any vents and make sure that there is a...

Page 18: ...REMOTE CONTROL 1 CD PLAY PAUSE button 2 FILE button 3 MEMORY button 4 FOLDER button 5 STOP button 6 REPEAT button 7 FILE button 8 FOLDER button 18 LOCATION OF CONTROLS ENGLISH ...

Page 19: ... backside to select FM MONO or STEREO reception mode If FM stereo is selected and a stereo station is received the FM STEREO indicator will light up HINTS FOR BEST RECEPTION AM The receiver has a built in AM ferrite antenna If the AM reception is weak rotate or reposition the unit or connect the external loop antenna This usually improves the AM reception FM Attached FM telescopic antenna at the r...

Page 20: ... MODE 1 During PLAY or PAUSE mode If the button is pressed it will go to the next track and display the track No and then remain in the PLAY or PAUSE mode 2 During PLAY or PAUSE mode if the button is pressed it will go back to the beginning of the track and display the original track No while remaining in the PLAY or PAUSE mode 3 After step 2 press button again It will go to the previous track and...

Page 21: ... with frame RANDOM PLAYBACK RAN NORMAL PLAYBACK not indicated in display CD PROGRAMMING Up to 20 tracks can be programmed for disc play in any sequence Before using be sure to press the STOP button first 1 Set the unit in CD mode 2 Press the MEMORY button P01 will appear on the LCD display 3 Select a desired track by pressing or buttons 4 Press the MEMORY button again to store the desired track th...

Page 22: ...AUSE and RECORD buttons together The recording function is now on stand by mode 4 Activate the CD player and then press the PAUSE button to start recording 5 To stop recording press the PAUSE button first and then press the STOP button on the CD player NOTE Pressing RECORD and PLAY together will automatically resume a paused CD playback GENERAL INFORMATION ON RECORDING Recording is permissable in ...

Page 23: ...e cassette door by pressing STOP EJECT 2 Press PLAY and clean the rubber pressure roller C 3 Press PAUSE and clean the magnetic heads A and the capstan B 4 After cleaning press STOP EJECT and close the cassette door NOTE Cleaning of the heads can also be done by using a special head cleaning cassette TAPEDECK MAINTENANCE DBBS FUNCTION Press the DBBS switch to activate or deactivate the bass boost ...

Page 24: ...ht line from the inside to the outside of the disc Small dust particles and light stains will have absolutely no effect on reproduction quality Clean the disc periodically with a soft lint free dry cloth Never use detergents or abrasive cleaners to clean the disc If necessary use a CD cleaning kit Never write on or affix labels to the surface of compact discs CARE OF THE CABINET If the cabinet bec...

Page 25: ...e not adjusted Adjust the Volume Power cord not securely connected Connect the AC cord properly Display does not function properly No reaction to operation of any of the controls Electrostatic discharge Switch off und aunplug the set Reconnect after a few seconds Poor cassette sound quality Dust and dirt on the head etc Clean deck parts etc Use of incompatible cassette types METAL or CHROME Only u...

Page 26: ...CIFICATIONS SUBJECT TO CHANGE WITHOUT NOTICE Disposal of old electrical appliances The European Directive 2002 96 EC on Waste Electrical and Electronic Equipment WEEE requires that old household electrical appliances must not be disposed of in the normal unsorted municipal waste stream Old appliances must be collected separately in order to optimise the recovery and recycling of the materials they...

Page 27: ......

Page 28: ......

Reviews: