


If a fault occurs, first check the points listed below before taking the set for repair. Do not open the set as
there is a risk of electric shock.
If you are unable to remedy the problem by following these hints, call service and support at the phone
number shown below.
Warning
:
Under no circumstances should you try to repair the set yourself, as this will invalidate the
warranty
If this product should be defective, despite our high standard quality control,
please contact the service & support hotline.
The hotline is available Monday through Friday from 10am to 6pm at this number:
0180 5 - 22 17 84
(€ 0,14 / Min. Germany only)
In case your product needs to be sent to our service centre, please use the
provided return sticker. If the return sticker is missing, please contact the
service & support hotline.
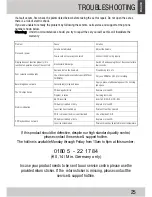
Problem
Cause
Solution
No sound / power
Volume not adjusted
Adjust the Volume
Power cord not securely connected
Connect the AC cord properly
Display does not function properly / No
reaction to operation of any of the controls
Electrostatic discharge
Switch off und aunplug the set. Reconnect after a
few seconds
Poor cassette sound quality
Dust and dirt on the head, etc.
Clean deck parts , etc.
Use of incompatible cassette types (METAL or
CHROME)
Only use NORMAL (IEC I) for recordng
Recording does not work
Cassette tab(s) may be broken
Apply a piece of adhesive tape over the missing
tab space
The CD skips tracks
CD damaged or dirty
Replace or clean CD
Program is active
Quit program mode
No disc indication
No CD inserted
Insert a CD, CD-R or CD-RW
CD badly scratched or dirty
Replace or clean CD
Laser lens has steamed up
Wait until lens has cleared
CD-R is blank or the disc is not finalized
Use a finalized CD-R
CD Playback does not work
CD badly scratched or dirty
Replace or clean CD
Laser lens steamed up
Wait until lens has adjusted to room temperature
25
TROUBLESHOOTING
ENGLISH
Summary of Contents for RRMP-3400
Page 1: ...RRMP 3400 Mini Stereo System BEDIENUNGSANLEITUNG USER MANUAL ...
Page 2: ......
Page 27: ......
Page 28: ......


