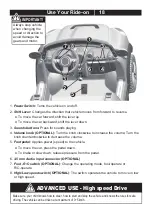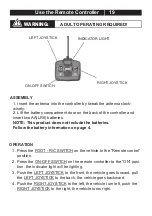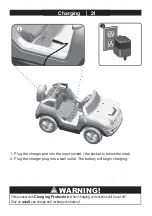
background image

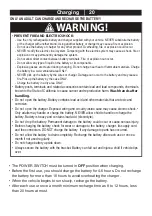
ONLY AN ADULT CAN CHARGE AND RECHARGE THE BATTERY!

• PREVENT FIRE AND ELECTRIC SHOCK:

-  Use the only rechargeable battery and charger supplied with your vehicle. NEVER substitute the battery 

or the charger with another brand. Using another battery or charger may cause a fire or explosion.

-  Do not use the battery or charger for any other product. Overheating, fire or explosion could occur.
-  NEVER modify the electric circuit system. Tampering with the electric system may cause a shock, fire or 

explosion or may permanently damage the system.

-  Do not allow direct contact between battery terminals. Fire or explosion can occur.   
-  Do not allow any type of liquid on the battery or its components.
-  Explosive gasses are created during charging. Do not charge near heat or flammable materials. Charge 

the battery in a well-ventilated area ONLY.

-  NEVER pick up the battery by the wires or charger. Damage can occur to the battery and may cause a 

fire. Pick up the battery by the case ONLY.

-  Charge the battery in a dry area ONLY. 

•  Battery posts, terminals and related accessories contain lead and lead compounds, chemicals 

known to the State of California to cause cancer and reproductive harm. 

Wash hands after 

handling.

•  Do not  open the battery. Battery contains lead acid and other materials that are toxic and 

corrosive.

•  Do not  open the charger. Exposed wiring and circuitry inside case may cause electric shock.•  

Only adults may handle or charge the battery. NEVER allow child to handle or charge the 
battery. Battery is heavy and contains lead acid (electrolyte). 

•  Do not  drop the battery. Permanent damage to the battery could occur or cause serious injury. 
•  Before charging the battery, check for wear or damage to the battery, charger, its supply cord 

and the connectors. DO NOT charge the battery  if any damage to parts has occurred. 

•  Do not  allow the battery to drain completely. Recharge the battery after each use or once a 

month if not used regularly. 

•  Do not charge battery upside down.
•  Always secure the battery with the bracket. Battery can fall out and injure a child if vehicle tips 

over.

WARNING!

• The POWER SWITCH must be turned in 

OFF

 position when charging.

• Before the first use, you should charge the battery for 4-6 hours. Do not recharge 

the battery for more than 10 hours to avoid overheating the charger.

• When the vehicle begins to run slowly, recharge the battery.
• After each use or once a month minimum recharge time as 8 to 12 hours, less 

than 20 hours at most. 

Charging   

  19

Charging   

  20

Summary of Contents for JJ298

Page 1: ...geanleitung Arten und Farben k nnen variieren Produziert in China Die Bedienungsanleitung enth lt wichtige Sicherheitsinfor mationen sowie Montage Anwendung und Wartungsanwei sungen Die Montage des Fa...

Page 2: ...r and it s rider Battery Fuse Charger 6V7Ah 2 or 6V10Ah 2 or 12V10Ah 1 4A 13A 12V1000mA Suitable age Load Capacity Speed Size of car Power way Charge time 37 96 Months Under 30 kgs 2 5 5km h 130 x 71...

Page 3: ...0 locknut Tool box Vehicle body Steering column Front axle Rear axle Seat Steering wheel M5x35 machines screw 5 nut Windshield Rear window Sport bar Charger M5x16 machine screw Hubcap Split pin 10 was...

Page 4: ...1 2 3 3 4 5 6 7 B 9 10 11 F G H 13 17 8 18 15 16 F F 12 14 18 19 A C D 20 E F i 21 NOTE Some parts shown are assembled on both sides of vehicle Parts Diagram 3...

Page 5: ...ct Battery leakage and corrosion can damage this product Dispose of batteries safely Never short circuit the battery terminals BATTERY INFORMATION Before You Begin Assembly 4 FOR THE SAFETY OF YOUR CH...

Page 6: ...x4 2 3 1 1 Fit the front axle to the vehicle body 2 Insert four 4x12 screws and tighten with a screwdriver 3 Repeat for the other side Attach the Front Axle 5...

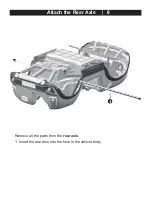
Page 7: ...1 Remove all the parts from the rear axle 1 Insert the rear alxe into the hole in the vehicle body Attach the Rear Axle 6...

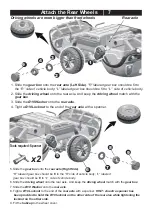
Page 8: ...r axle Right Side R labeled gear box should be fit to the R side of vehicle body L labeled gear box should be fit to L side of vehicle body 6 Slide the driving wheel onto the rear axle And keep the dr...

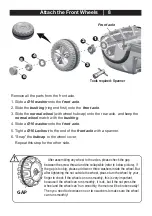
Page 9: ...peat this step for the other side GAP After assembling any wheel to the axles please check the gap between the screw thread and the collapsible refer to below picture if the gap is too big please add...

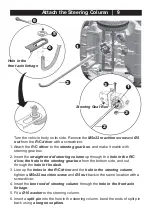
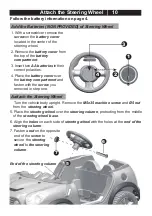
Page 10: ...g a long nose pliers Attach the Steering Column 9 Turn the vehicle body on its side Remove the M5x22 machine screw and 5 nut from the R C driver with a screwdriver 1 Attach the R C driver to the steer...

Page 11: ...ring column 7 Fasten a nut on the opposite end of the screw to secure the steering wheel to the steering column 1 With a screwdriver remove the screw on the battery cover located in the center of the...

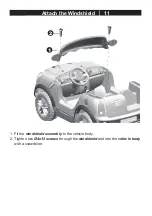
Page 12: ...1 2 Attach the Windshield 11 1 Fit the windshield assembly to the vehicle body 2 Tighten two 4x12 screws through the windshield and into the vehicle body with a scewdriver...

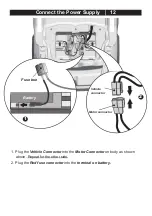
Page 13: ...Supply 12 1 Plug the Vehicle Connector into the Motor Connector on body as shown above Repeat for the other side 2 Plug the Red fuse connector into the terminal on battery Vehicle connector Motor conn...

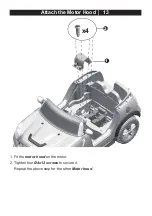
Page 14: ...2 1 x4 Attach the Motor Hood 13 1 Fit the motor hood on the motor 2 Tighten four 4x12 screws to secure it Repeat the above step for the other Motor hood...

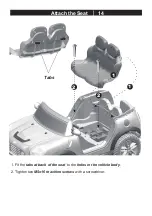
Page 15: ...1 1 2 2 Attach the Seat 14 1 Fit the tabs at back of the seat to the holes in the vehicle body 2 Tighten two M5x16 machine screws with a screwdriver Tabs...

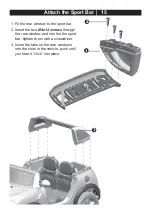
Page 16: ...window to the sport bar 2 Insert the two 4x12 screws through the rear window and into the the sport bar tighten them with a screwdriver 3 Insert the tabs on the rear windows into the slots in the veh...

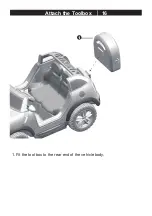
Page 17: ...1 Attach the Toolbox 16 1 Fit the tool box to the rear end of the vehicle body...

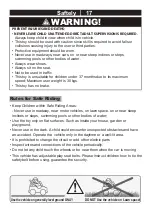
Page 18: ...ng This vehicle has adjustable play seat belts Please instruct children how to tie the safety belt before using guarantee the security Keep Children within Safe Riding Areas Never use in roadway near...

Page 19: ...uttons Press for sounds playing 4 Volume knob OPTIONAL Turn the knob clockwise to increase the volume Turn the knob counterclockwise to decrease the volume 5 Foot pedal Applies power speed to the vehi...

Page 20: ...e RIGHT JOYSTICK to the left the vehicle turn left push the RIGHT JOYSTICK to the right the vehicle turns right ASSEMBLY OPERATION 1 Insert the antenna into the controller by tweak the antenna clock w...

Page 21: ...cause cancer and reproductive harm Wash hands after handling Do not open the battery Battery contains lead acid and other materials that are toxic and corrosive Do not open the charger Exposed wiring...

Page 22: ...et the socket is below the seat 2 Plug the charger plug into a wall outlet The battery will begin charging WARNING This product with Charging Protection when charging all functions will be cut off Onl...

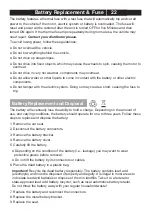
Page 23: ...e battery will eventually lose the ability to hold a charge Depending on the amount of use and varying conditions the battery should operate for one to three years Follow these steps to replace and di...

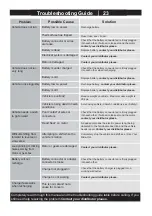
Page 24: ...nd the vehicle needs repair Contact your distributor please Attempting to shift while the vehicle is motion Completely stop the vehicle and shift see Use Your Ride On Check that the battery connectors...

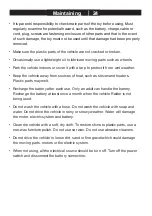
Page 25: ...aters Plastic parts may melt Recharge the battery after each use Only an adult can handle the battery Recharge the battery at least once a month when the vehicle Raider is not being used Do not wash t...

Page 26: ...Our products are suitable for ASTM F963 GB6675 EN71 and EN62115 standard...

Reviews: