background image

13

EN

similar items to clean tools. Otherwise, the tool may 

become discolored, deformed or cracked.

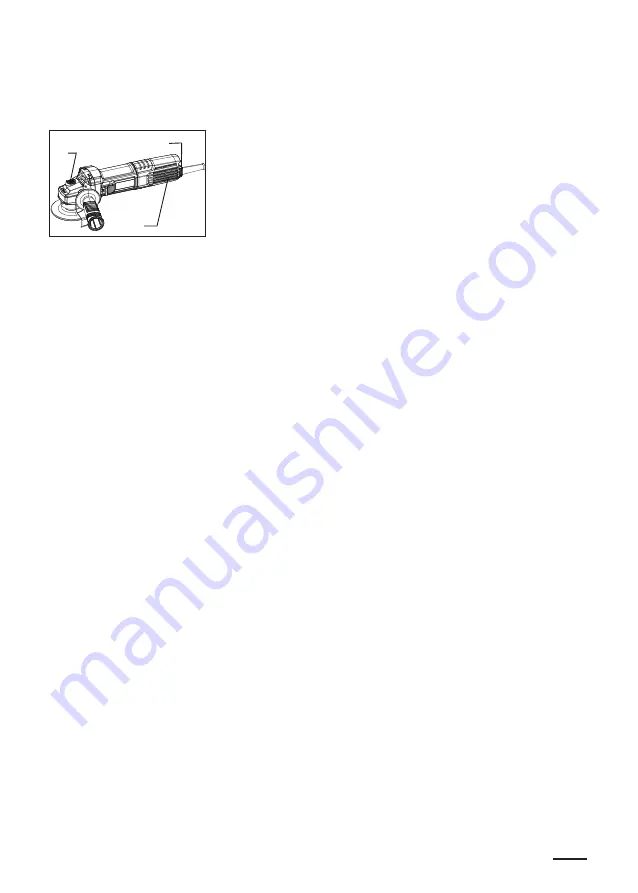
2.The tools and their vents should be kept clean.

3.The inlet and outlet of the tool should be cleaned 

regularly or at any time when it is blocked. The air 

window can be removed and cleaned.

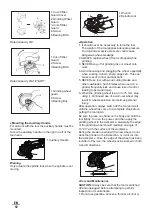
1.Air Inlet

2.Air Outlet

3.Air Window

2

1

3

Replacing carbon brushes

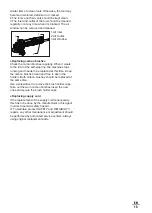
Check the carbon brushes regularly. When it wears 

to the limit of the self-stop line, the machine stops 

running and needs to be replaced at this time. Keep 

the carbon brushes clean and free to slip in the 

holders. Both carbon brushes should be replaced at 

the same time.

Use a screwdriver to remove the brush holder caps. 

Take out the worn carbon brushes insert the new 

ones and secure the brush holder caps.

Replacing supply cord

If the replacement of the supply cord is necessary, 

this has to be done by the manufacturer or his agent 

in order to avoid a safety hazard.

※ 

To maintain product SAFETY and RELIABILITY, 

repairs, any other maintenance or adjustment should 

be performed by authorized service centers, always 

using original replacement parts.

Summary of Contents for DSM10-125

Page 1: ...EN OPERATION INSTRUCTIONS FR INSTRUCTIONS D OP RATION 2 16 32 ES INSTRUCCIONES DE FUNCIONAMIENTO DSM10 125 ASM10 125 KSM10 125 DSM17 100B ASM17 100B KSM17 100B DSM17 115B ASM17 115B KSM17 115B...

Page 2: ...ailure to follow the warnings and instructions may result in electric shock fire and or serious injury Save all warnings and instructions for future reference The term power tool in the warnings refer...

Page 3: ...what you are doing and use common sense when operating a power tool Do not use a power tool while you are tired or under the influence of drugs alcohol or medication A moment of inattention while oper...

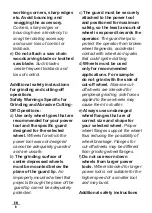
Page 4: ...adjustments changing accessories or storing power tools Such preventive safety measures reduce the risk of starting the power tool accidentally d Store idle power tools out of the reach of children a...

Page 5: ...nd recommended by the tool manufacturer Just because the accessory can be attached to your power tool it does not assure safe operation d The rated speed of the accessory must be at least equal to the...

Page 6: ...ance away from work area Anyone entering the work area must wear personal protective equipment Fragments of workpiece or of a broken accessory may fly away and cause injury beyond immediate area of op...

Page 7: ...the pinch point can dig into the surface of the material causing the wheel to climb out or kick out The wheel may either jump toward or away from the operator depending on direction of the wheel s mov...

Page 8: ...the plane of the guard lip cannot be adequately protected c The guard must be securely attached to the power tool and positioned for maximum safety so the least amount of wheel is exposed towards the...

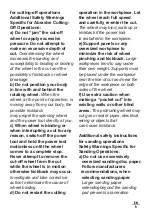
Page 9: ...e kickback may occur Investigate and take corrective action to eliminate the cause of wheel binding d Do not restart the cutting operation in the workpiece Let the wheel reach full speed and carefully...

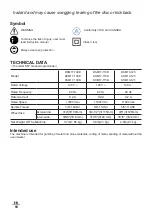
Page 10: ...20 V 120 V Rated Frequency 60 Hz 60 Hz 60 Hz Rated current 9 2 A 9 2 A 9 2 A Rated Speed 13000 min 11800 min 11800 min Spindle Thread 3 8 16UNC 5 8 11UNC 5 8 11UNC Wheel Size External dia 4 100mm 4 1...

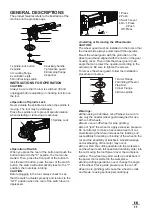
Page 11: ...Guard CAUTION The wheel guard must be installed on the tool so that the closed side always points toward the operator Mount the wheel guard with the protrusion on the wheel guard band aligned with th...

Page 12: ...control and kickback 5 NEVER use tool with wood cutting blades and other sawblades Such blades when used on a grinder frequently kick and cause loss of control leading to personal injury 6 When the g...

Page 13: ...ne stops running and needs to be replaced at this time Keep the carbon brushes clean and free to slip in the holders Both carbon brushes should be replaced at the same time Use a screwdriver to remove...

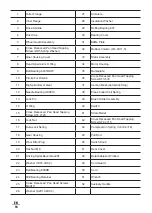
Page 14: ...evel Gear 37 Carbon Brush Automatic Stop 12 Needle Bearing HK0810 38 Plane Coiled Coil Spring 13 Lock Pin 39 Brush Holder Assembly 14 O Ring 40 Switch 15 Cross Recessed Pan Head Tapping Screw ST4 2 20...

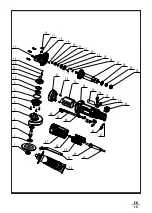
Page 15: ...15 EN 3 1 2 4 5 6 7 8 9 10 11 12 13 14 15 16 17 18 19 30 29 28 27 26 25 24 23 22 21 20 31 32 33 34 35 36 37 38 39 40 52 49 41 42 44 45 46 47 48 50 51 42...

Page 16: ...s tincelles qui peuvent enflammer la poussi re ou les vapeurs c loignez les enfants et Certaines poussi res cr es par le pon age m canique le sciage le meulage le forage et d autres activit s de const...

Page 17: ...ie ou l humidit L eau entrant dans un outil lectrique augmentera le risque de choc lectrique d N abusez pas du cordon N utilisez jamais le cordon pour transporter tirer ou d brancher l outil lectrique...

Page 18: ...z toute cl ou cl de r glage avant de mettre l outil lectrique en marche Une cl laiss e attach e une partie rotative de l outil lectrique peut entra ner des blessures corporelles e Ne vous sur estimez...

Page 19: ...Entretenir les outils lectriques V rifiez le mauvais alignement ou le grippage des pi ces mobiles la rupture des pi ces et toute autre condition pouvant affecter le fonctionnement de l outil lectriqu...

Page 20: ...ecommand s par le fabricant de l outil Ce n est pas parce que l accessoire peut tre fix votre outil lectrique qu il garantit un fonctionnement s r d La vitesse nominale de l accessoire doit tre au moi...

Page 21: ...des gants et un tablier d atelier capables d arr ter les petits fragments d abrasif ou de pi ce La protection oculaire doit tre capable d arr ter les d bris volants g n r s par diverses op rations Le...

Page 22: ...pas l outil lectrique proximit de mat riaux inflammables Des tincelles pourraient enflammer ces mat riaux p Ne pas utiliser d accessoires n cessitant des liquides de refroidissement L utilisation d e...

Page 23: ...re corps dans la zone o l outil lectrique se d placera en cas de rebond Le rebond propulsera l outil dans la direction oppos e au mouvement de la meule au point d accrochage d Soyez particuli rement p...

Page 24: ...meules peuvent les faire clater e Utilisez toujours des brides de meule non endommag s qui sont de taille et de forme correctes pour la meule que vous avez s lectionn e Des brides de meule appropri s...

Page 25: ...coincer remonter ou rebondir si l outil lectrique est red marr dans la pi ce usiner e Supportez les panneaux ou toute pi ce surdimensionn e pour minimiser le risque de pincement des meules et de rebo...

Page 26: ...5B KSM17 115B DSM10 125 ASM10 125 KSM10 125 Tension nominale 120 V 120 V 120 V Fr quence nominale 60 Hz 60 Hz 60 Hz Courant nominal 9 2 A 9 2 A 9 2 A Vitesse nominale 13000 min 11800 min 11800 min Fil...

Page 27: ...Pousser 3 Levier de l interrupteur 4 Marche 1 Appuyer 2 Pousser Arr t Appuyer 1 2 3 4 Installation ou retrait du prot ge meule MISE EN GARDE Le prot ge meule doit tre install sur l outil de mani re c...

Page 28: ...ves Apr s l utilisation toujours teindre l outil et attendre l arr t complet de la meule avant de d poser l outil Assurez vous de placer une main sur le corps et de tenir fermement l outil Mettez sous...

Page 29: ...rement les balais de charbon Lorsqu elle s use jusqu la limite de la ligne d arr t automatique la machine s arr te de fonctionner et doit tre remplac e ce moment Gardez les balais de charbon propres e...

Page 30: ...harbon arr t automatique 12 Roulement aiguilles HK0810 38 Ressort h lico dal enroul plan 13 Goupille de verrouillage 39 Assemblage du porte balais 14 Joint torique 40 Interrupteur 15 Vis taraudeuse t...

Page 31: ...31 FR 3 1 2 4 5 6 7 8 9 10 11 12 13 14 15 16 17 18 19 30 29 28 27 26 25 24 23 22 21 20 31 32 33 34 35 36 37 38 39 40 52 49 41 42 44 45 46 47 48 50 51 42...

Page 32: ...ctrica Las distracciones pueden hacerle perder el control Ap rtese mientras maneja una herramienta Parte del polvo generado por el lijado aserrado esmerilado taladrado y otras actividades de construcc...

Page 33: ...able para transportar tirar o desenchufar la herramienta el ctrica Mantenga el cable alejado del calor el aceite los bordes afilados o las piezas m viles Las cuerdas da adas o enredadas aumentan el ri...

Page 34: ...nales e No se extralimite Mantenga en todo momento el equilibrio y la posici n correcta de los pies Esto permite un mejor control de la herramienta el ctrica en situaciones inesperadas f V stase adecu...

Page 35: ...rramienta el ctrica Si est da ada haga reparar la herramienta el ctrica antes de utilizarla Muchos accidentes son causados por herramientas el ctricas mal mantenidas f Mantenga las herramientas de cor...

Page 36: ...del accesorio debe ser como m nimo igual a la velocidad m xima marcada en la herramienta el ctrica Los accesorios que funcionan a una velocidad superior a la nominal pueden romperse y salir despedidos...

Page 37: ...iduos voladores generados por diversas operaciones La m scara antipolvo o el respirador deben ser capaces de filtrar las part culas generadas por su operaci n La exposici n prolongada a ruidos de alta...

Page 38: ...o utilice accesorios que requieran refrigerantes l quidos El uso de agua u otros refrigerantes l quidos puede provocar una electrocuci n o una descarga el ctrica Otras instrucciones de seguridad para...

Page 39: ...a si se produce un contragolpe El contragolpe impulsar la herramienta en direcci n opuesta al movimiento de la rueda en el punto de enganche d Tenga especial cuidado cuando trabaje en esquinas bordes...

Page 40: ...mpan e Utilice siempre bridas de disco no da adas que tengan el tama o y la forma correctos para el disco seleccionado Las bridas de rueda adecuadas soportan la rueda reduciendo as la posibilidad de r...

Page 41: ...ta el ctrica se reinicia en la pieza de trabajo e Apoye los paneles o cualquier pieza de trabajo de gran tama o para minimizar el riesgo de pellizco y retroceso de la rueda Las piezas de trabajo grand...

Page 42: ...15B DSM10 125 ASM10 125 KSM10 125 Tensi n nominal 120 V 120 V 120 V Frecuencia Nominal 60 Hz 60 Hz 60 Hz Corriente Nominal 9 2 A 9 2 A 9 2 A Entrada de potencia nominal 13000 min 11800 min 11800 min R...

Page 43: ...y el sobrecalentamiento del motor No inicie la operaci n de corte en la pieza de trabajo Deje que la rueda alcance la velocidad m xima y entre cuidadosamente en el corte moviendo la herramienta hacia...

Page 44: ...MPRE la rueda si la herramienta se cae durante el amolado 3 NUNCA golpee el disco o la rueda de amolado contra la pieza de trabajo 4 Evite que la rueda rebote y se enganche especialmente cuando trabaj...

Page 45: ...las escobillas de carb n regularmente Cuando se desgastan hasta el l mite de la l nea de autodetenci n la m quina deja de funcionar y es necesario sustituirlas en ese momento Mantenga las escobillas d...

Page 46: ...carb n parada autom tica 12 Rodamiento de agujas HK0810 38 Muelle en Espiral Plano 13 Broche de bloqueo 39 Conjunto de Portacepillos 14 Anillo en O 40 Interruptor 15 Tornillo de cabeza plana cruciform...

Page 47: ...47 ES 3 1 2 4 5 6 7 8 9 10 11 12 13 14 15 16 17 18 19 30 29 28 27 26 25 24 23 22 21 20 31 32 33 34 35 36 37 38 39 40 52 49 41 42 44 45 46 47 48 50 51 42...

Page 48: ...Jiangsu Dongcheng M E Tools Co Ltd Power Tools Industrial Park of Tianfen Qidong City Jiangsu Province P R China www dongcheng tools com 90040600658 2022 10 NO 2...

Reviews: