background image

10

EN

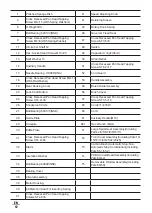
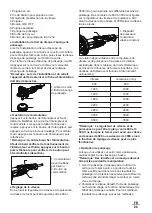
Number

Speed(/min)

600

600

1000

1000

1400

1400

1800

1800

2200

2200

2600

2600

3000

3000

3500

3500

Caution: The constant speed and power 

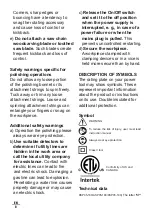
controller can be turned only as far as 3500 and 

back to 600. Do not force it past 600 or 3500, or 

the speed adjusting function may no longer work.

● 

Polishing Operation

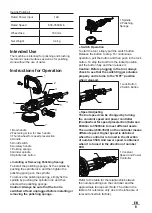
Please adjust the speed to a lower speed when 

used the machine as a polisher.

*Caution: Always wear goggles and mask 

during operation.

1. When using the tool for polishing, do not 

force the tool on the surface of the workpiece 

to be polished. Sometimes the weight of 

the tool applies adequate pressure. Forcing 

and excessive pressure will result in poor 

performance and dangerous. At the same time, it 

will also lead to tool overload and motor burning.

2. Sanding disc, polishing oil or wax oil should be 

selected in accordance with the material and 

desired surface finish. Maximum polishing effect 

will be attained by following method:

    Preliminary polishing with sander using a fine-

grain sanding disc.

    Polishing with a polishing guard using polishing 

oil or wax. Apply a small quantity of oil or wax on 

the material surface before polishing. 

Caution: When using the tool for polishing, 

do not force the tool on the surface of the 

workpiece to be polished. Sometimes the 

weight of the tool applies adequate pressure. 

Forcing and excessive pressure will result in 

poor performance and dangerous. At the same 

time, it will also lead to tool overload and motor 

burning. Apply polishing oil or wax oil on the 

workpiece in accordance with the material and 

desired surface finish before polishing.

Maintenance and Care

Caution: Always be sure that the tool is 

switched off and unplugged before attempting 

to perform inspection or maintenance.

● 

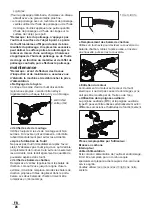
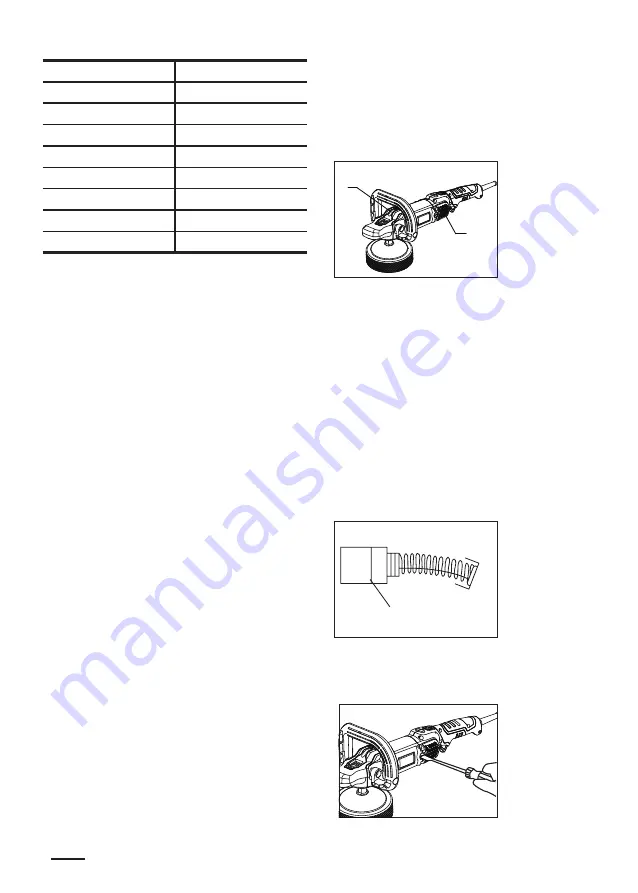
Clean the air vents

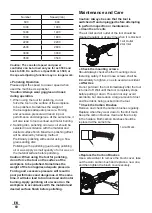
The air inlet and air outlet of the tool should be 

cleaned regularly or at any time when it is blocked.

1

2

1.Air Outlet

2.Air Inlet

● 

Check the mounting screws

Should always check whether mounting screw 

fastening safely. If found loose screws, shall be 

immediately to tighten, so as to avoid an accident.

● 

After Use

Do not put down the tool immediately after the tool 

is turned off. Wait until the tool completely stops 

before putting it down. This can not only avoid 

accidents, but also reduce a large amount of dust 

and fine debris being sucked into the tool.

● 

Check the Carbon Brushes

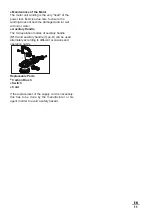
Remove and check the carbon brushes regularly. 

Replace when they wear down to the limit mark. 

Keep the carbon brushes clean and free to slip 

in the holders. Both carbon brushes should be 

replaced at the same time.

1

1.Limit Mark

● 

Replace the Carbon Brushes

Use a screwdriver to remove the brush cover, take 

out the worn carbon bush and replace a new one, 

and then tighten the brush cover securely.

Summary of Contents for DSP05-180

Page 1: ...ES DSP05 180 ASP05 180 KSP05 180 EN FR 2 14 27...

Page 2: ...tructions Failure to follow all instructions listed below may result in electric shock fire and or serious injury Save all warnings and instructions for future reference The term power tool in the war...

Page 3: ...a power tool Do not use a power tool while you are tired or under the influence of drugs alcohol or medication A moment of inattention while operating power tools may result in serious personal injury...

Page 4: ...ries or storing power tools Such preventive safety measures reduce the risk of starting the power tool accidentally d Store idle power tools out of the reach of children and do not allow persons unfam...

Page 5: ...he tool manufacturer Just because the accessory can be attached to your power tool it does not assure safe operation d The rated speed of the accessory must be at least equal to the maximum speed mark...

Page 6: ...essory could snag your clothing pulling the accessory into your body n Regularly clean the power tool s air vents The motor s or accessory is dropped inspect for damage or install an undamaged accesso...

Page 7: ...sing the wheel to climb out or kick out The wheel may either jump toward or away from the operator depending on direction of the wheel s movement at the point of pinching Abrasive wheels may also brea...

Page 8: ...rners sharp edges or bouncing have a tendency to snag the rotating accessory and cause loss of control or kickback e Do not attach a saw chain woodcarving blade or toothed saw blade Such blades create...

Page 9: ...shing Sponge Switch Operation To start the tool simply pull the switch button Release the button to stop For continuous operation pull the button and then push in the lock button To stop the tool from...

Page 10: ...the weight of the tool applies adequate pressure Forcing and excessive pressure will result in poor performance and dangerous At the same time it will also lead to tool overload and motor burning App...

Page 11: ...oil or water Auxiliary Handle The two operation modes of auxiliary handle M10 and auxiliary handle Type D can be used alternately according to different occasions and operation habits 1 2 Replaceable...

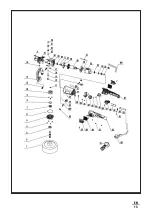
Page 12: ...Holder Assembly 20 Lock Shaft Button 56 Brush Cover 24 Cross Recessed Pan Head Tapping Screw ST4 2 30 57 Cross Recessed Pan Head Tapping Screw ST3 5 16 26 Shockproof Circle 60 Cord2 1 4YCW 27 Ball Bea...

Page 13: ...13 EN...

Page 14: ...ules microscopiques Pour plus d information veuillez consulter www P65Warnings ca gov Avertissements de s curit g n raux pour les outils lectriques AVERTISSEMENT Lire toutes les consignes de s curit L...

Page 15: ...cordon pour transporter tirer ou d brancher l outil lectrique Gardez le cordon l cart de la chaleur de l huile des ar tes vives ou des pi ces mobiles Les cordons endommag s ou emm l s augmentent le ri...

Page 16: ...rique peut entra ner des blessures corporelles e Ne pas travailler avec un geste trop tendu Gardez une bonne position assise et un bon quilibre tout moment Cela permet un meilleur contr le de l outil...

Page 17: ...ez le mauvais alignement ou la liaison des pi ces mobiles la rupture des pi ces et toute autre condition pouvant affecter le fonctionnement de l outil lectrique Si l outil lectrique est endommag veuil...

Page 18: ...es meules abrasives pour les copeaux et les fissures le plateau de support pour les fissures les d chirures toutes les op rations Avertissements de s curit communs pour le polissage a Cet outil lectri...

Page 19: ...nts g n r s par diverses op rations Le masque anti poussi re ou le respirateur doit tre capable de filtrer les particules g n r es par votre op ration Une exposition prolong e un bruit de haute intens...

Page 20: ...e proc dures ou conditions de fonctionnement incorrectes et peut tre vit en prenant les pr cautions main ou votre bras peut tre entra n dans la roue l Ne posez jamais l outil lectrique tant que l acce...

Page 21: ...us travaillez sur des coins des ar tes vives etc vitez de faire rebondir et d accrocher l accessoire Les coins les ar tes vives ou les rebonds ont tendance accrocher l accessoire rotatif et provoquer...

Page 22: ...marrage incontr l d Fixez la pi ce Une pi ce serr e avec des dispositifs de serrage ou dans un tau est mieux maintenue qu la main Symbole Pour r duire le risque de blessure l utilisateur doit lire le...

Page 23: ...tation R glage de la vitesse En tournant le r gulateur de vitesse et de puissance la vitesse de l outil peut tre ajust e entre 600 et 3500 min pour r pondre aux diff rents besoins de polissage Des nom...

Page 24: ...imm diatement pour viter les accidents Apr s l utilisation de l outil Ne posez pas l outil imm diatement apr s l avoir teint N abaissez pas l outil jusqu ce qu il s arr te compl tement de tourner Cela...

Page 25: ...e verrouillage de l arbre 56 Couvercle de brosse 24 Vis t le cruciforme t te cylindrique ST4 2 30 57 Vis t le cruciforme t te cylindrique ST3 5 16 26 Anneau anti choc 60 Cordon d alimentation 2 1 4YCW...

Page 26: ...26 FR...

Page 27: ...rnings ca gov Advertencias generales de seguridad de la herramienta el ctrica ADVERTENCIA Lea todas las instrucciones de advertencias de seguridad Si no sigue todas las instrucciones que se enumeran a...

Page 28: ...ca Mantenga el cable alejado del calor aceite bordes afilados o piezas m viles Los cables da ados o enredados aumentan el riesgo de descarga el ctrica e Cuando opere la herramienta el ctrica al aire l...

Page 29: ...se extralimite Mantenga la postura y el equilibrio en todo momento Esto permite un mejor control de la herramienta el ctrica en situaciones inesperadas f V stase adecuadamente No use ropa holgada ni...

Page 30: ...a condici n que pueda afectar el funcionamiento de la herramienta el ctrica Si est da ada repare la herramienta el ctrica antes de usarla Muchos accidentes son causados por herramientas el ctricas mal...

Page 31: ...rio debe ser al menos igual que la velocidad m xima marcada en la herramienta el ctrica Accesorios funcionar m s r pido que su velocidad nominal puede romperse y volarse en pedazos e El di metro exter...

Page 32: ...ica k Coloque el cable lejos del accesorio giratorio Si usted pierde el control el cable puede cortarse o engancharse si hay alambres sueltos o agrietados Si se cae una herramienta el ctrica o un acce...

Page 33: ...r agua u otros refrigerantes l quidos puede causar electrocuci n o descarga el ctrica Contragolpe y las advertencias relacionadas El contragolpe es una reacci n repentina al estado pellizcado o enganc...

Page 34: ...ar si los cables de servicios p blicos est n ocultas en el rea de trabajo o incorrectos y se puede evitar a trav s de tomar las precauciones adecuadas que se indican a continuaci n a Sujete firmemente...

Page 35: ...to evita un reinicio incontrolado d Asegure la pieza de trabajo La pieza de trabajo sujetada con dispositivo de sujeci n o tornillo de banco es m s segura que a mano S mbolo Para reducir el riesgo de...

Page 36: ...te de la velocidad giratoria A trav s del giro de la rueda de pulgar para preseleccionar la velocidad la velocidad giratoria de la herramienta puede ajustarse entre 600 y 3500 min para adaptarse a las...

Page 37: ...inmediatamente despu s de apagarla No la deje hasta que la herramienta haya dejado de girar por completo Esto no solo puede evitar accidentes sino que tambi n reduce una gran cantidad de polvo y part...

Page 38: ...billas 20 Bot n de bloqueo del eje 56 Tapa de escobilla 24 Autorroscante de cabeza plana empotrado en cruz ST4 2 30 57 Autorroscante de cabeza plana empotrado en cruz ST3 5 16 26 Anillo de choque 60 C...

Page 39: ...39 ES...
Page 40: ...Jiangsu Dongcheng M E Tools Co Ltd Add Power Tools Industrial Park Tianfen Town Qidong City Nantong Jiangsu 226244 Tel 86 400 182 5988 Fax 86 513 83299608 Http www china dongcheng com 90040600377 2022...

Reviews: