prevent risk of leakage. In areas with risk of frost, it is recommended to protect the water pipes with heat
isolation and anti-freeze liquids for plumbing.
CLEANNING:
It is recommended to use any cleaner without acid base formulation to clean all sanitary
appliances connected to the unit and the waste disposer. Lo prevent lime deposit, it is recommended to, on
a regular basis, disconnect from the power net the waste disposer, pour a mixture of 1 litre of vinegar and 3
litres of water (aprox.) through any connected sanitary appliance (washbasin, bidet or urinal), leave it act
some hours, connect the lifting station and switch it back on.
PROBLEM SOLUTION:
Verify that the connected elements work correctly and do not have leakages, check
that the waste disposer is correctly switched on its base and this base has power supply. Check the motor
heat protection has not acted (by waiting 20 minutes aprox. the unit should reset itself automatically).
MAINTENANCE AND INSTRUCTION MANUAL - 7
English
T-502 WASTE DISPOSER
For widespread version of this manual, visit www.jimten.com
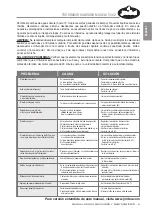
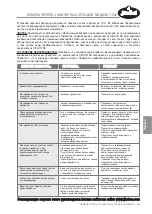
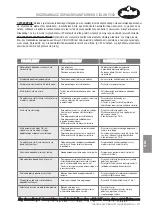
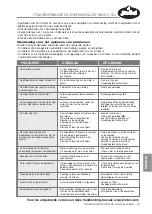
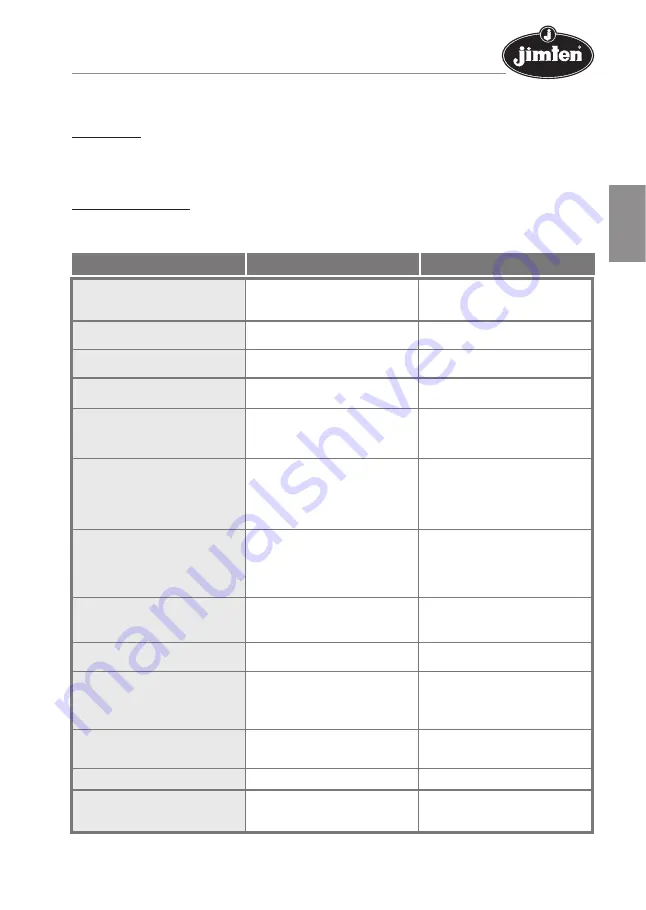
PROBLEM
CAUSE
SOLUTION
- The waste disposer does not start.
- It is disconnected.
- The electrical connection fails.
- The thermal protection circuit has been activated.
- Connect the unit properly.
- Check the electrical connection.
- Wait roughly 20 minutes until the motor cools.
- The differential switch trips.
- Motor earth wire is defective.
- Motor out of service. Contact the T.A.S.
- The motor works, but does not discharge or
makes it slowly.
- The evacuation pipe is obstructed
- Clean the evacuation pipe.
- The motor buzzes but does not spin.
- Turbines or blades blocked by foreign bodies.
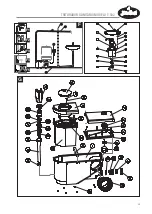
- See the waste disposer dismantling
(E)
.
- After the evacuation, the motor starts and stops
indefinitely.
- Escapes in the non-return valve or water loss
from the cistern or from the auxiliary connection.
- Clean the non-return valve of the discharge pipe.
- Review and replace the joints of the cistern
discharger and those of the taps from the
connected sanitary appliances.
- The motor does not stop.
- Evacuation pipe is too high or long.
- Power loss due to too many elbows.
- The discharge pipe is obstructed.
- The discharge pipe is obstructed due to lime
remains.
- The micro-switch does not work properly.
- Review the evacuation installation.
- Review the evacuation installation.
- Perform the descaling process as described .
- Contact the T.A.S.
- The motor only works when the WC
is discharged but not with the water from the
other sanitary connected appliance.
- The auxiliary connection or the
non-return valve is blocked.
- The auxiliary connection lacks
ventilation.
- The micro-switch is not working properly.
- Clean the pipe stretches of the auxiliary
connection and the non-return valve.,
- Install a secundary ventilation, or a Jimten A-69
vac-vave. / Review the evacuation installation.
- Contact the T.A.S.
- After evacuating the motor starts
continuously before stopping.
- The water returns to the waste
disposer. The non-return valve
dos not work properly.
- Carry out several discharges with clean water
and clean the non-return valve.
- Accumulation of wastes inside
the lavatory.
- Unsuitable water supply from the cistern.
- Adjust the water level in the cistern
(6 litres minimum).
- The water returns to the shower base
- The required minimum slope at the evacuation
installation has not been attained (see shower
base height)
- The non-return valve of the auxiliary connection
does not work properly.
- Review the installation (rising the shower base
height)
- Clean and/or replace the item from the waste
disposer.
- Odd noises when the motor operates.
- Obstruction due to a foreign object in the lavatory.
- Extract the item from the waste
disposer (
(E)
. motor dismantling and removal)
- The shower base does not evacuate correctly.
- Corrosion of the active carbon filter.
- Replace the filter (contact the T.A.S.)
- Nasty smells coming from the waste disposer.
- Obstruction on the run pipe.
- Siphonic valve on the shower base, generates
an air piston on the pipe.
- Clean the pipe.
- Replace the shower base valve trap using a
non-siphonic valve.


