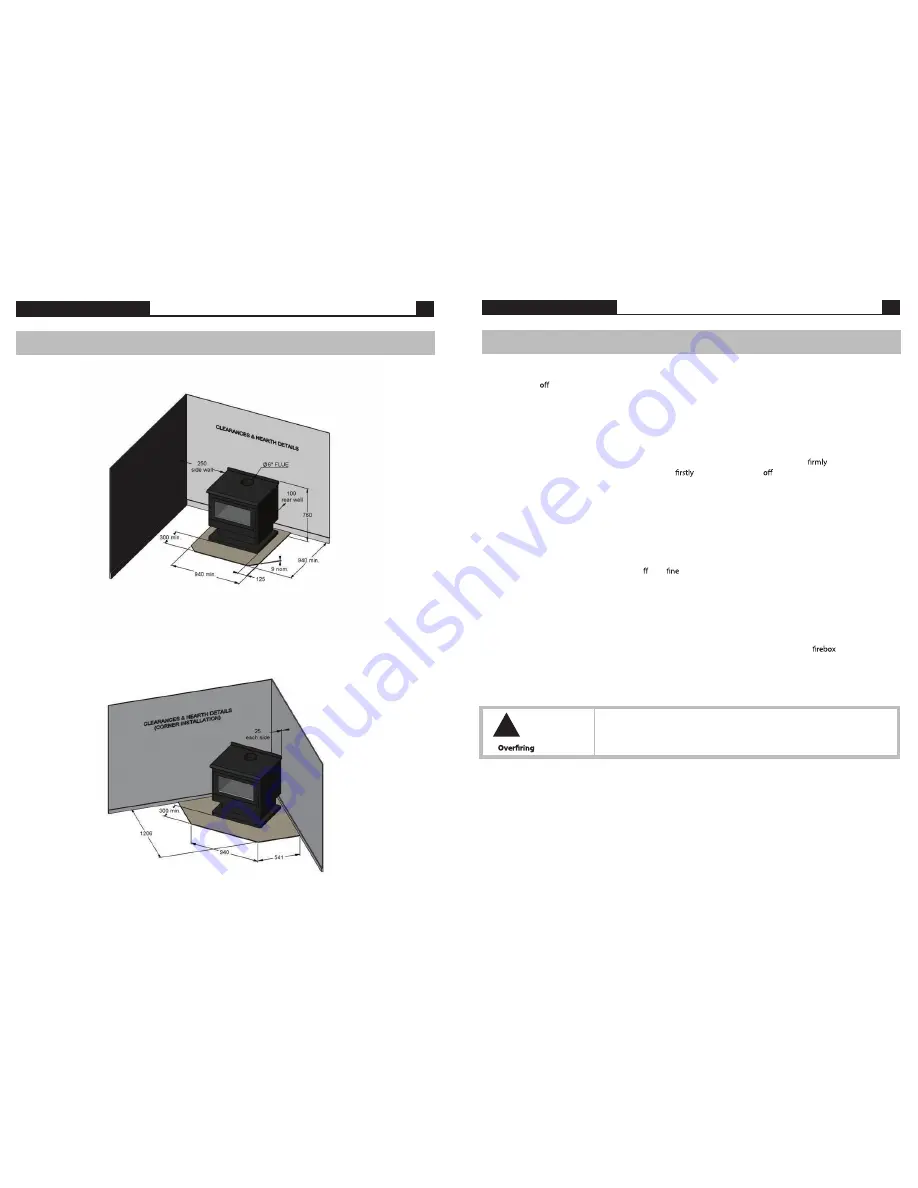
Kimberley Mk3 Freestanding
4
Kimberley Mk3 Freestanding
9
Installation
Corner Installation
Standard Installation
(continued)
• Noisy Fan
Turn the power and remove the three pin plug from the power point.
Remove the two screws that hold the front fan access panel. Remove the panel.
Disconnect the wiring loom via the plastic joiner. Unscrew the two nuts which hold the fan in position and remove the fan.
Clean any dust with a dry paint brush and vacuum the fan blades. Clean around the motor. After completion place two
or three drops of sewing machine oil on the shafts at the bearings. Replace the fan in reverse to the removal.
• Fan not working
Check the power connection with another appliance. If the power point is okay assume the fan or the switch is
defective. Isolate the power as above. Check that the terminals on the loom and the switch are
connected. If the
fan then fails to function, remove the fan and switch by
removing the knob the fan switch by pulling it away
from the heater. Undo the holding nut and pull the switch out. Disconnect the wiring from the power lead and remove
the fan and switch. Convey the same to the authorised Jindara dealer from whom you purchased your unit for service.
Replace in the reverse order.
• Air Control Jamming
Lift up and remove the top plate.
Remove the air control knob by turning anti-clockwise. Lift the air control panel out of the way.
There are three bolts holding the air slide in place. Undo them and remove the air slide. Wipe any ash or dust that may
have accumulated on the back of the air slide or on the face of the heater. If any burrs have developed on the back of the
air slide or on the face of the heater, rub them o with
wet and dry sand paper till you have a smooth surface and
edges. Replace the air slide and make sure the washers, spacers and springs are on the bolts when you screw the bolts back
into the face of the heater. Do not apply any type of lubricant to the air slide whatsoever as this will attract dust and make the
slide stick.
• No Overnight Burn
Remove the air slide as per air control jamming and check that the air slide is hard against the face of the heater. If it is
loose, tighten up the bolts holding the air slide to the face of the heater. Do not overtighten.
Check that the door rope has an even indentation from the sealing strip, which is on the face of the
. If it is uneven
and it appears as though air could leak through the seal, adjust the thickness of the door rope to suit. Stretch the rope to
make it thinner where the indentation is the heaviest and bunch up the excess where the indentation is smaller.
The door may become loose through the door seal shrinking. Refer “Door handle adjustment” instructions on page 8.
WARNING
!
NEVER OPERATE THE HEATER WITH THE DOOR LOOSE OR NOT AIR TIGHT.
OVERFIRING COULD RESULT IN DETRIMENTAL WEAR AND TEAR ON THE FIREBOX.
Troubleshooting


