background image


Jinpeng Telecommunication Industrial Co., Ltd.


 Rev 


Page 32 of 93 


Chapter 3    Messages 

This chapter introduces the usage of Short Message and Ring Tone. 

Using Short Message 

You can use Short Message function to send and receive message. There is an 

inbox and outbox in your phone. Inbox and outbox can hold a maximum of 60 

messages, each messages can contain a maximum of 160 characters. You can 

send the message now or later, etc. 

To check for received text messages   

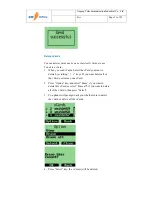
1.


When a new message comes, you will be noticed by means 

what you set at Profiles->Edit Profile->Message Alert, and 

“You have 1 new message!” will be displayed on screen. 


2.


Select “View” in the left soft key bar to view the incoming 

message. 

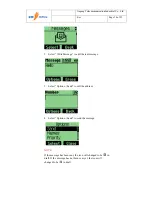
Note:

 When you have new message, there is an icon in idle 

screen to indicate. 

If your message memory is full, the icon will change to 


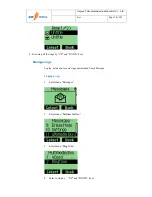
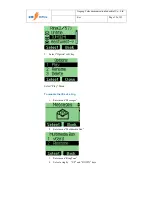
To read a text message 

1.


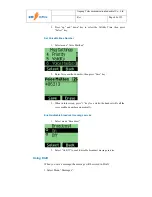
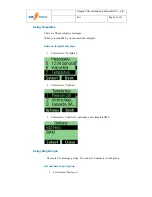
Select “Messages” in main menu. 

Summary of Contents for T100

Page 1: ...Jinpeng Telecommunication Industrial Co Ltd JinPeng T100 User Manual The picture is referenced please take material object as standard ...

Page 2: ...3 Navigating Through the Menus 13 CHAPTER 2 NAMES 15 Using the Keypad to Enter Information 15 Entering and Editing Names 17 Creating and Using the Speed List 22 Using the vCard VCard exchange 24 CHAPTER 3 MESSAGES 32 Using Short Message 32 Using Ring Tone 35 Browse all rings 37 Manage rings 38 Message Settings 41 Using Draft 44 Using 1234Service 45 Using Voice Mail 45 Using Templates 46 Using Msg ...

Page 3: ...59 To select Auto Answer 59 CHAPTER 6 USING THE PHONE ORGANISER 60 Using the Schedule 60 Using the Alarm Clock 62 Using the Calculator 64 Using the Tip Calculator 66 Using the World Clock 67 Using the Stop Watch 67 CHAPTER 7 SETTING UP YOUR PHONE 69 Setting up the Display 69 Call 72 Some Phone Information 78 Security 81 CHAPTER 8 PLAY GAME IN YOUR PHONE 85 CHAPTER 9 SOLVE PROBLEMS 87 Help and pers...

Page 4: ...Jinpeng Telecommunication Industrial Co Ltd Rev Page 4 of 93 Emergency calls 90 Other important safety information 90 Care and maintenance 91 SAR information 92 ...

Page 5: ...Kindly read all the information contained in this guide carefully prior to using the phone This will help you in getting the best performance and shall prevent any unintended damage to the phone Check the contents of the box ad per the packing list and report any discrepancies immediately to the store from where phone has been purchased Parts of the Phone The illustration below shows the main comp...

Page 6: ... down left right to navigate in menus Send key Use the key to dial or answer a call End key Use the key to end a call or turn power on off Soft key left Use the key to select or confirm something Soft key right Use the key to cancel something Alphanumeric keypad Use these keys to input numbers or characters ...

Page 7: ...icate the phone is in a call Indicate the phone has no signal Indicate new message s arrival Indicate new urgent message Indicate the message has been read Indicate urgent message has been read Indicate the message has been sent Indicate the message not send yet Indicate the message box is full Indicate voice mail Indicate phone is in roaming Indicate all kinds of phone mode Only vibrate Ring Ring...

Page 8: ... Page 8 of 93 Installing the Battery At firt you must install the battery before you want to use it 1 First step remove battery cover 1 2 Second step assemble battery 2 to the mobile as the figure 3 2 3 3 Third step fix battery cover as the figure 4 ...

Page 9: ...Jinpeng Telecommunication Industrial Co Ltd Rev Page 9 of 93 4 ...

Page 10: ...it you may see the battery picture is changing like the steps 1 First step open USB rubber Cover as the figure 5 5 2 Second step fix the charge plug as the figure 6 NOTE 1 It is not recommended to remove the battery when the charger is attached otherwise the phone may restart 2 Remove and re plug the charger may cause the phone restart ...

Page 11: ...re typing and it may change with each key that you press 2 Enter the whole word before editing or deleting the characters 3 When the word displays correctly go to step 4 Otherwise go on inputting the characters to display alternative word 4 Press to focus the word and press related number key to select the word Using Alphabet mode Press the appropriate key until the character you want appears on t...

Page 12: ...f Press End key for a while without releasing Making Answering and Ending a Call To make a call Enter the phone number you want to call in idle state Press the Send key to make the call Press the End key to end the call To answer a call Press the Send key To end the call press the End key Locking the Keypad In idle state press for a while without releasing Press 123 to unlock ...

Page 13: ...er 3 Press right soft key to back Menu tree 1 Names 1 Add Name 2 Find 3 Groups 4 Erase All 5 Speed Dial 6 Memory Status 2 Messages 1 Write Message 2 Inbox 3 1234 Service 4 Outbox 5 Draft 6 Voice mail 7 Templates 8 Msg Groups 9 Erase Msgs 10 Settings 11 Multimedia Box 3 Call History 1 Missed 2 Received 3 Dialled 4 Erase History 5 Call duration 4 Profiles 1 Vibrate Only 2 Silent 3 General ...

Page 14: ...ation Industrial Co Ltd Rev Page 14 of 93 4 Outdoor 5 Headset 5 Organiser 1 Scheduler 2 Alarm Clock 3 Calculator 4 Tip Calculator 5 World Clock 6 Stop Watch 6 Settings 1 Display 2 Call 3 Phone 4 Security 7 Game 1 KongMing ...

Page 15: ...nt character To enter text Input area left length Left soft key Right soft key 1 Press alphanumeric key to insert text before cursor 2 If you make a mistake you can press the right soft key Erase to delete current character before cursor 3 You can use and to move the cursor 4 Select Save to save your input after finish your enter 5 To quit entering Press Erase key for several seconds until it chan...

Page 16: ...r than 0 5 seconds between each twice pressing to enter a letter written in the key 2 If the cursor is disappeared you can keep on pressing alphanumeric key to change current character Chosen character will be entered when the cursor appears 3 If you want to enter a letter which are on the same key as the letter just entered you must wait for 0 5 seconds until the cursor appears then you can press...

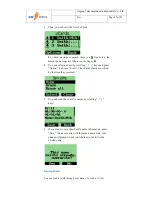
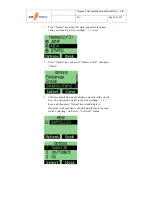
Page 17: ... 93 2 Press 0 to 9 to select the symbol you need 3 Press the left and right to change page Entering and Editing Names To add a new name 1 At the main menu input a number 2 Then press select 3 Then choose Add to new press select 4 Input the new name press Save ...

Page 18: ...o Ltd Rev Page 18 of 93 5 Select the Number type and press Select to save To list all phone books 1 In idle state press the right soft key To edit a name 1 Select a phone book in list 2 Then press Options 3 Select Details then press Select ...

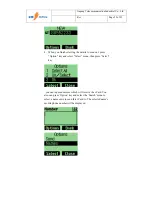
Page 19: ...4 Press Options select Edit then press left soft key 5 Then you can change the name press save button to save the information 6 After editing press Save To find name 1 Press right soft key to select Names in idle state Then there will be a list of all phone books ...

Page 20: ...ion Industrial Co Ltd Rev Page 20 of 93 2 Press Options then select Find name 3 Enter the first character or full name you want to find press Find To erase a name 1 Select one phone book in the list 2 Press Options soft key ...

Page 21: ... Industrial Co Ltd Rev Page 21 of 93 3 Select Erase in Options menu 4 Press yes or no to confirm To erase all Names Select Erase All in Names menu to erase all the names To list Groups Select Groups in Names menu to list groups ...

Page 22: ...Names menu to view memory status 2 Select it Then you can view memory state Creating and Using the Speed List You can assign 02 to 99 to some names in Speed List Then you can use such short number as 02 to dial quickly To add edit a phone number to the speed list 1 Select Names in Main Menu 2 Select Speed Dial ...

Page 23: ...ex is the short number press Options soft key 4 Select Set Entry in Option menu 5 Select one name 6 Select one phone number save it to speed list To make a call to a number on the speed list In idle state enter the short number and then the long number will appear and instead the short number and ...

Page 24: ...all numbers on the speed list 1 Select Names in the main menu 2 Select Speed Dial 3 Choose Options 4 Choose Erase or Erase All in Options menu Using the vCard VCard exchange The vCard allow you to exchange phonebook entries by SMS with others whose handsets support Smart Messaging ...

Page 25: ...ll be overwritten without prompt After the name information has been saved to phonebook the vCard received will be deleted Prompt means the handset will prompt for a new vCard s incoming The handset will popup a dialog to ask you whether read the message right now and your phone sounds and there will be a soft icon shown on the display Your phone holds up to 60 vCards or Ringtones To set reception...

Page 26: ...unread SMSs is shown on the display instead You have a choice of reading the message immediately by pressing View key or reading it later by press Back key When you press View key the display will show the content of the vCard message if there is only one unread vCard message Otherwise the display will show the vCard message list To read a vCard 1 Enter Message and select Multimedia Box 2 Select 1...

Page 27: ...elect a vCard by scrolling keys and press Option to choose View The vCards shown are sorted by the time they received 5 You can read the vCard s content by scrolling keys 6 If you want to save this vCard s name information press Save If a name entry with the same name exists your phone will prompt to ask you whether to overwrite the existed entry Send a vCard You can send a vCard through your phon...

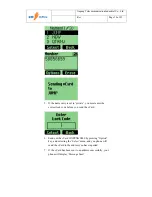
Page 28: ...y scrolling keys 2 Press Option key and select Send as vCard then press Select 3 All name details lists on the display and each with a check box You can select a detail to send by scrolling keys and then press Option key to add delete it into from to be sent data or add all details into to be send data by selecting Un Select Select all menus ...

Page 29: ... details to send out press Option key and select Select menu then press Select key you can input addresses which will receive the vCard You also can press Option key and select the Search menu to select a name entry to send this vCard to The selected name s mobile phone number will be displayed ...

Page 30: ... must enter the correct lock code before you send the vCard 6 Send out the vCard JINPENG SMS by pressing Option key and selecting the Select menu and you phone will send the vCard to the address you have inputted 7 If the vCard has been sent to an address successfully your phone will display Message Sent ...

Page 31: ...e vCard you want to delete by scrolling keys If you want delete all of the vCards select any one vCard 2 Press Option key and select Erase if you want to delete this vCard or select Erase all if you want to delete all of the vCards then press Select 3 You phone will prompt to ask you whether sure to delete the vCard or delete all the vCards 4 Press Select key the vCard s will be deleted ...

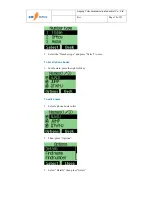
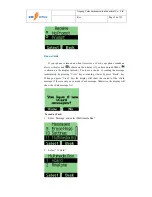
Page 32: ...es can contain a maximum of 160 characters You can send the message now or later etc To check for received text messages 1 When a new message comes you will be noticed by means what you set at Profiles Edit Profile Message Alert and You have 1 new message will be displayed on screen 2 Select View in the left soft key bar to view the incoming message Note When you have new message there is an icon ...

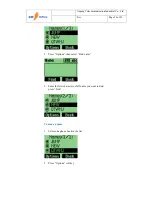
Page 33: ...munication Industrial Co Ltd Rev Page 33 of 93 2 Select Inbox 3 Select one message to read To erase a text message 1 Select one message 2 Select Erase in Option To send a text message 1 Select Messages from main menu ...

Page 34: ...ct Write Message to edit the text message 3 Select Options Send to edit the address 4 Select Options Send to send the message NOTE If the message has been sent the icon will changed to be in draft If the message has not been sent yet the icon will changed to be in draft ...

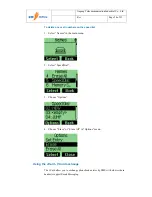
Page 35: ...u can select Option Send to group to send the message to several addresses 2 Select Options Send to send message to the selected address Using Ring Tone Ring Tone module is used to manage the rings downloaded Smart Message It includes functions of playing ring deleting ring and renaming ring title 1 Select Messages in Menu 2 Select Multimedia Box ...

Page 36: ...Jinpeng Telecommunication Industrial Co Ltd Rev Page 36 of 93 3 Select Ringtone 4 Select one 5 Then you can select option Play Rename Delete Ringtone A Playing Ringtone B Rename Ringtone ...

Page 37: ...al Co Ltd Rev Page 37 of 93 C Browse all rings Browse all the rings downloaded Smart Message To browse all ring downloaded Smart Message 1 Enter menu Messages 2 Select the Multimedia Box 3 Enter menu Multimedia Box 3 Enter menu RingTone ...

Page 38: ...age 38 of 93 4 Browsing all the rings by UP and DOWN keys Manage rings To play delete and rename rings downloaded Smart Message To play a ring 1 Enter menu Messages 2 Enter menu Multimedia Box 3 Enter menu RingTone 4 Select a ring by UP and DOWN keys ...

Page 39: ...ation Industrial Co Ltd Rev Page 39 of 93 5 Select Option soft key Select Play Menu To rename the title of a ring 1 Enter menu Messages 2 Enter menu Multimedia Box 3 Enter menu RingTone 4 Select a ring by UP and DOWN keys ...

Page 40: ...ation Industrial Co Ltd Rev Page 40 of 93 5 Select Option soft key 6 Select Rename Menu 7 Input the new title in the renaming dialog 8 Select Save soft key To delete a ring 1 Enter menu Messages 2 Enter menu Multimedia Box ...

Page 41: ...on Industrial Co Ltd Rev Page 41 of 93 3 Enter menu RingTone 4 4 Select a ring by UP and DOWN keys 5 Select Option soft key 6 Select Delete Menu 7 Select Select to the confirming dialog Message Settings 1 Select menu Messages ...

Page 42: ... Settings Enable disable auto save outgoing message Select menu Auto Save or Do Not Save Enable disable auto delete message 1 Select menu Auto Delete 2 Select Auto Delete On Off to enable disable auto delete the saved message to save the new message if the memory space is full ...

Page 43: ...wn key to select the deferred time then press Select key Set Priority You can set priority of sent message and the receiver will know which priority of the message is when he read it 1 Select menu Priority Press up and down key to select the Priority then press Select key Set Validity Time If you set Validity Time message will be kept in Short Message Center until the time you set here is expired ...

Page 44: ...Mailbox 2 Enter Voice mailbox number then press Save key 3 When in idle screen press 1 key for a while the handset will call the voice mailbox number automatically Enable disable broadcast message service 1 Select menu Broadcast 2 Select On Off to enable disable broadcast message service Using Draft When you save a message the message will be stored in Draft 1 Select Menu Messages ...

Page 45: ...5 of 93 2 Select Write Message 3 Select Save message in Option 4 After you press Select you can find the picture as below Using 1234Service Please contact with operator Using Voice Mail Please contact with carrier This function needs the network s support ...

Page 46: ...essages When you send SMS you can insert the template Add new template message 1 Select menu Templates 2 Select menu Options 3 Select menu Add New and input a new template SMS Using Msg Groups There are five message groups You can set 10 numbers in each group Set numbers in each group 1 Select menu Messages ...

Page 47: ...Jinpeng Telecommunication Industrial Co Ltd Rev Page 47 of 93 2 Select Msg Groups 3 Select menu Options 4 Select menu View 5 Select Add in Options menu 6 Then you can add numbers in the phone book ...

Page 48: ...Jinpeng Telecommunication Industrial Co Ltd Rev Page 48 of 93 Rename the group 3 Select menu SMS Groups 4 Select menu Options 5 Select menu Rename 6 Input the name and select save ...

Page 49: ...communication Industrial Co Ltd Rev Page 49 of 93 Send group messages 1 Select menu SMS Groups 2 Select menu Options 3 Select menu Send 4 Input the text message and select Send Clear Group 8 Select menu SMS Groups ...

Page 50: ... Select menu Clear Group 11 Select yes to clear the numbers of the group Chapter 4 Making Calls Viewing Incoming Call Details The detailed information will be displayed on screen when there is an incoming call 1 Press Accept or Send key or 1 9 and if any key in Answer Mode to accept call ...

Page 51: ...efault emergency call is 100 101 102 No more than three emergency numbers can be added in setting menu 2 When phone is locked you can select left soft key to select the emergency number and make a call Making Calls To make a phone call 1 At idle state input phone number then press Call key 2 The call is outgoing Now press Cancel to cancel this call and return idle state or else go to step 6 3 When...

Page 52: ...press the left soft key to select Mute or Cancel mute 5 You can adjust the volume by Up or Down Key 6 Press End key to End call 7 Return idle status For dialing extension 1 At idle state input phone number then press and hold star key until the UI screen displays T 2 Then input the extension number ...

Page 53: ...At idle state select Name to enter name list 2 Choose the person you want to call press the Call key To make a call from the call history 1 At idle state press send key enter the dialed list 2 Use the navigation pad to find the number you wish to call and then press the Call key To call a number on the speed list 1 Two keys dial 1 At idle state input the short number ...

Page 54: ...u are in a calling process the phone will alert to you and the new comer s phone number or name will be displayed in screen 2 You can press Accept to accept incoming call and meanwhile the picture displays as before 3 You can use the Send key to switch between the 2 persons To forward a call unconditional no answer busy 1 Refer to chapter 7 Call forward settings To change the earpiece volume durin...

Page 55: ...Jinpeng Telecommunication Industrial Co Ltd Rev Page 55 of 93 2 Then select one item 3 Select Detail in options to view detail To erase one or all lists of call historys 1 Select Erase in Options ...

Page 56: ...profile 1 Select Vibrate Only from Profiles menu And when received an incoming call or alarm clock works the handset will vibrate only Also the icon of profiles will be changed Note You can select Vibrate only mode by long press in idle state 2 You can select one of the following profiles Vibrate Only Silent General Outdoor and Headset 3 You can set Ringer Type Ringer Tone Ringer Volume Earpiece V...

Page 57: ...neral Outdoor and Headset Besides the Headset profile supports Auto Answer To select Ring Type 1 Select Edit Profile menu item 2 Select Ringer Type There are six types Ringer Vibration Vibr then Ring Silence Vibra and Ring One beep 3 Choose one then press the select soft key to save To select Ring Tone 1 Select Edit Profile menu item ...

Page 58: ...Select Ringer Tone 3 Choose one then press the select soft key to save To select Ring Volume 1 Select Edit Profile menu item 2 Select Ringer Volume There are seven types Highest High High Med Med Med Low Low Lowest 3 Choose one then press the select soft key to save ...

Page 59: ...est Off 3 Choose one then press the select soft key to save To select Message Alert To select Message Alert Type 1 Select Message Alert menu item 2 Select Alert Type There are five types Ring Vibrate Silence Two Beeps and Four Beeps 3 Choose one then press the select soft key to save To select Ring Tone 1 Select Message Alert menu item 2 Select Alert Tone 3 There are five rings Choose one then pre...

Page 60: ...ludes scheduler alarm clock calculator tip calculator world clock and stop watch Using the Schedule You can use schedule to associate an alert with an event You can use scheduler to arrange appointments include meetings and other events To add a schedule 1 Select Organiser from main menu 2 Select Scheduler 3 Select Add New ...

Page 61: ...ation Industrial Co Ltd Rev Page 61 of 93 4 Edit the date and then press OK to save 5 Add the description then press Ok 6 Set the time then press Ok To delete the schedule 1 Select Organiser in main menu 2 Select Scheduler ...

Page 62: ...communication Industrial Co Ltd Rev Page 62 of 93 3 Select List All 4 Select the item you want to delete 5 Select Erase in options Using the Alarm Clock To set the alarm time 1 Select Alarm Clock in Organiser menu ...

Page 63: ...cation Industrial Co Ltd Rev Page 63 of 93 2 Select Alarm 1 3 Press left or right key to set the Alarm On 4 Press up or down key to focus the time then set time 5 Then press left key Next choose Everyday Work day or Once ...

Page 64: ... Industrial Co Ltd Rev Page 64 of 93 6 Then select the music for the alarm clock Using the Calculator Calculate 1 Select Calculator in Organiser menu 2 Select Calculator 3 Enter the number 4 Select Option to select an operator ...

Page 65: ...mber 6 select operator to get the result Tips for calculator 1 If you want to calculator decimal fraction press star key to present dot 2 If you want to calculator negative number first input the positive number then press pound key to change the positive number to negative number ...

Page 66: ...o Ltd Rev Page 66 of 93 Using the Tip Calculator To calculate a tip 1 Select Tip Calculator in Organiser menu 2 Select Tip Calculator and enter bill amount 3 Select the rate 4 Press left soft key and get the result 5 Select Option soft key ...

Page 67: ...elhi Kolkata Bangkok Beijing Shanghai Seoul Solomon islands Wellington Midway islands Hawaii Alaska Los Angeles Arizona Houston New York Caracas Brasilla Cape verde islands London Berlin Cairo St Petersburg Islamabad Mumbai Using the Stop Watch 1 Press left soft key to start 2 Then press left soft key to stop 3 Or press right soft key to split ...

Page 68: ...Jinpeng Telecommunication Industrial Co Ltd Rev Page 68 of 93 4 When the stop watch is stopped you can press left soft key to restart right soft key to reset ...

Page 69: ... and phone information network service Setting up the Display Customizing your display by creating a banner adjusting the backlight selecting the contrast for display text etc Display SDCA namer 1 Select Display menu item in Settings menu 2 Select SDCA name 3 The mobile station shall display the test message or SDCA name Service Area name Creating a display banner 1 Select Display menu item ...

Page 70: ...communication Industrial Co Ltd Rev Page 70 of 93 2 Select Banner menu item 3 Editing the banner 4 Select Save to save banner Setting backlight Setting the timer for the backlight 1 Select Backlight in Display item ...

Page 71: ...Jinpeng Telecommunication Industrial Co Ltd Rev Page 71 of 93 2 Select an option 3 Select Select to save Setting Contrast 1 Select Contrast in Display item 2 Select an option 3 Select SELECT to save ...

Page 72: ...cation Industrial Co Ltd Rev Page 72 of 93 Call Call Forward settings Immediate 1 Select Call in Setting Menu 2 Select Call Forward from Call Menu 3 Select Immediate 4 Select Enable 5 Then select Voicemail or Other Number ...

Page 73: ...ecommunication Industrial Co Ltd Rev Page 73 of 93 6 You can set the Other Number you want When busy 1 Select Call Forward from Call Menu 2 Select When busy 3 Select Enable 4 Then select Voicemail or Other Number ...

Page 74: ... Industrial Co Ltd Rev Page 74 of 93 5 You can set the Other Number you want Not reply Not reachable 1 Select Call Forward from Call Menu 2 Select Not reply Not reachable 3 Select Enable 4 Then select Voicemail or Other Number ...

Page 75: ...Page 75 of 93 5 You can set the Other Number you want Disable all 1 Select yes to disable all call forward settings Call waiting 1 Select Call from Settings menu 2 Select Call Waiting 3 If Disable is selected the call waiting setting is not allowable ...

Page 76: ...e call waiting setting is allowable Any Key Answer 1 Select Any Key Answer from Call menu 2 If Off is selected the user can t answer a call without the send key 3 If On is selected the user can answer any call with any key Auto Redial 1 Select Call menu item 2 Select Auto Redial menu item ...

Page 77: ...t Off or On and then select SELECT to save Setting up Voice Privacy 1 Select Call menu item in Settings menu 2 Select Voice Privacy menu item 3 Select an option and then press Select to save Call Connect Alert 1 Select Call menu item 2 Select Call Connect Alert menu item ...

Page 78: ...d during phone idle status The keyguard turns off the keypad functionality This is a helpful feature if for example your phone is turned off and in your pocket and you want to prevent accidental keypress from pressing a button etc When you enable this feature your phone will automatically lock after a specified time of inactivity 1 Select Phone from Setting menu 2 Select Keyguard ...

Page 79: ...9 of 93 3 Select Off to disable key guard Or select Customize to enable key guard To set Airplane Mode 1 Select Phone in Settings menu 2 Select Airplane Mode 3 If you select On the handset will reboot And any functions attached with the network won t work ...

Page 80: ... Ltd Rev Page 80 of 93 To set NAM 1 Select Phone in Settings menu 2 Select Set NAM 3 You must input the correct password can you change the NAM settings To view the version of software installed on your phone 1 Select Phone in Settings menu ...

Page 81: ...are version and PRL version vCard Receiving Prompt Giving prompt when receiving a vCard 1 Select vCard menu item 2 No Promt means not giving the prompt when receiving a vCard and save it to phonebook directly Security Provide password protection for Reset to Default Call Restriction Login Security 1 Select Security menu item ...

Page 82: ...Industrial Co Ltd Rev Page 82 of 93 2 Enter the password and the default password is 0000 Lock mode 1 Select Lock Mode menu item 2 You can select Off to turn off the Lock Mode 3 You can select Now to lock the handset immediately ...

Page 83: ...lock the handset When the handset is powered up the handset will be lock 5 Unless you input the password 0000 can you unlock the handset Emergency number 1 There are three emergency numbers 100 101 102 2 All these three numbers are editable Changing lock code 1 Select Change lock code menu item ...

Page 84: ...Jinpeng Telecommunication Industrial Co Ltd Rev Page 84 of 93 2 Input new password 3 Confirm password Reset to default 1 Select Reset menu item 2 Select Yes soft key to reset to default ...

Page 85: ... Phone There is one game called KongMing Chess integrated in the handset 1 Select Game in the main menu and then select KongMing 2 There are 30 missions you can choose anyone of them by Select Game 3 You can select Start Game to begin a new game or Resume Game to go on playing the last game ...

Page 86: ...Jinpeng Telecommunication Industrial Co Ltd Rev Page 86 of 93 4 You can acquire the help information by select Instructions ...

Page 87: ...ve entered a number but it was not dialled Be sure that you have pressed Be sure you have accessed the right cellular network Be sure that you have not set an outgoing call barring option Your correspondent cannot reach you Be sure that your phone is switched on pressed for more than one second Be sure that you are accessing the correct cellular network Be sure that you have not set an incoming ca...

Page 88: ...h If the above guidelines do not help you to solve the problem take note of The model and serial numbers of your phone Your warranty details A clear description of the problem Then contact your local dealer for after sales service Chapter 10 Health and safety information Precautions when using batteries Never use a charger or battery that is damaged in any way Use the battery only for its intended...

Page 89: ...tal strips on the battery For example do not carry a spare battery in a pocket or bag where the battery may contact metal objects Short circuiting the terminals may damage the battery or the object causing the short circuiting Dispose of used batteries in accordance with local regulations Always recycle Do not dispose of batteries in a fire Road safety Your wireless phone gives you the powerful ab...

Page 90: ...s or when certain network services and or phone features are in use Check with local service providers To make an emergency call 1 Switch on the phone 2 Key in the emergency number for your present location Emergency numbers vary by location 3 Press send key 4 If the handset is in locking feature mode select the left soft key select the emergency number Consult this document and your local cellula...

Page 91: ...n electric shock to you or damage to the phone Do not use or store the phone in dusty dirty areas as its moving parts may be damaged Do not store the phone in hot areas High temperatures can shorten the life of electronic devices damage batteries and warp or melt certain plastics Do not store the phone in cold areas When the phone warms up to its normal operating temperature moisture can form insi...

Page 92: ...sue Device types T100 FCC ID T2M01200603 has also been tested against this SAR limit The highest SAR value reported under this standard during product certification for use at the ear is 1 432 W kg and when properly worn on the body is 0 916 W kg This device was tested for typical body worn operations with the back of the handset kept 1 5cm from the body To maintain compliance with FCC RF exposure...

Page 93: ...Jinpeng Telecommunication Industrial Co Ltd Rev Page 93 of 93 Packet LIST Mobile phone 1 Battery 1 Charger 1 User manual 1 Earphone Optional ...

Reviews: