background image


Jinyuan Lighting 


3


1. Introduction   

Thank you very much for choosing the Photovoltaic Modules(referred as ‘Modules’) 

manufactured and sold by Guangdong Jinyuan Lighting Technology Co.,Ltd.   

This installation manual provides the modules installation and use info of Guangdong Jinyuan 

Lighting Technology Co.,Ltd(referred as ‘Jinyuan’). 

Do read and understand this manual before installation, use and maintenance. Please provide 

this manual to the owner and installer of the PV System for their reference, and notify them all the 

requirements and suggestions about safety, operation and maintenance. If there is any question, 

please contact our customer service department for further explanation. 

The installer should be familiar with the mechanical and electrical requests of the PV System 

before installing. The product limited warranty will be invalid if the operation during installing doesn’t 

follow the requirements of this manual. Please keep this manual properly as reference for future 

maintenance and servicing. 

The design of Jinyuan PV Modules conforms to IEC61215 and IEC61730 International 

Standard, with the application level Grade A: the modules can be applied to the systems available 

for public access with voltage or power above DC50V or 240W. Also the modules have passed two 

parts of the international standard, which are IEC61730-1 and IEC61730-2, meeting the 

requirements of Safety Class II. 


2. Disclaimer 

Jinyuan will not bear any corresponding responsibility for all matters infringing on third party 

patents or any other rights in the process of using Jinyuan Modules.   

For some installation, operation, use and maintenance of the modules, which are beyond the 

control of Jinyuan, Jinyuan will not bear any corresponding responsibility for the module power loss, 

damage or casualties and any extra cost caused by the improper installation, operation, use or 

maintenance. 

        All the info in this manual is based on Jinyuan’s reliable experience, however, all the info and 

suggestions don’t constitute any guarantee, neither ostensive or connotative. Jinyuan reserves the 

Summary of Contents for Ec

Page 1: ... xxx 250 255 in steps of 5 d 48 cells JYxxxM48 xxx 220 230 in steps of 5 e 36 cells JYxxxM36 xxx 165 170 in steps of 5 For 6 poly series a 72 cells JYxxxP72 xxx 300 330 in steps of 5 b 60 cells JYxxxP60 xxx 255 275 in steps of 5 c 54 cells JYxxxP54 xxx 225 240 in steps of 5 d 48 cells JYxxxP48 xxx 200 215 in steps of 5 e 36 cells JYxxxP36 xxx 150 165 in steps of 5 Guangdong Jinyuan Lighting Techno...

Page 2: ... General Installation Rules 8 7 2 Selection of Installation Direction and Tilt Angle 9 7 3 Selection of the Bracket 10 7 4 Ground Installation 10 7 5 Roof Installation 10 7 6 Installation Method 11 7 6 1 Installation Method and Position 11 7 6 2 Installation Details 13 8 Electrical Installation 15 8 1 General Installation Rules 15 8 2 Grid connected Electrical System 17 8 3 Equipotential Connectio...

Page 3: ...keep this manual properly as reference for future maintenance and servicing The design of Jinyuan PV Modules conforms to IEC61215 and IEC61730 International Standard with the application level Grade A the modules can be applied to the systems available for public access with voltage or power above DC50V or 240W Also the modules have passed two parts of the international standard which are IEC61730...

Page 4: ... of the modules or system matched components the short circuit current Isc and open circuit voltage Voc stated on the module label should be multiplied by the coefficient 1 25 It is forbidden to use modules with different structures in one system PV system can only use the PV specialized equipment such as inverters connectors cables and brackets The integrated night PID recovery inverter is recomm...

Page 5: ...package at a lucifugal dry and flat place If the modules need to be stored before installation please do not open the package The package should be stored somewhere lucifugal draughty and away from exposure If the modules need to be taken out of the package for temporary storage then they should be put on the dry and draughty pallet and make sure the glass side of the modules are downwards the gla...

Page 6: ...the transportation The surface of the module is very easy to be damaged and when it is damaged the performance and security may be affected If any damaged module is founded please contact Jinyuan customer service department For your safety concern please do not disassemble or modify Jinyuan modules which may affect the performance and security of the product and even bring some invocatable damage ...

Page 7: ...cifications and dimensions maximum system voltage maximum protect current etc Every module has several serial numbers for tracking One of them is encapsulated in the module permanently which is visible from the front of the module The rest serial numbers are stuck on the frame and back sheet of the modules The serial number coding rule is as blow JY 18 01 05 001 0001 6 Installation Conditions Jiny...

Page 8: ... of creepage distance is invariant 3 reducing the product over voltage bearing capacity arcing ability and breaking ability Make sure the wind pressure or snow pressure after module installation will not exceed the bearable load The module should be installed somewhere with sufficient sun irradiation and no shadow perennially The module system need lightning protection during the installation and ...

Page 9: ...Do not wear any metal object such as watch ring earring nose ring or oral ring etc Please do not touch the module with bare hands which will lead to dangers like scald or electric shock because the surface and the frame of the glass may be very hot Due to the thermal expansion and contraction effect of the module frame the distance between two adjacent modules should be bigger than 10mm The end of...

Page 10: ... should be made with materials resistant to abrasion corrosion and UV resistance b Do not drill extra mounting holes on the surface or the frame of the modules otherwise the warranty will be invalid 7 4 Ground Installation Choose the proper installation height tilt angle and distance to avoid the bottom of the module from flooded by the rain or buried by the snow Meanwhile do make sure the module ...

Page 11: ...tion with clamp and embedded installation with frame embedded The installer can choose the suitable method for installation Aluminum alloy is recommended for clamp material There are 8 mounting holes with dimension 9 14mm on the frame of every module which are used to fasten the module to the bracket using screws Under any circumstance the clamp can not contact the glass or cause the module frame ...

Page 12: ...y factors γm 1 5 Install with screws through the mounting hole Mounting hole Screw installing using 8 mounting holes Clamp fixed installation Clamp installation permit range on the long side Clamp installation permit range on the short side Frame embedded installation Clamp installation permit range ...

Page 13: ... the bracket with metal clamps Clamp A is used on the module square edge clamp B is used between two modules Clamps with below conditions are recommended Width 38mm Thickness 3mm Material Aluminum Alloy Bolt dimension M8 Torque range of screw tightening 18N m to 24N m accessories bolt nut spacer Spring shim material stainless steel stainless steel stainless steel stainless steel Dimension and leng...

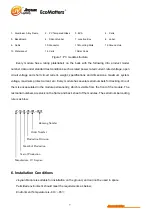
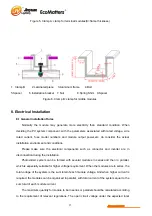
Page 14: ... smooth otherwise the frame and the module will be damaged The clamp can not have shelter effect on the solar cells The clamp can not cover the waterspout 1 Clamp B at least 2 pcs 2 Clamp A at least 2 pcs 3 Installation bracket 4 PV module Figure 4 Clamp Fixed Installation 1 Laminated piece 2 Bolt 3 Spacer 4 Clamp A 5 Aluminum frame 6 Spacer 7 Spring shim 8 Nut 9 Installation bracket ...

Page 15: ...installation environment and conditions Please make sure the electrical components such as connector and inverter are in disconnection during the installation Photovoltaic system can be formed with several modules in series and then in parallel which is especially suitable for higher voltage requirement When the modules are in series the total voltage of the system is the sum total of each module ...

Page 16: ...ountry To avoid the cable and connector overheated the cable conductivity and connector endurance should meet the short circuit current and temperature when the system is exposed outdoor Jinyuan suggests that the connect cable on site should satisfy the module to be used under the module maximum short circuit current The cable should be a waterproof and UV proof cable complying with the photovolta...

Page 17: ...tem The DC current of PV system can be converted to AC and connected to the public supply network As the policies in different area about connecting PV system to public supply network are different please consult the senior system design engineer when designing Usually the installation of this system will need the recognition acceptance and formal approval of the public utilities 8 3 Equipotential...

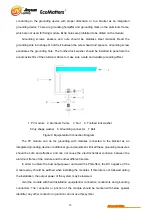
Page 18: ...up shape washer 6 Grounding connector 7 Bolt Figure 9 Equipotential Connection Diagram The PV module can do the grounding with modules connected to the bracket as an integrated grounding device or additional ground equipment But all these grounding measures should be safe and effective and can not cause the electrochemical corrosion between the aluminum frame of the module and the other different ...

Page 19: ...3 Please do not touch or handle the glass surface of the module with bare hands to avoid leaving the fingerprint or any other dirt on the glass When cleaning the module surface firstly use a dry duster or cloth to brush off the surface adhesive materials and then clean with wet soft sponge or cloth Mild cleaning agent without abradant can also be used to get rid of the dirties 4 When cleaning do n...

Page 20: ... 19 5 JY340M72 340 3 38 8 8 79 47 1 3 9 24 5 JY345M72 345 3 38 9 8 87 47 3 3 9 31 5 JY275M60 275 3 31 7 8 7 38 5 3 9 41 5 JY280M60 280 3 31 8 8 81 38 6 3 9 49 5 JY285M60 285 3 32 1 8 91 38 7 3 9 51 5 JY250M54 250 3 28 7 8 71 34 5 3 9 18 5 JY255M54 255 3 28 9 8 93 34 8 3 9 26 5 JY220M48 220 3 25 5 8 63 30 8 3 9 48 5 JY225M48 225 3 25 7 8 76 31 3 9 58 5 JY230M48 230 3 25 9 8 89 31 3 3 9 61 5 JY165M3...

Page 21: ...8 46 5 JY205P48 205 3 25 1 8 17 30 5 3 8 62 5 JY210P48 210 3 25 3 8 3 30 8 3 8 74 5 JY215P48 215 3 25 4 8 53 31 3 9 11 5 JY150P36 150 3 18 4 8 15 22 9 3 8 42 5 JY155P36 155 3 18 8 8 24 23 3 8 66 5 JY160P36 160 3 19 8 55 23 3 3 9 14 5 JY165P36 165 3 19 1 8 64 23 4 3 9 21 5 Operating temperature range 40 85 Maximum Reverse Protection Rated Current 15A Maximum System Voltage 1000V Pmax Temperature Co...

Reviews: