PAGE 28 of 177
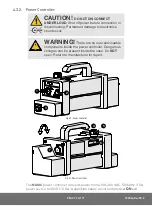
OFF
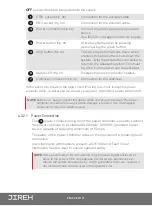
push-buttons are integrated into the supply.
1
CTRL socket
(Fig. 60)
Connection for the auxiliary cable.
2
ENC socket
(Fig. 60)
Connection for the encoder cable.
3
Power connection
(Fig. 60)
Connect plug from a properly grounded
source.
Use IEC320 cord approved for AC supply.
4
Power button
(Fig. 61)
Activate system power by pressing
(and releasing)
the green button.
5
Stop button
(Fig. 61)
The red stop button latches down when
pressed, this stop button shuts down the
system. Twist the stop button clockwise to
return to the released position. This must
be done before power can be activated.
6
Status LCD
(Fig. 61)
Displays the power controller’s status.
7
Umbilical connection
(Fig. 61)
Connection for the umbilical.
In the event of a break in the stop circuit
(the stop circuit runs through the power
controller cable, umbilical and the crawler’s emergency stop button)
power will shut off.
NOTE:
Before use, always inspect the power cable and plug for damage. The power
controller should not be used if visible damage is present. Use of damaged
components may be a safety hazard.
4.3.2.1 Power Connection
The
3
power connection
(Fig. 60)
of the power controller is used to connect
the power controller to a suitable 100-240VAC, 50/60Hz grounded power
source capable of supplying a minimum of 5 amps.
The safety of the power controller relies on the provision of a proper ground
connection.
In environments with moisture present, a GFCI (Ground Fault Circuit
Interrupter) must be used to ensure operator safety.
NOTE:
Some generators or DC-AC inverters may introduce significant levels of
noise to the system. This may degrade overall system performance or
reduce the system life expectancy. Use of generators or DC-AC inverters is
not recommended and are used at the operator’s risk.


