background image

Summary of Contents for AIRCUS

Page 1: ...AIRCUS 5G WIFI BRUSHLESS DRONE WITH PORTABLE GIMBAL AND CAMERA AGE 14 Please read this manual carefully before operation and keep it properly for future reference ...

Page 2: ...article Users should firmly uphold the principle of safety comes first Never fly the drone near airports above crowds or in zones storing dangerous goods and understand the responsibility of the accident may cause by improper operations Stay away from obstacles crowds power lines trees or waters Always choose a wide open area for every flight well away from people and property Never fly directly o...

Page 3: ...r your flying experience Never fly under influence of alcohol or drugs Keep the remote controller at least 20cm away from your body when flying the drone Keep distance from a flying drone Never use your hands to touch a flying drone under any circumstance Don t approach or touch a landed drone before its propellers are completely locked Keep away from heat source The drone is made of metal fiber p...

Page 4: ... preferred I I o I I Outdoor Sunny windless and breezy weathers are preferred Please keep the drone in sight during the flight and keep it away from barriers high tension cables trees and people Do not fly in extreme environment such as hotness coldness strong wind or heavy rain 3 ...

Page 5: ... Please use standard SV USB charger to charge up while avoid using worn or old chargers Do not charge dilatant or outworn battery Do not over charge battery Please unplug the charger once fully charged Do not charge the battery next to inflammables such as carpet timber floor or wood furniture or on the surface of electro conductive objects Please always keep an eye on the battery when charging Do...

Page 6: ...ude hold mode outdoor GPS mode headless mode auto return to home and fence mode etc G Propeller A Backward propeller j Propeller B Forward propeller Motor Indicator Light of Battery Level Front Indicator Light Blue Seamless Dual axis Gimbal Landing Gear Back Indicator Light Green C rl f 1 t Power Short Press to Turn on Press 2 Seconds to Turn off Flight Battery Buckle Gimbal Damping Ball and Anti ...

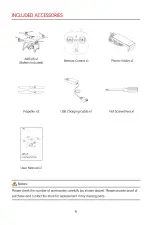
Page 7: ...EWITH POPTAl lEGIMBAI ANDC AMf flA User Manual xl Notes Remote Control xl Phone Holder xl USB Charging Cable xl Flat Screwdriver xl Please check the number of accessories carefully as shown above Please provide proof of purchase and contact the store for replacement if any missing parts 6 ...

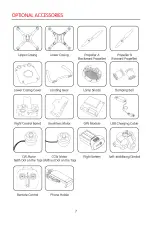
Page 8: ...Flight Control Board Brushless Motor CW Motor CCW Motor With Dot on the Top Without Dot on the Top Remote Control Phone Holder 7 Propeller A Backward Propeller Propeller B Forward Propeller Lamp Shade Damping Ball GPSModule USB Charging Cable Flight Battery Self stabilizing Gimbal ...

Page 9: ...Press Fence Mode off Long Press Headless Mode G Antenna Mode Indoor Positioning Outdoor GPS Return to Home Power Switch Gimbal Pitch Angle J Seamless Phone Holder 8 CD 0 Right Joystick Left Joystick LCD Screen for Flight Status One key Start One key Landing Switch Photo Video Battery Box ...

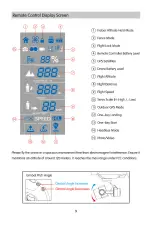
Page 10: ...Flight Altitude Flight Distance Flight Speed Servo Scale H High L Low Outdoor GPS Mode One key Landing One key Start Headless Mode PhotoNideo Please fly the drone in a spacious environment free from electromagnet interference Ensure it maintains an altitude of around 120 meters It reaches the max range under FCC conditions Gimbal Pitch Angle I Gimbal Angle Increases Gimbal Angle Decreases 9 ...

Page 11: ...n the right side see MODEL 11 when the remote controller has not been switched on yet 2 Switch on the remote controller And the screen prompts with a number of 01 3 Switch american hand to japanese hand power off and then power on the remote controller to complete Switch between japanese hand and american hand l Press the button on the left side see MODEL 21 when the remote controller has not been...

Page 12: ...h indicates the battery level of the remote controller BATIERY ASSEMBLING AND CHARGING Battery Assembling for Remote Control AA batteries 4 0 Cl 0 Cl 2 2 ii ii Cl 0 Cl 0 Open the cover of battery compartment insert four AA batteries not included Notes l Ensure the polarity symbols on the batteries match the symbols inside the battery compartment 2 Do not mix new and old batteries 3 Do not mix diff...

Page 13: ...t turns on during charging and turns off when the charging completes It takes about 3 5 hours to charge up to full and gives about 20 23 minutes of running time when fully charged Phone Holder Installation G Align the phone holder to the tapped hole and tighten the screws 2 Unfold the phone holder Adjust the phone holder rack and clamp the phone Notes Ensure the drone flies within the effective ra...

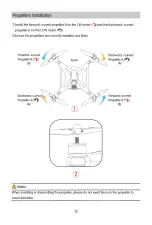
Page 14: ...e CCW motor 2 Ensure the propellers are correctly installed and fixed Forward curved Backward curved Propeller B Front Propeller A It Bl Al Backward curved Forward curved Propeller A It Propeller B Al Bl G Notes When installing or dismantling the propeller please do not exert force on the propeller to avoid distortion 13 ...

Page 15: ...de to the right as to turn on auto return to home mode The green light turns slow flashing indicating the return to home mode has been enabled When the drone battery is at a low condition both of the blue and green lights turn quick flashing Under this circumstance please keep the drone within your eyesight Drone Lights and Aircraft Status Modes Navigation Indicator Navigation Indicator Light Blue...

Page 16: ...rections shown as figure l and keep them still until the front blue light blinks with a clear sound of beep 2 Slowly rotate the drone horizontally until the back green light turns solid while the front blue light turning solid with a clear sound of beep CT Slowly rotate the drone for few circles with its nose facing upward until the front and back lights turn on with another clear sound of beep in...

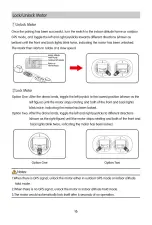
Page 17: ...est position shown as the left figure until the motor stops rotating and both of the front and back lights blink twice indicating the motor has been locked Option Two After the drone lands toggle the left and right joysticks to different directions shown as the right figure until the motor stops rotating and both of the front and back lights blink twice indicating the motor has been locked Option ...

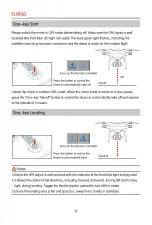
Page 18: ...e motor starts to rotate at a slow speed press the One key Takeoff button to control the drone to automatically take off and ascend to the altitude of 3 meters One key Landing Icons on the Remote Controller Press the button to control the drone to automatically land Notes Ground T l Ensure the GPS signal is well received with the indicates of the front blue light turning solid 2 lt allows the cont...

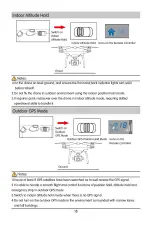
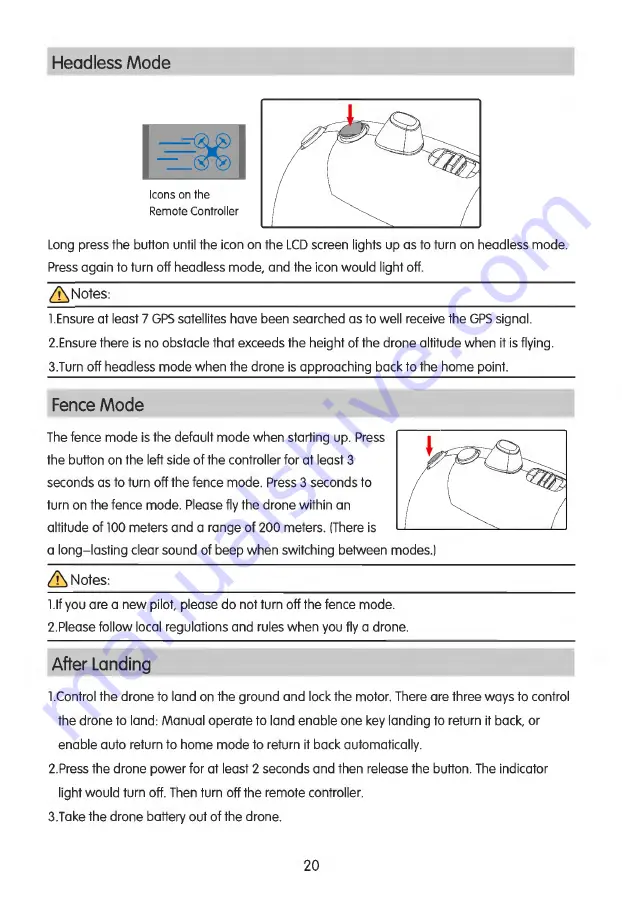
Page 19: ... mode requiring skilled operational skills to handle it Outdoor GPS Mode Switch on Outdoor GPSMode Outdoor GPS Position Hold Mode Icons on the Remote Controller Ground Notes l Ensure at least 8 GPS satellites have been searched as to well receive the GPS signal 2 lt is able to handle a smooth flight and control functions of position hold altitude hold and emergency stop in outdoor GPS mode 3 Switc...

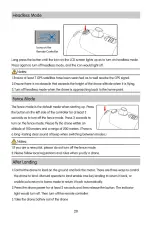
Page 20: ...tion 2 The front and back lights blink when the battery voltage is under 7 0SV triggering the low voltage alarm A When the drone is at low voltage and flies at the altitude of over 30 meters it would automatically return home at the same altitude and then descend B When the drone is at low voltage and flies at the altitude lower than 30 meters it would ascend to the altitude of 30 meters before re...

Page 21: ...ds as to turn off the fence mode Press 3 seconds to turn on the fence mode Please fly the drone within an altitude of 100 meters and a range of 200 meters There is a long lasting clear sound of beep when switching between modes Notes l If you are a new pilot please do not turn off the fence mode 2 Please follow local regulations and rules when you fly a drone After Landing l Control the drone to l...

Page 22: ...able video footages under almost any situation The pitch angle can be adjusted between 90 and 0 Camera SD Slot Long press the button to tilt the pitch angle upward Long press the button to tilt the pitch angle downward X6 supports the Micro SD card Please apply a Micro SD card of Class 10 or UHS 1 and above as to ensure a smooth process of the HD video recording You can also use SD card reader to ...

Page 23: ...College for tutorial video or user manual Product Features Please refer to product page description or product brochure After sale Service Please refer to conditions and terms of after sale service The final interpretation right belongs to all JJRC Should you have any further questions please visit JJRC Online Feedback and leave your message Thank you again for your support JIANJIAN TECHNOLOGY CO ...

Reviews: