background image

SECTION 4 - BASIC HYDRAULIC INFORMATION & SCHEMATICS

4-12

3121788

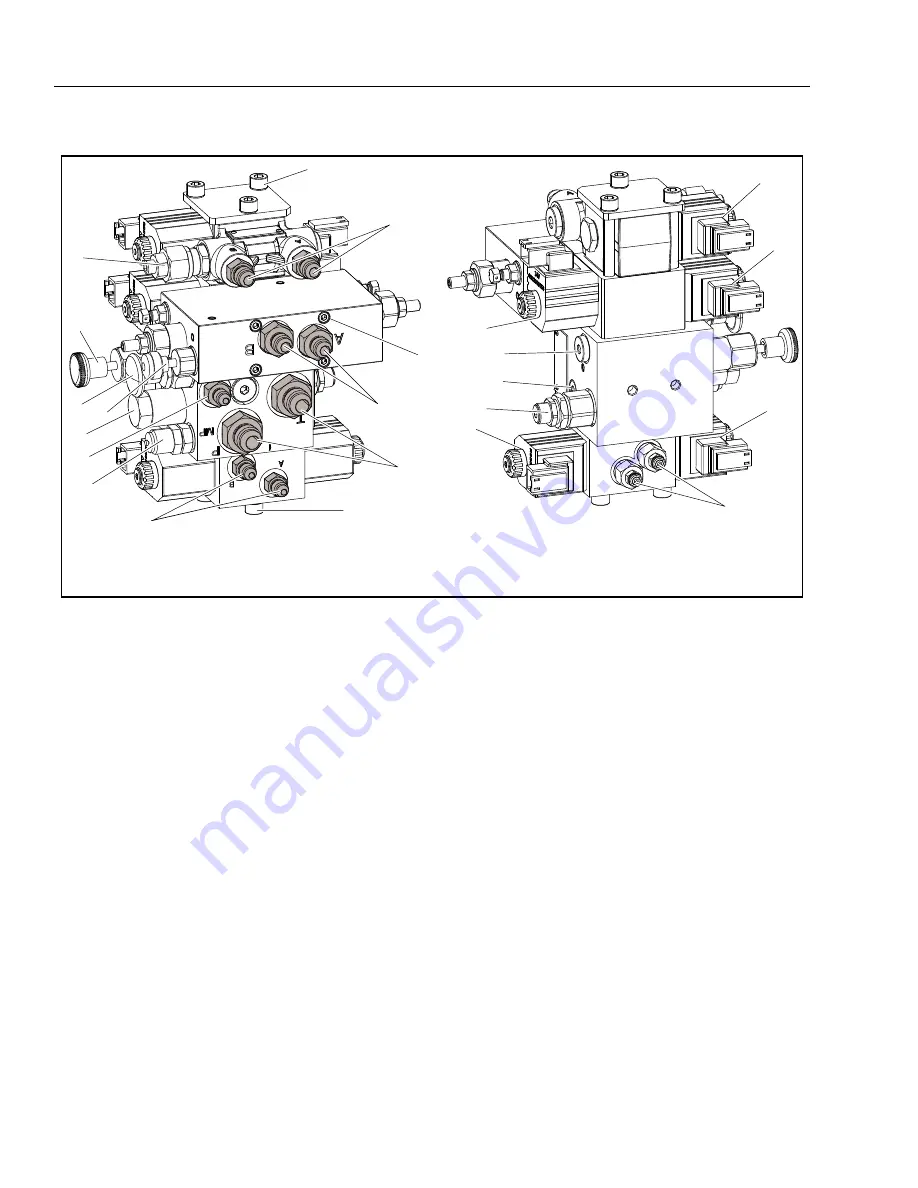
Figure 4-9.   Hydraulic Manifold Assembly - Component Torque

1.

Socket Head Screws - 16 ft. lb. (21 Nm)

2.

Screw - 4 ft. lb. (5.5 Nm)

3.

Pressure/Tank Port Fittings - 59 ft. lb. (79 Nm)

4.

Port A/B Fittings - Drive - 36 ft. lb. (49 Nm)

5.

Brake Port Fittings - 20 ft. lb. (27 Nm)

6.

Port A/B Fitting - Lift - 31 ft. lb. (42 Nm)

7.

Port B Fitting - Steer - 23 ft. lb. (31 Nm)

8.

MP Port Fitting - 50 ft. lb. (20 Nm)

9.

Needle Valve - 26 ft. lb. (35 Nm)

10.

Relief Valve - Lift - 31 ft. lb. (43 Nm)

11.

Hand Pump - 28 ft. lb. (38 Nm)

12.

Brake Release Valve - 33 ft. lb. (45 Nm)

13.

Bypass Valve - 33 ft. lb. (45 Nm)

14.

Main Relief Valve - 31 ft. lb. (43 Nm)

15.

Steer Relief Valves - 7 ft. lb. (9.5 Nm)

16.

Solenoid Valves - 4 ft. lb. (5.5 Nm) 
(Coil Resistance 22 Ohms)

17.

Plug - 9 ft. lb. (12.5 Nm)

18.

Plug - 23 ft. lb. (32 Nm)

MAF10640

1

7

1

10

6

11

12

9

2

4

3

8

5

13

16

17

18

14

16

15

16

16

16

RIGHT FRONT VIEW

LEFT REAR VIEW

Go to

Discount-Equipment.com 

to

order your 

parts

Summary of Contents for 2632R

Page 1: ...Service Maintenance Manual Models 2632R 3246R 3121788 April 12 2019 Rev B AS NZS GB G o t o D i s c o u n t E q u i p m e n t c o m t o o r d e r y o u r p a r t s...

Page 2: ...ith a quote for the right part that your machine needs We sell worldwide for the brands Genie Terex JLG MultiQuip Mikasa Essick Whiteman Mayco Toro Stone Diamond Products Generac Magnum Airman Haulott...

Page 3: ...hydraulic systems operate at extremely high potentially dangerous pres sures Every effort should be made to relieve any system pressure prior to disconnecting or removing any por tion of the system M...

Page 4: ...IONA INTRODUCTION MAINTENANCESAFETYPRECAUTIONS B 3121788 REVISION LOG Original Issue February 14 2019 Revised April 12 2019 G o t o D i s c o u n t E q u i p m e n t c o m t o o r d e r y o u r p a r...

Page 5: ...4 3 3 Battery Charging 3 5 3 4 DC AC Power Inverter Installation Option 3 11 3 5 Logic Control Module Installation 3 12 3 6 Main Power Contactor Relay and pump control Module 3 13 3 7 Pump Control Mo...

Page 6: ...ensing System 6 1 6 2 Analyzer Information 6 3 6 3 Calibration Preparation 6 5 6 4 Calibration And Verification Procedure 6 6 6 5 Testing 6 7 6 6 LSS Connector Pin Assignments 6 8 6 7 LSS Troubleshoot...

Page 7: ...trol Station Disassembly 3 19 3 17 Platform Control Station Components 3246R Internal 3 20 3 18 Platform Control Station Components 2632R Internal 3 20 3 19 Joystick 3 21 3 20 Tilt Sensor Installation...

Page 8: ...ic Schematic 2632R Sheet 1 of 2 4 30 4 30 Hydraulic Schematic 2632R Sheet 2 of 2 4 31 5 1 Hand Held Analyzer 5 1 5 2 Diagnostic Port Location 5 1 5 3 Analyzer Menu Help and Diagnostics Version P1 10 S...

Page 9: ...Codes Eagle Battery Charger 3 10 3 4 Pump Control Module Specifications 3 14 3 5 Pump Power Module Terminal Functions CO117 J1 3 14 3 6 Joystick Specifications 3 21 3 7 Connector Chart 3 21 3 8 Tilt...

Page 10: ...vi 3121788 LIST OF TABLES TABLE NO TITLE PAGE NO This page left blank intentionally G o t o D i s c o u n t E q u i p m e n t c o m t o o r d e r y o u r p a r t s...

Page 11: ...ngSlope platformfullyelevated FronttoBack SidetoSide 3 5 1 5 HighDriveSpeed FWD REV 2 2mph 3 5kph 2 0mph 3 2kph ElevatedDriveSpeed FWD REV 0 5mph 0 8kph ElevatedDrivePlatformHeight 65in 1 65m 55in 1 4...

Page 12: ...ons DESCRIPTION 3246R 2632R MaximumPlatformHeight 32ft 9 75m 25 50ft 7 77m OverallMachineHeight Stowed TelescopeRails DualRails RailsFolded 7 96ft 2 43m 8 03ft 2 45m 6 47ft 1 97m 7 30ft 2 23m 7 29ft 2...

Page 13: ...rmittent Max Power 45 hp 34 kW Max Oil Flow 18 gpm 68 lpm Continuous Max Oil Flow 25 gpm 95 lpm Intermittent Max Speed 335 rev min at Max Intermittent flow Drive Motors 2632R Type Hydraulic Displaceme...

Page 14: ...270VAC 100VAC 240VACRMS 50 60Hz 7 5A IP66NEMA4Type4 40 F 40 C to149 F 65 C 24V 36V 27 1A 1A 24V ElectronicProtection AutoReset CurrentLimited CurrentLimited CurrentLimited PRO EaglePerformanceSeries...

Page 15: ...75 indoor 22 27ft 6 7 8 23m 3 50 outdoor 3 75 indoor 5 4 22ft 1 65 6 7m 2632R 3 5 1 50 outdoor 1 50 indoor 18 21ft 5 84 6 4m 20 5 26ft 6 2 7 9m 2 50 outdoor 2 25 indoor 14 18ft 4 2m 5 4m 16 5 20 5ft 5...

Page 16: ...3 8 95 ViscosityIndex 152 152 Viscosity SUSat100 F 26 0 Viscosity SUSat210 F 56 8 Color ASTMD1500 3 0 Table 1 9 Biodegradable Hydraulic Fluid Specs Inspection Data MOBIL EAL ENVIRONSYN H 32 MOBIL SHC...

Page 17: ...il DTE 10 Excel 32 Mobil DTE 10 Excel 15 Description 55 33 32 15 CsT Typical Viscosity 40 c Fluid 145 147 164 168 Visc Index Mineral Oils Vegetable Oils Synthetic Synthetic Polyol Esters Properties Ba...

Page 18: ...inderBoreDiameter 3 94in 100mm 3 54in 80mm LiftCylinderStroke 47 85in 1215 5mm 47 6in 1210 5mm LiftCylinderRodDiameter 2 56in 65mm 2 36in 60mm SteerCylinderBoreDiameter 2 36in 60mm SteerCylinderStroke...

Page 19: ...loosened refer to the Torque Charts on page 1 10 to determine proper torque value 3246R 2632R COMPONENT ANSI CSA KOR JPN CE GB AUS ALL MARKETS PlatformwithRails Extension RailinRail 474lb 215Kg 474lb...

Page 20: ...ICATIONS 1 10 3121788 Torque Charts Figure 1 2 Torque Chart Sheet 1 of 5 SAE Fasteners Torq ue To rqu e Torq ue To rqu e Torq ue Torq ue G o t o D i s c o u n t E q u i p m e n t c o m t o o r d e r y...

Page 21: ...ON 1 SPECIFICATIONS 3121788 1 11 Figure 1 3 Torque Chart Sheet 2 of 5 SAE Fasteners Torq ue Tor que Torq ue Torqu e To rqu e G o t o D i s c o u n t E q u i p m e n t c o m t o o r d e r y o u r p a r...

Page 22: ...ICATIONS 1 12 3121788 Figure 1 4 Torque Chart Sheet 3 of 5 SAE Fasteners Cl amp L oa d To rque To rqu e Torq ue Torqu e Tor que Torq ue G o t o D i s c o u n t E q u i p m e n t c o m t o o r d e r y...

Page 23: ...CIFICATIONS 3121788 1 13 Figure 1 5 Torque Chart Sheet 4 of 5 METRIC Fasteners To rqu e To rqu e Torq u e To rq ue To rqu e To rq ue G o t o D i s c o u n t E q u i p m e n t c o m t o o r d e r y o u...

Page 24: ...ECIFICATIONS 1 14 3121788 Figure 1 6 Torque Chart Sheet 4 of 5 METRIC Fasteners Torq ue To rqu e Tor qu e To rqu e To rqu e To rq ue G o t o D i s c o u n t E q u i p m e n t c o m t o o r d e r y o u...

Page 25: ...ith a quote for the right part that your machine needs We sell worldwide for the brands Genie Terex JLG MultiQuip Mikasa Essick Whiteman Mayco Toro Stone Diamond Products Generac Magnum Airman Haulott...

Page 26: ...ection shall be accomplished for each machine in service for 3 months or 150 hours which ever comes first out of service for a period of more than 3 months or when purchased used The frequency of this...

Page 27: ...r Outofserviceforaperiodofmorethan3months orPurchased used Owner Dealer or User QualifiedJLGMechanic ServiceandMaintenanceManual andapplicableJLGinspectionform AnnualMachine Inspection Annually nolate...

Page 28: ...intended to replace any local or regional regulations that may pertain to this type of equipment nor should the lists be considered as all inclusive Variances in inter val times may occur due to clima...

Page 29: ...3 Guardrailsandfloor 1 2 1 2 Platformrollpinsandfolddownrails 1 2 1 2 LanyardAnchoragePoint 1 2 6 1 2 6 ChassisAssembly Wheelrimnuts 150 1 Tires 1 2 Oscillatingaxleandlocknut 3 3 Steer Driveandaxlecom...

Page 30: ...k cap breatherandvent 1 4 Hydraulicfitting 1 4 ElectricalConnections 1 3 1 3 Switches gauges hornandlights 1 3 1 3 Switchesandcontrols 1 3 1 3 Allhydraulicpressures 3 3 HydraulicFluid 8 8 GENERAL Noun...

Page 31: ...dicates a 50 hour interval required to perform task after initial use of machine This only occurs once in machine life Refer to Operators Manual for machine specific instructions Annualmachineinspecti...

Page 32: ...TENANCE COMPONENTS Figure 2 1 Machine Component Locations 3246R 1 Scissor Arm 2 Hydraulic Tank 3 Pump Assembly 4 Batteries Location 5 Safety Prop MAF10020 5 4 1 3 2 1 G o t o D i s c o u n t E q u i p...

Page 33: ...ATFORM The safety prop is located in between scissor arms To engage the safety prop 1 From the Ground Control Station raise the plat form approximately 9 ft 2 7 m 2 At the rear of the machine pull red...

Page 34: ...level in the reservoir 1 Open the hydraulic compartment door and locate the hydraulic reservoir 1 2 Locate the lines indicating the maximum and minimum levels of hydraulic oil 2 and 3 in the reservoi...

Page 35: ...em in preserving the long service life of a machine is to keep dirt and for eign materials out of the vital components Precau tions have been taken to safeguard against this Shields covers seals and f...

Page 36: ...ing parts If it becomes necessary to hand fabricate a gasket use gasket material or stock of equivalent material and thickness Be sure to cut holes in the right location as blank gaskets can cause ser...

Page 37: ...wear in of meshing compo nents Hydraulic Oil 1 Refer to Section 1 for recommendations for viscos ity ranges 2 JLG recommends Mobilfluid 424 hydraulic oil which has an SAE viscosity of 10W 30 and a vis...

Page 38: ...llowing is observed a Frayed or separated fibers on the liner surface b Cracked or damaged liner backing c Bearings that have moved or spun in their housing d Debris embedded in liner surface 3 Pins s...

Page 39: ...SECTION 2 GENERAL 2 14 3121788 NOTES G o t o D i s c o u n t E q u i p m e n t c o m t o o r d e r y o u r p a r t s...

Page 40: ...ith a quote for the right part that your machine needs We sell worldwide for the brands Genie Terex JLG MultiQuip Mikasa Essick Whiteman Mayco Toro Stone Diamond Products Generac Magnum Airman Haulott...

Page 41: ...oor 2 Compartment Latch and Release Handle 3 Batteries 4 Pump Power Module 5 Main Contactor Relay 6 Inverter Optional Figure 3 2 Components on right Side Swing Out Compartment Door 3246R 1 Right Side...

Page 42: ...3 3 Components on right Side Swing Out Compartment Door 2632R 1 Right Side Component Compartment Door 2 Compartment Latch and Release Handle 3 Hydraulic Assembly 4 Hydraulic Tank w Filter G o t o D i...

Page 43: ...Shaft 14 Door Latch 15 Door Latch Pin NOTE1 To adjust SURFACE A to be parallel with SURFACE B within 3mm when doors are closed Rotate the Door Adjuster Bolt in clockwise to decrease and counterclockwi...

Page 44: ...dis connected at the batteries without removing battery cables from the battery posts To disconnect power locate the RED quick disconnect connector on top of the batteries inside the battery compartm...

Page 45: ...OUCH NON INSULATED PORTION OF OUTPUT CONNEC TOR OR NON INSULATED BATTERY TERMINAL DO NOT OPERATE CHARGER IF THE AC SUPPLY CORD IS DAMAGED OR IF THE CHARGER HAS RECEIVED A SHARP BLOW BEEN DROPPED OR OT...

Page 46: ...LED on External Error Condition Caution Amber LED flash ing Green Power Battery Charger China GB Only Battery Charging Yellow LED AGM flashes quickly Flooded remains on AGM flooded flashes slowly Char...

Page 47: ...NG OR BREAKING THE POS NEG CONNECTIONS TO THE BATTERY DO NOT OPEN OR DISASSEMBLE CHARGER 1 For flooded lead acid batteries regularly check water levels of each battery cell after charging and add dist...

Page 48: ...learoncetheconditionhasbeencorrected E 0 0 7 Batteryamphourlimitexceeded1 Possiblecausesincludepoorbatteryhealth verydeeplydischargedbattery poorly connectedbattery and orhighparasiticloadsonbatterywh...

Page 49: ...functionproperly Pleaseplacethechargerintoanareawithambi entairflowortoacoolerplace 2 Disconnectthechargerandwaitfor15 20minsbeforerecon nectingforcharging 4 BatteryHighTemperatureProtection 1 Charger...

Page 50: ...period Thisindicatesthatapossible batteryproblemexistsandthatthechargecyclehasbeenterminatedat thispoint 30 90 REDLEDS BLINKING INTERNALOVERTEMPSHUTDOWN Thisindicationoccursifthechargercircuitryhasdet...

Page 51: ...er Surge OutputPower AC OutputVoltage AC OutputFrequency Type Protection OutputReverseDCPolarity PowerBright 20to30VDC 4 F 20 C to113 F 45 C 900W 1800W 7 5A 117V 10 60Hz ModifiedSineWave 3X25AReplacea...

Page 52: ...le from Machine 1 Disconnect machine power at the positive battery cable or use quick disconnect if equipped 2 Mark or note the harness connector positions before removing from the module 3 Disconnect...

Page 53: ...TOR RELAY OR SERVICING THE ELECTRICAL SYSTEM FAILURE TO DO SO COULD CAUSE DAMAGE TO THE MACHINES ELECTRICAL COMPONENTS 1 Main Power Contactor Relay 2 Battery Cable 3 Mounting Bolts Nuts and Washers 4...

Page 54: ...nnectors cables to the module 3 Torque all terminal bolts to torque specifications as shown in Table 3 4 Overtightening could damage the module 4 After all connections to the pump module are made the...

Page 55: ...eries 2 Main Power Contactor Relay 3 Pump Control Module 4 Hydraulic Pump Motor 5 To Logic Module Controller 6 To Logic Control Module 7 To Battery Charger 8 To Battery Charger 9 Battery Mega Fuse MAF...

Page 56: ...Check that all components are installed into the control station panel and connected to the wir ing harness on the back of the panel 2 Insert the control station into position on the machine and alig...

Page 57: ...meter 8 Overload Indicator 9 Multi Display Indicator If Equipped NOTE SeeelectricalschematicSection7forwiringconnectionsto switchesandgauges MAF10190 1 2 2 3 4 6 5 7 8 9 Figure 3 12 Ground Control Sta...

Page 58: ...lt Indicator 13 Alarm not shown located on bottom of box 14 Alarm not shown located on bottom of box 15 Alarm not shown located on bottom of box 16 Speed Select Switch 100122089 3A MAF10440 1 2 3 4 5...

Page 59: ...sembly 1 Place the platform control station assembly on a suitable work bench 2 Remove the main body from the mount by removing bolt cap nut and washers item 1 and the two bolts and washers item 2 on...

Page 60: ...utton Switch 7 Overload Indicator If Equipped 8 Alarm 9 Main Harness Connector MAF10210 1 3 2 7 6 5 4 8 9 Figure 3 18 Platform Control Station Components 2632R Internal 1 Drive Lift and Steer Joystick...

Page 61: ...sumption 10mA 12VDC Output HandleCentered 2 5 0 1 VDC Output FullPositive Reverse Deflection 4 0 1 VDC Output FullNegative Forward Deflection 1 0 1 VDC Table 3 7 Connector Chart CONNECTOR PINOUT Term...

Page 62: ...e with bolts washer and nuts 3 When mounting the tilt sensor onto the mount ing plate mount with the wiring harness point ing to the rear of the machine Align the two mounting holes of the sensor with...

Page 63: ...LSS equipped machines this sensor works in tandem with the lift cylinder pressure switch to accurately deter mine platform load for any given platform height There is no adjustment to the angle senso...

Page 64: ...in from other end Secure keeper pin with mounting hardware 5 Carefully rotate sensor and bracket to load sen sor spring until holes in the bracket line up with slots on frame mounting plate Figure 2 R...

Page 65: ...SECTION 3 CHASSIS SCISSOR ARMS 3121788 3 25 MAF10350 G o t o D i s c o u n t E q u i p m e n t c o m t o o r d e r y o u r p a r t s...

Page 66: ...Spring 8 Lower Actuator 9 Pinion Plate 10 Anti Static Strap 11 Link 12 Spring 13 Pin 14 Bar RH 15 Bar LH 16 Sensor Mounting Plate 17 Bearing 18 Bolt 19 Limit Switch Mounting Screw 15 14 12 13 9 10 6 2...

Page 67: ...pper Actuator 6 Mounting Plate 7 Spring 8 Lower Actuator 9 Pinion Plate 10 Anti Static Strap 11 Link 12 Spring 13 Pin 14 Bar RH 15 Bar LH 16 Sensor Mounting Plate 17 Bearing 18 Bolt 19 Limit Switch Mo...

Page 68: ...ctuator assembly and deploy the PHP bars The actuator bearing bracket 2 allows for some side to side adjustment mark the cur rent position of the actuator bearing bracket 2 on the frame c Loosen and m...

Page 69: ...and Spindle Assembly Installation 3246R 1 Mount steer cylinder with ports facing the rear of the machine 2 Apply JLG Thread locker PN 0100011 to bolt threads before tightening 3 Spindle weldment inte...

Page 70: ...dle Assembly Installation 2632R 1 Mount steer cylinder with ports facing the rear of the machine 2 Apply JLG Thread locker PN 0100011 to bolt threads before tightening 3 Spindle weldment interchangeab...

Page 71: ...allation Option Figure 3 26 Drive Motor Cover Installation Option NOTE Cover installation same for both sides 1 Drive Motor Cover 2 Cover carriage bolts nuts and washers MAF10260 1 2 2 2 G o t o D i s...

Page 72: ...06 x 127 Tire 15 55 in 395 mm minimum If any uneven wear is discovered A tire with significant damage in the tread area or sidewall requires immediate evaluation before plac ing the machine into servi...

Page 73: ...g platform back onto scissor arm assembly follow removal procedures in reverse order 3 16 SCISSOR ARMS REMOVAL 1 Remove platform refer to Section 3 15 Platform Removal 2 Disconnect all wiring and cabl...

Page 74: ...SECTION 3 CHASSIS SCISSOR ARMS 3 34 3121788 Figure 3 28 Arms and Platform Positioning with Overhead Support MAF10270 G o t o D i s c o u n t E q u i p m e n t c o m t o o r d e r y o u r p a r t s...

Page 75: ...SECTION 3 CHASSIS SCISSOR ARMS 3121788 3 35 Figure 3 29 Platform Assembly Installation Removal MAF10410 G o t o D i s c o u n t E q u i p m e n t c o m t o o r d e r y o u r p a r t s...

Page 76: ...HASSIS SCISSOR ARMS 3 36 3121788 Figure 3 30 Scissor Arm Assembly 3246R MAF10090 A A K K K H H K K K J J K K K A K K B C E G D F K G o t o D i s c o u n t E q u i p m e n t c o m t o o r d e r y o u r...

Page 77: ...ON 3 CHASSIS SCISSOR ARMS 3121788 3 37 Figure 3 31 Scissor Arm Assembly Pin Configuration 3246R MAF10100 A K H J B C E G D F G o t o D i s c o u n t E q u i p m e n t c o m t o o r d e r y o u r p a r...

Page 78: ...IS SCISSOR ARMS 3 38 3121788 E G D A B I K K K K K J J J J H C F H K J A 1001370010 D MAF12650D Figure 3 32 Scissor Arm Assembly 2632R G o t o D i s c o u n t E q u i p m e n t c o m t o o r d e r y o...

Page 79: ...SSIS SCISSOR ARMS 3121788 3 39 B A C I J D H K F E G 1001370010 D MAF12660D Figure 3 33 Scissor Arm Assembly Pin Configuration 2632R G o t o D i s c o u n t E q u i p m e n t c o m t o o r d e r y o u...

Page 80: ...R LOOP IN THIS AREA ON THE INBOARD CLOCKWISE DIRECTION ALONG LIFT CYLINDER BUSHING LOOKING FROM LEFT SIDE DO NOT TWIST THE CABLE SECURE CABLE TO TUBE SUPPORT ON CYLINDER DO NOT TIE TO CYLINDER ABOVE 3...

Page 81: ...ROUTE THE CABLES IN CLOCKWISE DIRECION ALONG LIFT CYLINDER BUSHING LOOKING FROM LEFT SIDE DO NOT TWIST THE CABLE SECURE CABLE TO TUBE SUPPORT ON CYLINDER DO NOT TIE TO CYLINDER ABOVE 350MM FROM BLOCK...

Page 82: ...E THE CABLES IN CLOCKWISE DIRECION AROUND LIFT CYLINDER BUSHING LOOKING FROM LEFT SIDE DO NOT TWIST THE CABLE SECURE CABLE TO TUBE SUPPORT ON CYLINDER DO NOT TIE TO CYLINDER ABOVE 350MM FROM BLOCK FAC...

Page 83: ...HIS AREA ROUTE THE CABLES IN CLOCKWISE DIRECION AROUND LIFT CYLINDER BUSHING LOOKING FROM LEFT SIDE DO NOT TWIST THE CABLE SECURE CABLE TO TUBE SUPPORT ON CYLINDER DO NOT TIE TO CYLINDER ABOVE 350MM F...

Page 84: ...TECABLE AROUND CROSSTUBEOFARM STACK DONOTLEAVE EXCESSSLACKOR LOOPINTHISAREA SECUREPLATFORMCABLE WITHTIESTARPTHROUGHCHA SISCUTOUT ROUTEALONGOUT SIDEOFCABLEGUIDE ROUTEALONGOUT SIDEOFCABLEGUIDE SECUREPLA...

Page 85: ...YLINDER DONOTTIETO LIFTCYLABOVE350MM FROMBLOCKFACE ROUTECABLE AROUND CROSSTUBEOFARM STACK DONOTLEAVE EXCESSSLACKOR LOOPINTHISAREA SECUREPLATFORMCABLE WITHTIESTARPTHROUGH CHASISCUTOUT SECUREPLATFORMCAB...

Page 86: ...YLINDER DONOTTIETO LIFTCYLABOVE350MM FROMBLOCKFACE ROUTECABLE AROUND CROSSTUBEOFARM STACK DONOTLEAVE EXCESSSLACKOR LOOPINTHISAREA SECUREPLATFORMCABLE WITHTIESTARPTHROUGH CHASISCUTOUT SECUREPLATFORMCAB...

Page 87: ...ONOTTIETO LIFTCYLABOVE350MM FROMBLOCKFACE ROUTECABLEAROUND CROSSTUBEOFARM STACK DONOTLEAVE EXCESSSLACKOR LOOPINTHISAREA SECUREPLATFORMCABLEWITHTIE STARPTHROUGHCHASISCUTOUT SECUREPLATFORMCABLE TOARMSAT...

Page 88: ...SECTION 3 CHASSIS SCISSOR ARMS 3 48 3121788 NOTES G o t o D i s c o u n t E q u i p m e n t c o m t o o r d e r y o u r p a r t s...

Page 89: ...ith a quote for the right part that your machine needs We sell worldwide for the brands Genie Terex JLG MultiQuip Mikasa Essick Whiteman Mayco Toro Stone Diamond Products Generac Magnum Airman Haulott...

Page 90: ...position therefore when the control is released the spool automatically returns to neutral prohibiting any flow through the circuit Relief Valves Main relief valves are installed at various points wit...

Page 91: ...Terminals The internal windings are very low impedance and should appear to be a short circuit for an ordinary voltmeter other tests can determine if the windings are truly shorted High resistance ca...

Page 92: ...the cable from Pump Motor Positive Ter minal Using a voltmeter set for resistance mea surement Ohms ensure that the resistance between the Pump Motor Positive and Negative Terminals is less than 2 Ohm...

Page 93: ...ousing Cap 5 Cap O Ring 6 Hydraulic Oil Filter 7 Bowl O Ring 8 Tank Return Hose Port 9 Filter Return Housing Screws and Washers Torque to 5 ft lbs max 10 Tank Placement Emboss Features On Bottom of Ta...

Page 94: ...ve the oil level in the hydraulic tank 6 Loosen and remove the pump pressure side fit ting and hose Cap the pump port and the hose fitting Keep pressure hose elevated if necessary 7 Loosen the suction...

Page 95: ...p above the oil level in the hydraulic tank 5 Loosen and remove the pump pressure side fit ting and hose Cap the pump port and the hose fitting Keep pressure hose elevated if necessary 6 Loosen the su...

Page 96: ...motor receptacle 3 Slide the motor all the way into the pump motor and install the bolts and washers Pump Motor Installation Reverse instructions for removal When reinstalling the Negative and Positiv...

Page 97: ...Motor Components 1 Hydraulic Pump 2 Electric Motor 3 Pump Drive Shaft Seal 4 Seal to Pump Retaining Snap Ring 5 Pump To Motor Gasket 6 Pump To Motor Bolts and Washers 7 Pump Suction Port 8 Pump Press...

Page 98: ...10 ft lb 13 5 Nm max 3 Manifold Valve Assembly 4 Valve Mounting Washers 3 1 2 4 MAF10650 NOTE Themountingscrews item2 whenonlyloosened allowthe manifoldassemblyto berotateddownforservicingifnecessary...

Page 99: ...RMATION SCHEMATICS 4 10 3121788 MP 220 0 10 BAR 17 LPM 170 0 10 BAR 50 bar 50 bar MAF12620 Figure 4 7 Hydraulic Manifold Assembly Schematic 1001248679 G o t o D i s c o u n t E q u i p m e n t c o m t...

Page 100: ...rcuit Port 8 Drive Motor Release Needle Valve 9 Brake Release Valve 10 Hand Pump 11 Diagnostic Pressure Port 12 Bypass Valve 13 Drive Pressure Relief Adjust Port B 14 Drive Pressure Relief Adjust Port...

Page 101: ...t lb 31 Nm 8 MP Port Fitting 50 ft lb 20 Nm 9 Needle Valve 26 ft lb 35 Nm 10 Relief Valve Lift 31 ft lb 43 Nm 11 Hand Pump 28 ft lb 38 Nm 12 Brake Release Valve 33 ft lb 45 Nm 13 Bypass Valve 33 ft lb...

Page 102: ...1 Manifold Valve Block 2 Oil Tank Filter Drain Plug 3 Pump Motor 4 Drive Motors Interchangeable 5 Steer Cylinder 6 Brakes 7 Lift Cylinder AlsoreferenceFigure3 34 toFigure3 37 8 Traction Valve MAF1070...

Page 103: ...e 4 11 Hydraulic Hose Routing 2632R 1 Manifold Valve Block 2 Oil Tank Filter Drain Plug 3 Pump Motor 4 Drive Motors Interchangeable 5 Steer Cylinder 6 Brakes 7 Lift Cylinder Also reference Figure 3 38...

Page 104: ...racteristics of the series drive circuit Figure 4 12 Drive Motor Installation Right Motor shown Left Motor the same flip motor over keeping ports facing forward 1 Hydraulic Drive Motor 2 Steer Spindle...

Page 105: ...Ports on Top 2 Mounting Screws Apply JLG Threadlocker PN 0100011 on assembly and Torque to 74 ft lb 100 Nm 3 Washers Inside of Frame 4 Mounting Nuts 5 Hyd Hose to Right Side Brake Assembly MAF10770 2...

Page 106: ...s approximately 5 to 10 strokes The brakes should now be released 6 After towing is complete release the BLACK brake override button 2 and screw the tow mode needle valve knob 1 all the way in to rese...

Page 107: ...lief adjustment 4 Now steer wheels fully to the left and adjust the left relief to 1150 psi 80 bar lock the relief adjustment 5 Return Steering Personalities to their original settings 4 12 CYLINDER C...

Page 108: ...nder NOTE To avoid having to readjust the manual descent remove the large nut located behind the manual descent bracket as shown Also see Figure 3 30 for lift cylinder mounting hard ware configuration...

Page 109: ...ng 10 Ring Back up 11 O Ring 12 Piston 13 Seal Piston 14 Ring Wear 15 O Ring 16 Fitting 17 Plug 18 Bearing 19 Orifice 20 Cartridge Valve 21 Cartridge Solenoid Valve 22 Ball 23 Setscrew MAF10791 100124...

Page 110: ...acer 8 Bearing 9 Ring Wear 10 Ring Wear 11 O Ring 12 O Ring 13 O Ring 14 Ring Back Up 15 Ring Back Up 16 Seal 17 Seal Stop 18 Wiper 19 Fitting Straight MAF10780C 1 1 1 1 2 3 4 6 7 7 8 8 9 9 10 10 10 1...

Page 111: ...12 3 4 5 6 8 7 10 9 11 11 2 7 8 6 5 4 3 Figure 4 18 Steer Cylinder 2632R 1 Barrel 2 Rod 3 Head 4 Wiper 5 Rod Seal 6 Wear Ring 7 O Ring 8 Backup Ring 9 Piston Seal 10 Spacer 11 Flange Bearing 12 Straig...

Page 112: ...y removing again If still no release tap barrel with hammer in threaded area and try again Repeat if necessary until head is com pletely removed 7 Attach a suitable pulling device to the cylinder rod...

Page 113: ...for burrs and sharp edges Dress applicable surfaces as necessary 12 Examine cylinder head outside diameter for scoring or other damage and ovality and taper ing Replace as necessary 13 If applicable E...

Page 114: ...dislodged Push the head along the rod to the rod end as applicable 5 If applicable correctly place new o ring in the inner piston diameter groove The backup ring side facing the O ring is grooved 6 I...

Page 115: ...tapered bushing is tapped 3 times as there are 3 spaces between the capscrews 13 Retorque the capscrews evenly and progres sively in rotation to the specified torque value 14 Remove the cylinder rod f...

Page 116: ...EN WHEN INSTALLING THE CYLINDER ROD HEAD AND PISTON AVOID PULLING THE ROD OFF CENTER WHICH COULD CAUSE DAMAGE TO THE PISTON AND CYLINDER BAR REL SURFACES 25 With barrel clamped securely and while ade...

Page 117: ...ASIC HYDRAULIC INFORMATION SCHEMATICS 4 28 3121788 4 15 HYDRAULIC SCHEMATICS Figure 4 27 Hydraulic Schematic 3246R Sheet 1 of 2 4 5 G o t o D i s c o u n t E q u i p m e n t c o m t o o r d e r y o u...

Page 118: ...SECTION 4 BASIC HYDRAULIC INFORMATION SCHEMATICS 3121788 4 29 Figure 4 28 Hydraulic Schematic 3246R Sheet 2 of 2 G o t o D i s c o u n t E q u i p m e n t c o m t o o r d e r y o u r p a r t s...

Page 119: ...LEFTSIDE RIGHTSIDE 4 77 cm rev STEERLEFT STEERRIGHT 220 bar 3200 psi C4 LIFTUP STEERLEFT DRIVEREV MACHINE FUNCTION ELEC SCHEM DESC STEERRIGHT DRIVEFWD HV65 HV02 HV03 HV04 HV05 HV06 LIFTDOWN P1 P2 P3...

Page 120: ...07bar 207bar RIGHTSIDE LEFTSIDE REARBRAKES A B B A A B T 3000 psi 3000 psi 220 bar 3200 psi DRIVE REVERSE DRIVE FORWARD LIFTUP C3 LEFT RIGHT C2 C1 C5 LIFTCYLINDER V1 U 2 mm V2 LIFT DOWN 1 mm 1 mm U SH...

Page 121: ...SECTION 4 BASIC HYDRAULIC INFORMATION SCHEMATICS 4 32 3121788 NOTES G o t o D i s c o u n t E q u i p m e n t c o m t o o r d e r y o u r p a r t s...

Page 122: ...ith a quote for the right part that your machine needs We sell worldwide for the brands Genie Terex JLG MultiQuip Mikasa Essick Whiteman Mayco Toro Stone Diamond Products Generac Magnum Airman Haulott...

Page 123: ...each end of the cable the cable cannot be connected back wards 2 Power up the control system by turning the ground control station platform ground selec tor switch to the platform position and pulling...

Page 124: ...If ENTER is pressed again the display moves to the follow ing display LOG 211 1 Power Cycle Or last recorded fault At this point the analyzer will display the highest priority active fault if any are...

Page 125: ...UP or DOWN arrow keys enter the first digit of the password 3 Then using the RIGHT arrow key position the cursor to the right one space to enter the second digit of the pass word Use the UP or DOWN a...

Page 126: ...ARTICULAR MACHINE CAN RESULT IN IMPROPER OPERATION GROUND ALARM 1 DESCENT The effect of the machine digit value is displayed along with its value The above display would be selected if the machine was...

Page 127: ...uncalibrated tilt sensor values If either raw angle reads 5 0 or more the machine is too unlevel and the software will prohibit calibration There fore attempt to dissect the three areas of error to fi...

Page 128: ...are use the Hand held Analyzer to view the machine s settings MACHINE SETUP and PER SONALITIES refer to Figure 5 3 thru Figure 5 5 for Ana lyzer Flow Chart It is important to write down the settings t...

Page 129: ...X UPR LIFT DN LS ON UPR LIFT DN CRNT XXXXMA DRIVE FWD OFF DRIVE REV OFF TWO SPEED OFF PLATFORM PWR ON HOUR METER OFF BEACON OFF GROUND ALARM XXX WN ALARM OFF OVERLOAD LT OFF DIAGNOSTICS LOAD OVERLOAD...

Page 130: ...TEST LEDS ALRM RUN SYSTEM TEST BATTERY 1 ON RUN SYSTEM TEST BATTERY 2 ON RUN SYSTEM TEST BATTERY 3 ON RUN SYSTEM TEST BATTERY 4 ON RUN SYSTEM TEST SYS DISTRESS ON RUN SYSTEM TEST TILT LAMP ON RUN SYST...

Page 131: ...YES ENTER NO ESC CAL LOAD FAIL NOT IN GND MODE CAL LOAD FAIL CAL ANGLE CAL LOAD FAIL PLATFORM EMPTY CAL LOAD PLAT NOT STOWED CAL LOAD FAIL LIFT TO MAX ELEV CAL LOAD LOWER TO STOWED CAL LOAD LIFT TO M...

Page 132: ...ALARM 1 2 3 MOTION GroundAlarmsoundsduringLiftUp LiftDown DriveForward orDriveReverse HORNONLY GroundAlarmonlysoundswhenuserpressesPlatformHornbutton DESCENT GroundAlarmsoundsduringLiftDown 1 1 1 2 1...

Page 133: ...100 60 60 LIFT ACCEL 0 1 5 0 Sec 0 7 0 7 DECEL 0 1 1 0 Sec 0 1 0 1 UPMIN 1 45 20 20 UPSTOP 1 100 55 70 UPMAX 31 100 69 100 UPCREEP 1 100 50 50 DOWNMIN 250 350mA 280 350 DOWNS STOP 250 1200mA 450 470 D...

Page 134: ...SECTION 5 JLG CONTROL SYSTEM 5 12 3121788 NOTES G o t o D i s c o u n t E q u i p m e n t c o m t o o r d e r y o u r p a r t s...

Page 135: ...ith a quote for the right part that your machine needs We sell worldwide for the brands Genie Terex JLG MultiQuip Mikasa Essick Whiteman Mayco Toro Stone Diamond Products Generac Magnum Airman Haulott...

Page 136: ...pt a partial height calibration The platform should be lifted as close as practical to the ceiling when prompted to LIFT TO MAX ELEV The control system will automatically restrict lift up to the demon...

Page 137: ...G SYSTEM SERVICE 6 2 3121788 1 Arm Angle Sensor 2 Pressure Sensor Barrel 3 Pressure Sensor Rod Figure 6 1 LSS Component Locations MAF11230 1 2 3 G o t o D i s c o u n t E q u i p m e n t c o m t o o r...

Page 138: ...3 S This parameter sets the debounce time in sec onds where platform load must be greater than the capacity limit before triggering over load OVR HOLD 5 0 S This parameter sets the minimum hold time...

Page 139: ...0 0to9999 9BAR Displaystheliftcylinderrodpressurescaledreadingin BAR NET FORCE XX XXX LBS 0 0to50 000LBS Displays the calculated lift cylinder net force in LBS PLT LOAD XX XXX LBS 0 0to25 000LBS Disp...

Page 140: ...umentation fur nished with the factory provided accessories or con sult JLG Table 6 3 Calibrations Menu MENU SUBMENU DESCRIPTION CALIBRATIONS LOAD 0 CAL LOAD YES ENTER NO ESC Press ENTER to begin cali...

Page 141: ...the top level menu Loaded Platform Calibration The following procedure should be executed to cali brate LSS with test weights 1 Place weight corresponding to 110 of the vehicle s rated load in the cen...

Page 142: ...ill be displayed that will help lead to a resolution refer to the Trou bleshooting section of this manual Press ESC to return to the top level menu 6 Ensure the new maximum height has been set by runn...

Page 143: ...ation should continue until the deck is nearly stowed 11 If successful the Analyzer will display the COMPLETE prompt Press ESC to return to the top level menu and then re adjust MACHINE SETUP LOAD to...

Page 144: ...Ltopreventplatform andground controls during an overload Adjust the configuration to CUTOUT PLTM to prevent platform controls only during an overload LSS requires re calibration Re calibrate the eleva...

Page 145: ...indicates an issue with the wire harness pres suretransducer s orthegroundmodule Confirmcurrentsandvoltagesatthegroundmoduletodeterminetheori gin of the issue Refer to LSS Theory of Operation LIFT CY...

Page 146: ...ith a quote for the right part that your machine needs We sell worldwide for the brands Genie Terex JLG MultiQuip Mikasa Essick Whiteman Mayco Toro Stone Diamond Products Generac Magnum Airman Haulott...

Page 147: ...system test ANALYZER SYSTEM TEST for intermittent or difficult problems System Fault DTC Indication In addition to the DTC codes being displayed on the MDI and handheld analyzer DTC codes are indicat...

Page 148: ...ndoor Outdoorselectionandfur therliftupmotionisnotpossible PlatformHeightValue MaxHeightAllowed Value X 007 DRIVING AT CUTBACK POT HOLE STILL ENGAGED None None Drive State CREEP Whilestowed drivespeed...

Page 149: ...NTED LiftDownState PREVENTED Trigger Switch in the Platform Control Box was closed for more than five seconds while the Joy stick accelerator was in the neutral position centered Release switch or rep...

Page 150: ...off shorted to B or shorted to B ground to cause this difficulty In PlatformMode JOY_SIG is 4 50V OR 0 50V Retained until the EMS is cycled X 227 STEER SWITCHES FAULTY None 2_2 Drive State PREVENTED B...

Page 151: ...23199 PRESSURE SENSOR 2 OUT OF RANGE LOW 2_3 Lift Up State PREVENTED The Pressure1RawValue is considered out of range low since it is 3 5mA Onlyapplicable if MACHINESETUP LOAD CUTOUT ALL or CUTOUT PLT...

Page 152: ...emperature as communicated by the tem perature tilt sensor is less than 40 degrees Cel sius If Transport State FALSE then set Drive State CREEP Lift Down State MAX Lift Up State PREVENTED The platform...

Page 153: ...lowingfaultsare active DTC251 ELEV ANGLE SENSOR FAULTY VOLT AGE OUT OF RANGE DTC2511 ELEV ANGLE SENSOR FAULTY NOT MOUNTED DTC252 ELEV ANGLE SENSOR HAS NOT BEEN CALIBRATED X 252 ELEV ANGLE SENSOR HAS N...

Page 154: ...E SETUP PHP ALARM YES PF 500ms On 500ms Off GND 500ms On 500ms Off 2_5 DriveState PREVENTED While elevated driving is not possible since the control system detected that the pot hole pro tection mecha...

Page 155: ...t Up State PREVENTED The vehicle s Main Line Contactor did not close when energized Check the line contactor coil and the associated power wiring The Power Module detected an open circuit for the line...

Page 156: ...State PREVENTED Curtis Code 31 Coil 1 Driver Open Short Set Driver 1 pin 6 is either open or shorted This fault can be set only when Main Enable Off Effect ShutdownDriver1 Possible Cause Open or shor...

Page 157: ...7 DRIVE FORWARD VALVE OPEN CIRCUIT None 3_3 Disable Output Drive State PREVENTED Open Circuit detected on DRIVE_FWD_VLV X 33318 DRIVE FORWARD VALVE SHORT TO BATTERY None 3_3 Disable Output Lift Up Sta...

Page 158: ...IFT_DN_VLV_2 AND MACHINE SETUP MODEL 4047R X 33539 AUXILIARY LIFT DOWN VALVE SHORT TO BATTERY None 3_3 Disable Highside Output Open Lowside Output LiftDownState PREVENTED LiftUpState PREVENTED Short t...

Page 159: ...ble if MACHINE SETUP WHITE NOISE ALARM YES X 3379 HOUR METER SHORT TO GROUND None 3_3 Disable output Short to Ground was detected on HOUR_MTR X 338 STEER LEFT VALVE OPEN CIR CUIT None 3_3 Disable Outp...

Page 160: ...s out of range 104 F 40 C or 302 F 150 C Flag Error to show that analog input readings are not being temperature compensated and allow normal operation Not having temperature compensation affects Elev...

Page 161: ...ed Effect Reduced Drive Torque Possible Cause Battery menu parameters are misadjusted Non controller system drain on battery Battery resisitance too high Battery disconnected while driving See Monitor...

Page 162: ...Capacitor Volt age Blown B fuse or main contactor did not close X 4474 POWER MODULE VOLTAGE TOO HIGH REDUCED OPERATION None 4_4 DriveState CREEP LiftUpState CREEP Curtis Code 24 B Overvoltage Cutback...

Page 163: ...2 0V and ChargeInterlock State FALSE System Devices powered by VSW will be dis abled Suppress all DTC Messages caused by the lack of system power Pump Module Platform Module Tilt Sensors LSS and Pot H...

Page 164: ...Motion 0x00 not received for 250mS AND PlatformMode selected This error shall be suppressed anytime that VSWis De energized orif unitis in SafeMode X 6649 CANBUS FAILURE TILT TEMP SENSOR None 6_6 Tilt...

Page 165: ...l be suppressed if DTC 825 LSS HAS NOT BEEN CALIBRATED fault is active This fault shall be suppressed if DTC 252 ELEV ANGLE SENSOR HAS NOT BEEN CALIBRATED fault is active X 8215 LSS ANGLE SENSOR OUT O...

Page 166: ...ETUP LOAD CUTOUT ALL or CUTOUT PLTM AND MACHINE SETUP LOAD CFG PRESSURE and MACHINE SETUP MODEL 1532R 1932R 2632R or 3247R X 8525 LIFTCYLINDERHEADPRESSURE 2 OUT OF RANGE HIGH None 8_5 OverloadState TR...

Page 167: ...Mode The control system may resume operation once the difficulty has been corrected X 9912 POWER MODULE FAILURE SYSTEM MONITOR None 9_9 DriveState PREVENTED LiftUpState PREVENTED Curtis Code 77 Superv...

Page 168: ...e Pump Module detected an out of range or corrupt personality setting Reset control system Personalities to default settings to clear diffi culty Curtis Code 82 Bad Calibrations Set Calibration values...

Page 169: ...e parameter Effect ShutdownPump Possible Cause KSI and Hydraulic throttle input applied in incorrect sequence hydraulic throttle input was active when KSI was turned on Fault wiring crimps or switches...

Page 170: ...9959 POWER MODULE FAILURE INTERNAL ERROR None 9_9 DriveState PREVENTED LiftUpState PREVENTED Curtis Code 44 Pump Throttle Wiper Low Set Pot2 wiper voltage is lower than the low fault threshold can be...

Page 171: ...ll must match for compatibility The control system may resume operation once the diffi culty has been corrected Curtis Code 98 Illegal Model Number Set Illegal Mecklenburg variable when KSI cycles a c...

Page 172: ...SECTION 7 DIAGNOSTIC TROUBLE CODES 7 26 3121788 NOTES G o t o D i s c o u n t E q u i p m e n t c o m t o o r d e r y o u r p a r t s...

Page 173: ...ith a quote for the right part that your machine needs We sell worldwide for the brands Genie Terex JLG MultiQuip Mikasa Essick Whiteman Mayco Toro Stone Diamond Products Generac Magnum Airman Haulott...

Page 174: ...to take the measurement by accessing a connector s contact on the same side as the wires the back of the connector Readings can be done while maintaining circuit continuity this way If the con nector...

Page 175: ...ds First test meter and leads by touching leads together Resistance should read a short circuit very low resistance Circuit power must be turned OFF before testing resistance Disconnect component from...

Page 176: ...Use firm contact with meter leads First test meter and leads by touching leads together Meter should produce an audible alarm indicating continuity Set up the meter for the expected current range Be s...

Page 177: ...uity of two wires here 1 and 2 at once by following steps 1 through 4 If there is a prob lem the third wire is used to troubleshoot the other wires To find the problem start at step 1 and use the enti...

Page 178: ...or installation AMP Mini Fit Jr This connector system is typically used on control mod ules at JLG Follow the general guidance for installation Mini Fit Sr This connector system is typically used on c...

Page 179: ...ows 1 To insert a contact push it straight into the appro priate circuit cavity as far as it will go See Figure 8 3 2 Pull back on the contact wire with a force of 1 or 2 lbs to be sure the retention...

Page 180: ...ition Release the locking latches by squeezing them inward See Figure 8 4 4 Slide the wedge lock into the housing until it is flush with the housing See Figure 8 5 Figure 8 3 Connector Assembly Figure...

Page 181: ...circuit testing in the field by using a flat probe such as a pocket knife DO NOT use a sharp point such as an ice pick Service Voltage Reading CAUTION DO NOT PIERCE WIRE INSULATION TO TAKE VOLTAGE RE...

Page 182: ...SECTION 8 GENERAL ELECTRICAL INFORMATION SCHEMATICS 3121788 8 9 Figure 8 7 Connector Installation G o t o D i s c o u n t E q u i p m e n t c o m t o o r d e r y o u r p a r t s...

Page 183: ...will snap into place Rectan gular wedges are not oriented They may go in either way NOTE The receptacle is shown use the same procedure for plug DT DTP Series Disassembly 5 Remove wedgelock using need...

Page 184: ...environmental sealing HD30 HDP20 Series Disassembly 4 With rear insert toward you snap appropriate size extractor tool over the wire of contact to be removed 5 Slide tool along into the insert cavity...

Page 185: ...ess if it was disconnected for step a and turn on machine 3 Hold switch away from metal and observe switch state in the control system diagnostics using the Analyzer See vehicle or control system docu...

Page 186: ...NTROL CABLE PLATFORM CONTROL COILED CABLE PLATFORM CONTROLW FTSW CABLE PLATFORM CONTROL COILED W FTSW HARNESS PLATFORM BOX HARNESS OVERHEAD PROTECTION SHEET 4 BEACON DUAL CHARGER INTERLOCK DELTA Q CHA...

Page 187: ...D ANGLE 1 WHT 68 ANGLE 1 WHT 68 ANGLE 1 WHT 70 5V ANGLE 1 WHT 70 5V ANGLE 1 WHT 73 GND ANGLE 2 WHT 73 GND ANGLE 2 WHT 69 ANGLE 2 WHT 69 ANGLE 2 WHT 71 5V ANGLE 2 WHT 71 5V ANGLE 2 1 2 2 1 3 4 5 6 7 8...

Page 188: ...H GRN CAN1 3 LOW BLK 1 27 MDI GND BLK 1 27 MDI GND BLK 1 3 TILT GND BLK 1 3 TILT GND BLK 1 41 PLT GND BLK 1 41 PLT GND YEL CAN1 2 HIGH YEL CAN1 5 HIGH GRN CAN1 5 LOW GRN CAN1 2 LOW YEL 3 3 TILT IGN YE...

Page 189: ...6 RED BATT POWER RED BATT POWER BLU E STOP BLU E STOP ORG IGNITION ORG IGNITION BLK GND BLK GND YEL CAN HIGH GRN CAN LOW YEL CAN HIGH GRN CAN LOW X61 A B C D E F G H J K L M N P WHT PWR 26 WHT PWR 26...

Page 190: ...WR YEL PWR YEL PWR WHT 43 1 TRIGGER WHT 43 1 TRIGGER WHT 43 2 TRIGGER WHT 43 2 TRIGGER BLK 1 41 PLT GND BLK 1 41 PLT GND YEL 1 5 CAN HIGH YEL 1 5 CAN HIGH GRN 1 5 CAN LOW GRN 1 5 CAN LOW WHT 90 JOY SI...

Page 191: ...W YEL 2 5 2 PLT MODE YEL 2 5 2 PLT MODE RED 2 1 TEL PWR RED 2 1 TEL PWR GRN CAN1 6 LOW YEL CAN1 6 HIGH YEL 3 5 TEL IGN BLK 11 1 TEL GND X570 1 2 3 4 5 6 BRAKE RELEASE SWITCH SW571 1 1 SW571 2 1 YEL 10...

Page 192: ...INV 1 INV 1 BLK 57 GND BLK 57 GND BLK 6AWG BLK 6AWG RED 6AWG RED 6AWG RED 6AWG RED 6AWG RED 6AWG WHT 56 INV ON WHT 56 INV ON X276 1 2 YEL 3 4 INV IGN X307 X308 X309 1 2 3 GOLD SILVER GREEN BLU BLUE GR...

Page 193: ...SECTION 8 GENERAL ELECTRICAL INFORMATION SCHEMATICS 8 20 3121788 NOTES G o t o D i s c o u n t E q u i p m e n t c o m t o o r d e r y o u r p a r t s...

Page 194: ...3121788 G o t o D i s c o u n t E q u i p m e n t c o m t o o r d e r y o u r p a r t s...

Page 195: ...ith a quote for the right part that your machine needs We sell worldwide for the brands Genie Terex JLG MultiQuip Mikasa Essick Whiteman Mayco Toro Stone Diamond Products Generac Magnum Airman Haulott...

Reviews: