SECTION 3 - CHASSIS, PLATFORM, & SCISSOR ARMS
31215079
3-43
Platform Control Station
DO NOT SWITCH PLATFORM CONTROL BOXES FROM ONE MACHINE TO
ANOTHER. IF BOXES ARE SWITCHED, THE MACHINE WILL NOT POWER
UP IN PLATFORM MODE, AND THE SYSTEM DISTRESS INDICATOR ON
THE PLATFORM CONTROL BOX WILL REMAIN LIT.
DISASSEMBLY
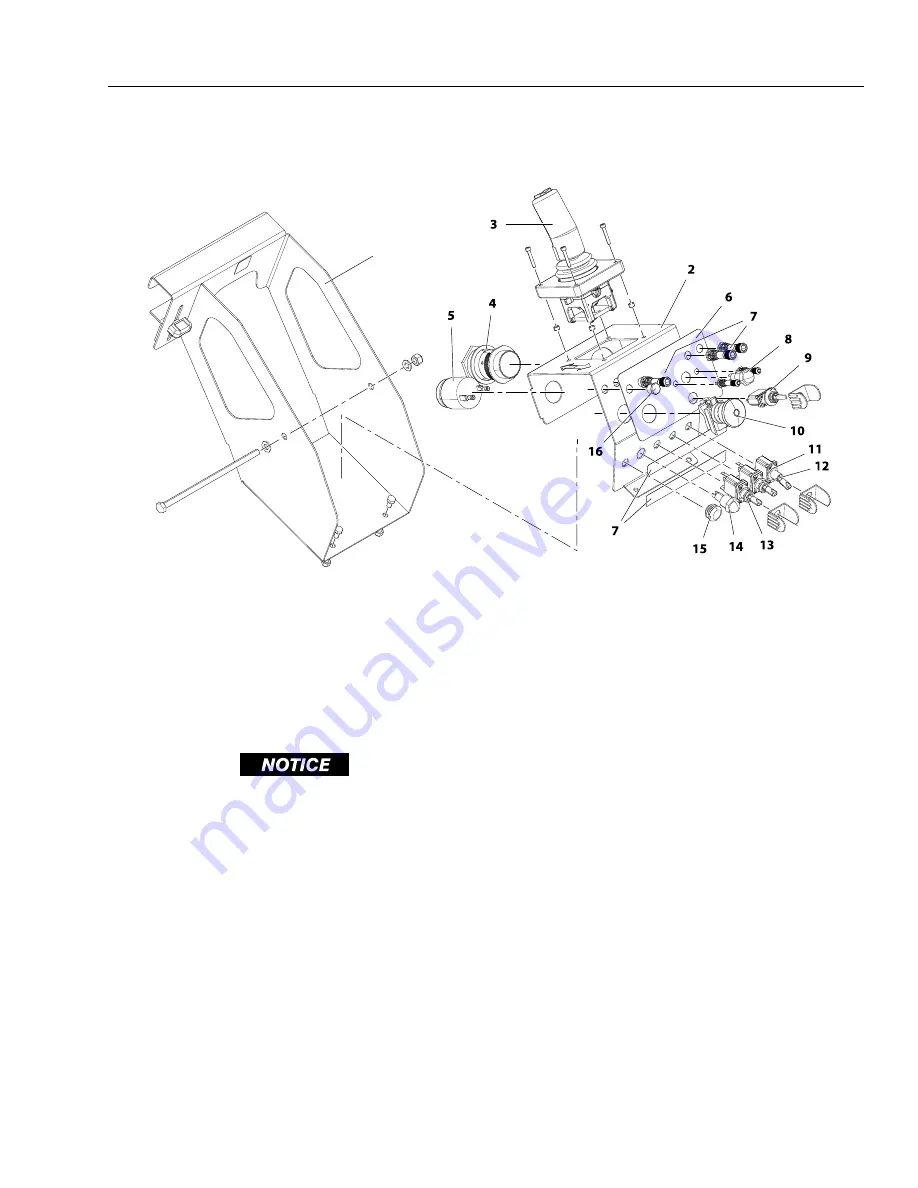
1. Disconnect the cable from the harness connector (4)
on the underside of the platform control station.
2. Remove the control box plate (2) from the mounting
bracket (1) by removing the three bolts and washers.
3. Once loaded control box plate is removed, switches,
buttons and bulbs can be removed for replacement.
4. Remove the the four screws and nuts to remove the
joystick controller (3).
5. The harness can be removed from the box by remov-
ing the harness connector terminal nut (4), and dis-
connecting all the wiring inside the control box.
ASSEMBLY
1. Follow Disassembly Procedures in reverse.
2. Ensure electrical wires are properly and securely
attached to switches, buttons and bulbs.
NOTE:
Ensure wires are not pinched when installing the
loaded control box plate back onto the mounting
bracket.
3. Reattach wiring cable to harness connector (4) on
underside of platform control station.
4. Mount control station to platform rail.
5. Operate functions with platform control console to
ensure proper operation.
1. Mounting Bracket
2. Control Box Plate
3. Joystick Controller
4. Wiring Harness Connector
5. Alarm Speaker
6. Function Decal
7. LED Indicator
8. Leveling Jack Switch/LEDS
(If Equipped)
9. Select Switch/Guard
10. Stop Switch
11. Fuel Select or Glow Plug Switch/
Guard
12. Speed Select Switch
13. Engine Start Switch
14. Horn Switch
15. Blank Plug
16. Blank Plug
Figure 3-35. Platform Control Station
1
Go
to
Discount-Equipment.com
to
order
your
parts


