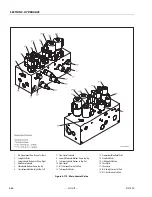
SECTION 5 - HYDRAULICS
5-66
– JLG Lift –
3121290
5.5
HYDRAULIC COMPONENT START-UP
The goal at hydrostatic system start up is to preserve the
designed life span of the system. Use the following start-up
procedure when a new pump or motor is installed or a system
is restarted after a pump or motor has been removed and rein-
stalled.
THE FOLLOWING PROCEDURE MAY REQUIRE MACHINE TO BE DISABLED
(WHEELS RAISED OFF THE GROUND, WORK FUNCTIONS DISCONNECTED, ETC.)
WHILE PERFORMING PROCEDURE. TO PREVENT INJURY. TAKE NECESSARY
SAFETY PRECAUTIONS BEFORE MOVING VEHICLE/MACHINE.
Inspect pumps or motors for damage that may have been
incurred during shipping and handling before installation.
Make sure all system components (reservoir, hoses, valves, fit-
tings, heat exchanger, etc.) are clean before filling with fluid.
Fill reservoir with recommended hydraulic fluid. This fluid
should be passed through a 10 micron (nominal, no bypass)
filter before entering reservoir. Using contaminated fluid can
damage components and may cause unexpected vehicle/
machine movement.
INSPECT ALL PUMPS OR MOTORS FOR DAMAGE AND CONTAMINATION IF ANY
PUMP OR MOTOR IS REPLACED DUE TO INTERNAL DAMAGE. FLUSH AND
REPLACE ALL HYDRAULIC SYSTEM FLUID OR DAMAGE TO ENTIRE SYSTEM MAY
RESULT.
Inlet line from reservoir to pump must be filled prior to start-
up. Check inlet line for properly tightened fittings, restrictions,
and air leaks.
NOTE:
Reservoir is usually above pump inlet. Pressure head cre-
ated by higher oil level helps keep inlet pressures within
acceptable range and prevent high vacuum levels. How-
ever, air may be trapped due to hose routing or low reser-
voir locations. Bleed air by loosening hose at fitting closest
to pump. When oil begins to flow, line is full and air has
been purged. Tighten fitting to specified torque. If tank
needs to be pressurized to start oil flow, take a vacuum
reading at pump inlet during operation to verify pump is
not trying to draw an inlet vacuum higher than its capabil-
ity.
Fill pump and motor housing with clean hydraulic fluid before
start up. Fill housing by pouring filtered oil in upper case drain
port.
NOTE:
Use highest possible case drain port. This ensures housing con-
tains as much oil as possible and offers the greatest amount of
lubrication to internal components.
NOTE:
It may be easier to fill housing before installing the case drain
line. Component (especially motor) location may prevent case
drain port access after installation.
NOTE:
Oil used to fill component housing must be clean. Store fill
container properly to prevent contamination.
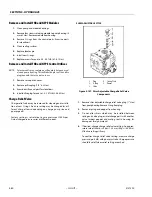
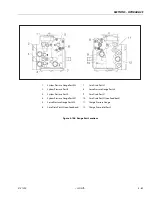
Install 1000 psi (60 bar) pressure gauge in charge pressure
gauge port to monitor charge pressure during start-up.
It is recommended external control input signal, (electrical
connections for EDC), be disconnected at pump control until
after initial start-up. This ensures pump remains in its neutral
position.
DO NOT START ENGINE UNLESS PUMP IS IN NEUTRAL POSITION (0° SWASH-
PLATE ANGLE). TAKE PRECAUTIONS TO PREVENT MACHINE MOVEMENT IN
CASE PUMP IS ACTUATED DURING INITIAL START-UP.
”Jog” or slowly rotate engine until charge pressure starts to
rise. Start engine and run at lowest possible RPM until charge
pressure is established. Excess air should be bled from system
lines as close to motors as possible.
NOTE:
With engine on low idle loosen, do not remove, system lines
at motor(s). Continue to run engine at low idle and tighten
system lines as soon as oil is observed to leak from them.
When oil is observed to ”leak” at motor, line is full and air is
purged. Tighten system hoses to specified torque.
Once charge pressure is established, increase speed to normal
operating RPM. Charge pressure should be as indicated in the
pump model code. If charge pressure is inadequate, shut
down and determine cause.
INADEQUATE CHARGE PRESSURE WILL AFFECT OPERATOR'S ABILITY TO CON-
TROL MACHINE.
Shut down engine and connect external control input signal.
Reconnect machine function(s), if disconnected earlier. Start
engine, checking pump remains in neutral. With engine at nor-
mal operating RPM, slowly check forward and reverse machine
operation.
Charge pressure may slightly decrease during forward or
reverse operation. Continue to cycle slowly between forward
and reverse for at least five minutes.
Shut down engine, remove gauges, and plug ports. Check res-
ervoir level and add filtered fluid if needed.
Machine is ready for operation.
Summary of Contents for 450A II Series
Page 46: ...SECTION 3 CHASSIS TURNTABLE 3 6 JLG Lift 3121290 Figure 3 4 Drive Hub 4WD Front Only ...
Page 79: ...SECTION 3 CHASSIS TURNTABLE 3121290 JLG Lift 3 39 Figure 3 32 Swing Bearing Drive ...
Page 101: ...SECTION 3 CHASSIS TURNTABLE 3121290 JLG Lift 3 61 Figure 3 42 Auxiliary Pump ...
Page 113: ...SECTION 3 CHASSIS TURNTABLE 3121290 JLG Lift 3 73 Figure 3 53 EMR2 Fault Codes Sheet 1 of 5 ...
Page 114: ...SECTION 3 CHASSIS TURNTABLE 3 74 JLG Lift 3121290 Figure 3 54 EMR2 Fault Codes Sheet 2 of 5 ...
Page 115: ...SECTION 3 CHASSIS TURNTABLE 3121290 JLG Lift 3 75 Figure 3 55 EMR2 Fault Codes Sheet 3 of 5 ...
Page 116: ...SECTION 3 CHASSIS TURNTABLE 3 76 JLG Lift 3121290 Figure 3 56 EMR2 Fault Codes Sheet 4 of 5 ...
Page 117: ...SECTION 3 CHASSIS TURNTABLE 3121290 JLG Lift 3 77 Figure 3 57 EMR2 Fault Codes Sheet 5 of 5 ...
Page 159: ...SECTION 3 CHASSIS TURNTABLE 3121290 JLG Lift 3 119 ...
Page 161: ...SECTION 3 CHASSIS TURNTABLE 3121290 JLG Lift 3 121 ...
Page 163: ...SECTION 3 CHASSIS TURNTABLE 3121290 JLG Lift 3 123 ...
Page 165: ...SECTION 3 CHASSIS TURNTABLE 3121290 JLG Lift 3 125 ...
Page 173: ...SECTION 3 CHASSIS TURNTABLE 3121290 JLG Lift 3 133 Sensor Transducer Type ...
Page 177: ...SECTION 3 CHASSIS TURNTABLE 3121290 JLG Lift 3 137 Sensor Transducer Type ...
Page 179: ...SECTION 3 CHASSIS TURNTABLE 3121290 JLG Lift 3 139 ...
Page 181: ...SECTION 3 CHASSIS TURNTABLE 3121290 JLG Lift 3 141 ...
Page 183: ...SECTION 3 CHASSIS TURNTABLE 3121290 JLG Lift 3 143 ...
Page 185: ...SECTION 3 CHASSIS TURNTABLE 3121290 JLG Lift 3 145 ...
Page 187: ...SECTION 3 CHASSIS TURNTABLE 3121290 JLG Lift 3 147 ...
Page 203: ...SECTION 3 CHASSIS TURNTABLE 3121290 JLG Lift 3 163 ...
Page 207: ...SECTION 3 CHASSIS TURNTABLE 3121290 JLG Lift 3 167 ...
Page 217: ...SECTION 4 BOOM PLATFORM 3121290 JLG Lift 4 5 Figure 4 2 Boom Limit Switches ...
Page 310: ...SECTION 5 HYDRAULICS 5 70 JLG Lift 3121290 NOTES ...
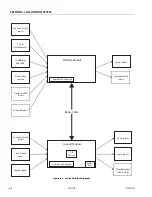
Page 312: ...SECTION 6 JLG CONTROL SYSTEM 6 2 JLG Lift 3121290 Figure 6 2 Controller Block Diagram 0 ...
Page 370: ...SECTION 6 JLG CONTROL SYSTEM 6 60 JLG Lift 3121290 NOTES ...
Page 394: ...SECTION 7 BASIC ELECTRICAL INFORMATION SCHEMATICS 7 24 JLG Lift 3121290 NOTES ...
Page 395: ......

