background image

Exploded view 

Summary of Contents for CT100

Page 1: ... ER R OWNER S MANUAL IMPORTANT Please read all instructions carefully before using this product Retain this manual for future reference The specifications of this product may vary slightly from the illustrations and are subject to change without notice ...

Page 2: ...y We advise that you inspect your machine periodically to ensure it is in good condition It is your responsibility to ensure that all users of the equipment understand how to use the fitness equipment properly 5 Keep children and pets away from the equipment The equipment is designed for adult use only 6 Before using the machine please check the nuts and bolts are tightened securely 7 Always use t...

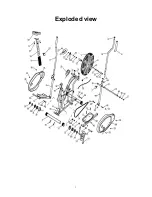
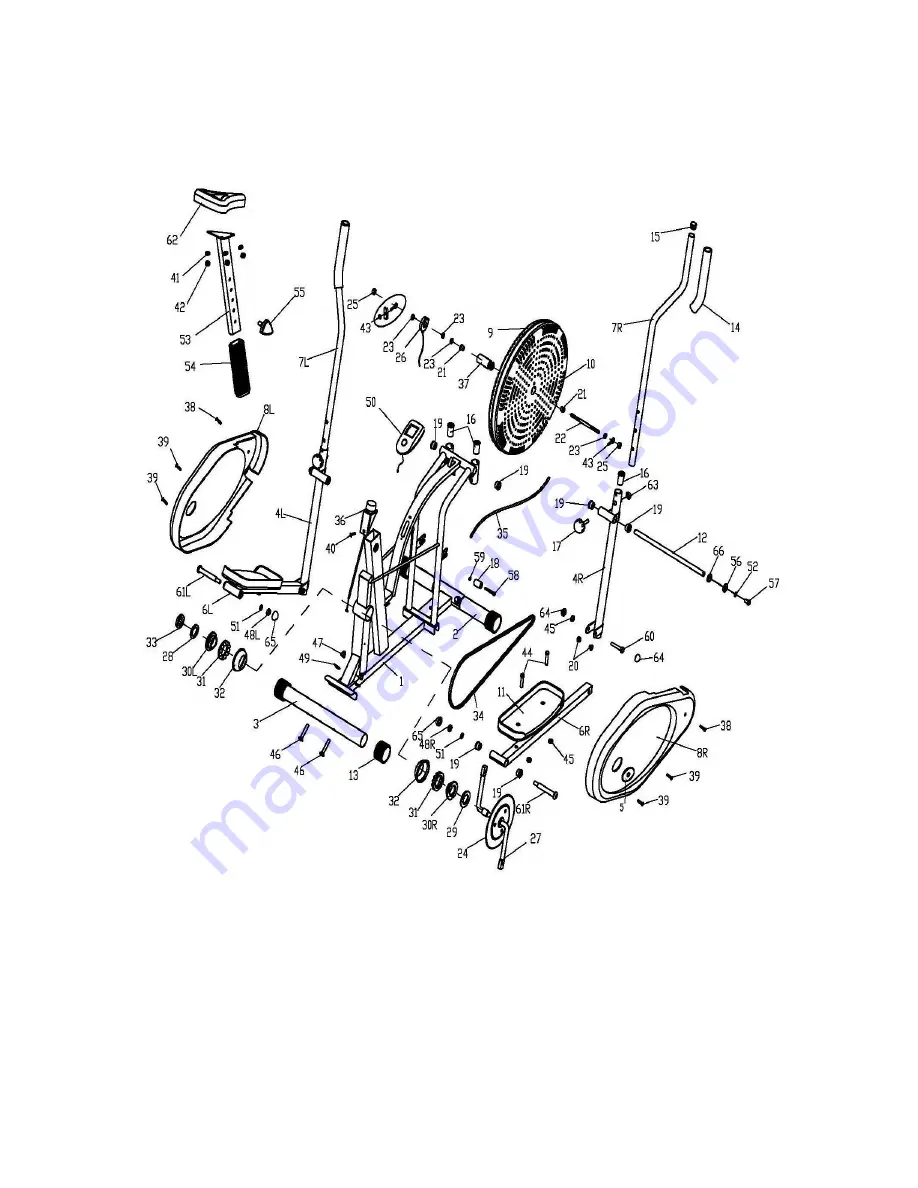
Page 3: ...3 Exploded view ...

Page 4: ...4 14 Foam Grip 2 47 Acorn Nut 4 15 End Cap 6 48 Nylon Nut L R 2 16 Plastic Bushing 4 49 Arc Washer 4 17 Handlebar Bolt 2 50 Monitor 1 18 Plastic Roller 2 51 Spring Washer 2 19 Steal Bushing 10 52 Spring Washer 2 20 Small Steal Bushing 4 53 Saddle Post 1 21 Brass Bushing 2 54 Saddle Bar Cover 1 22 Fan Wheel Axle 1 55 Saddle Post Bolt 1 23 Nut 4 56 D Shape Washer 2 24 Crankshaft 1 57 Inner Hexagon B...

Page 5: ...e Inner Hexagon Screw 57 spring washer 52 D shape washer 56 and Flat Washer 66 Then tighten the Pedal support to the Mainframe with Pedal hinge bolt 61 L R spring washer 51 and Nylon Nut 48 Lastly cover the Pedal Support with the Plastic Caps 64 65 Note The left bolt will thread on in an anti clockwise direction The right bolt will thread in a clockwise direction HINT There is a left and right bol...

Page 6: ...n Bolt 44 and a Nylon Nut 45 Note Do not over tighten the bolts STEP 4 Insert the Handlebar 7L R to the Coupler bar 4 L R and tighten with Handlebar bolt 17 then cover the Handlebar with a Plastic Cap 63 You can adjust the height of the Handlebar using the different holes ...

Page 7: ...ith a Nylon Nut 42 and Flat Washer 41 Then slide the Saddle Bar cover 54 on to the post STEP 6 Insert the Saddle post 53 into the stem coming from the Mainframe 1 adjust the height accordingly and then tighten the Saddle Post Bolt to secure the position 55 ...

Page 8: ...tor will automatically skip through the settings so you do not need to keep pressing the button whilst you are working out By pressing MODE this will release the monitor from the scan mode You are then able to select the mode you wish to view whilst working out The modes are in the following order Distance Speed and then Time Calories STEP 8 To increase the resistance turn the tension control towa...

Page 9: ...trenuous exercise by heating up and stretching your muscles increasing your circulation and pulse rate and delivering more oxygen to your muscles COOL DOWN at the end of your workout repeat these exercises to reduce soreness in tired muscles Inner Thigh Stretch Sit with the soles of your feet together with your knees pointing outward Pull your feet as close into your groin as possible Gently push ...

Page 10: ...hen bend the left leg and lean forward by moving your hips toward the wall Hold then repeat on the other side for 15 counts Toe Touch Slowly bend forward from your waist letting your back and shoulders relax as you stretch toward your toes Reach down as far as you can and hold for 15 counts Side Stretch Open your arms to the side and continue lifting them until they are over your head Reach your r...

Reviews: