background image

english

16

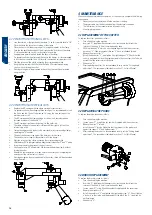
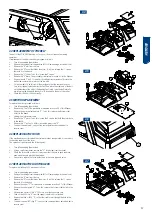
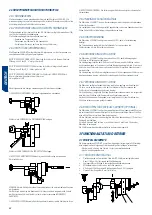
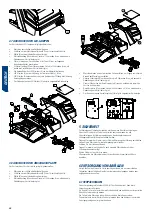
3.2.2 encrYPtion oF Frontal KeYs

• 

lock the rotation of the right-hand side clamp. to do this, operate handle “16”.

• 

Place the key in the throat cross-section of the clamp.

• 

Place the key so that the asymmetric bit is facing downwards of the clamp.

• 

Push the key until the back part of the bit reaches the front face of the clamp.

• 

it is important that the key bit is as horizontal as possible.

• 

Keeping these details in mind, fasten the keys in the clamps.

• 

For greater comfort when fastening the keys in the clamps, it is recommended 

to lock the X axis and the Y axis (in this way, the machine carriage stays still).

• 

start the rotation of the cutter, activating the corresponding switch.

• 

bring the keys towards the cutter and the Probe. we recommend working 

slowly, without forcing the cutter.

• 

if during cutting, burrs are produced in the cut key, these will be eliminated 

using the brush.

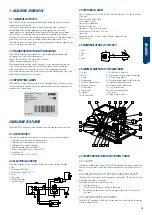
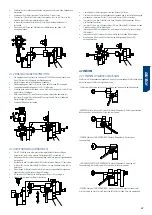
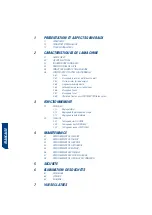
3.2.3 encrYPtion oF Vertical cuts

• 

replace the bit carriage with the clamp carriage for vertical cuts. 

• 

For greater comfort when changing these carriages, it is recommended to lock 

the X axis and the Y axis of the machine. this way, the main carriage of the 

machine remains still.

• 

the bit carriage and the clamp carriage for vertical cuts are released and 

fastened by means of the handle “13”.

• 

the bit carriage is pulled out by pulling it to the right side.

• 

the clamp carriage for vertical cuts is introduced from right to left, until an 

internal stop is felt.

• 

Fasten the virgin key and the key to be encrypted in its corresponding clamps, 

operating the “s” handles.

• 

the bit of the key must stop against the lower part of the clamp.

• 

the key bit must rest against the vertical wall of the clamp.

• 

start the rotation of the cutter, activating the corresponding switch.

• 

with the lever “w” in its highest position, bring the keys to the cutter “c” and “t” probe.

• 

insert the probe into the groove of the key to be cut.

• 

gently move lever “w” downwards. we recommend working slowly, without 

forcing the cutter.

• 

repeat this same operation, as many times as necessary until completing the 

encryption of the vertical cuts of the key.

• 

if during encryption, burrs are produced in the cut key, these will be eliminated 

using the brush.

4 MAINTENANCE

when executing any maintenance operation, it is necessary to complete the following 

requirements:

• 

never carry out any operation while the machine is running.

• 

the power cable must be disconnected from the electrical connection.

• 

the instructions in this manual must be followed strictly.

• 

use original spare parts.

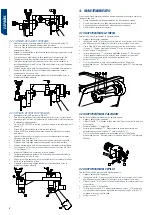
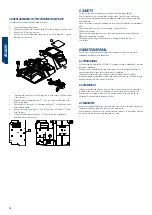
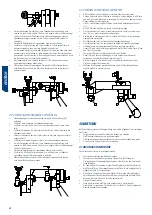
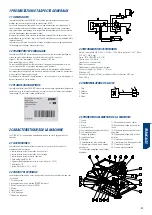
4.1 REPLACEMENT Of THE CUTTER

to replace the cutter, proceed as follows:

• 

turn off and unplug the machine.

• 

insert rod “a” supplied with the accessories into the hole that blocks the 

rotation of the head. to find it, turn the head by hand.

• 

with the fixed key “b” which is also supplied together with the accessories, 

loosen nut “e”. take into account that nut “e” has a left-handed thread.

• 

remove the worn cutter “c”.

• 

install the new cutter “c”, and tighten it by tightening nut “e”. check that the 

cutter is mounted with its cutting teeth pointed in the correct position. take into 

account that the cutter rotates clockwise.

• 

remove rod “a”.

• 

after replacing the cutter, it is recommended to carry out the “cutting depth 

adjustment”. this procedure is indicated in section 3.1.2 of this Manual.

A

B

C

E

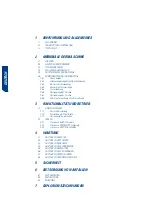
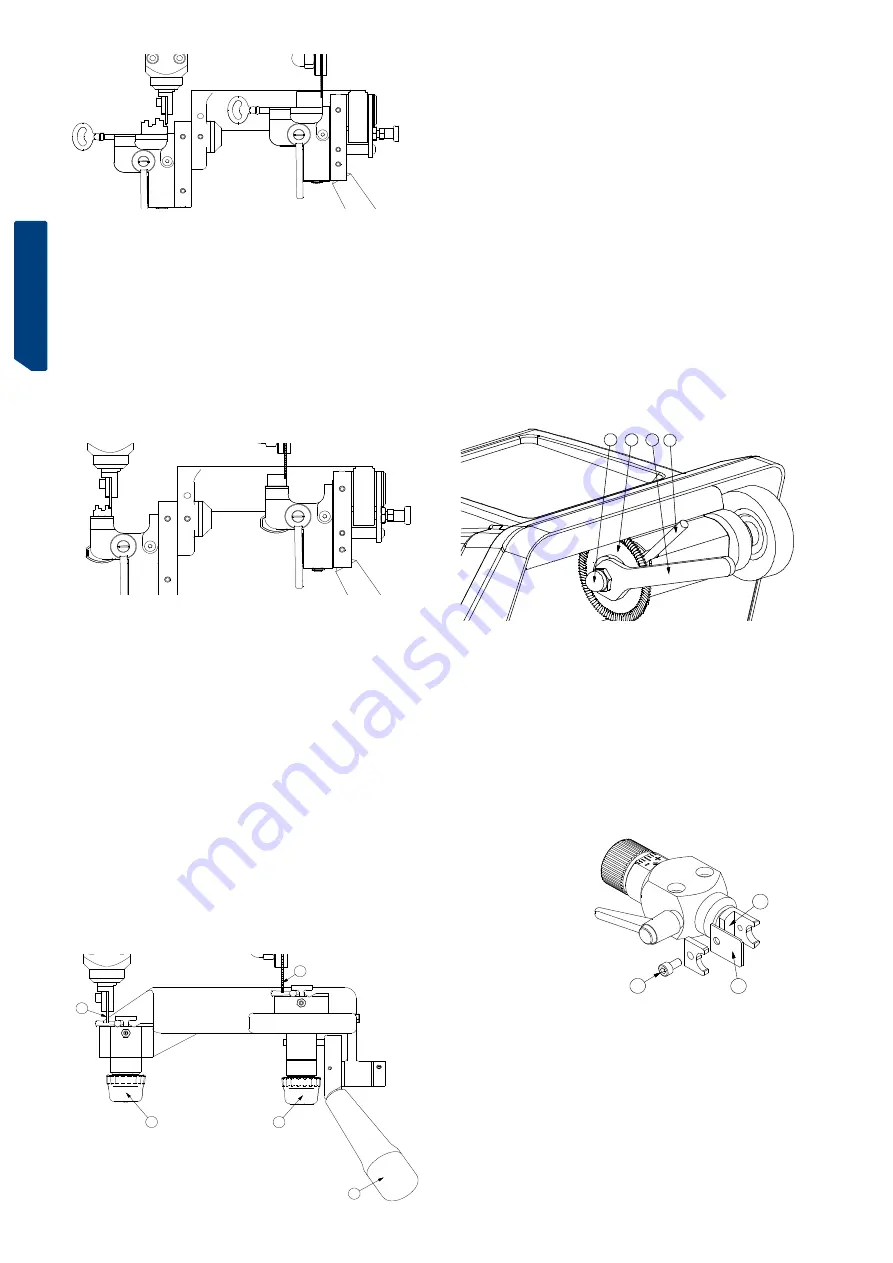
4.2 REPLACING THE PROBE

to replace the probe, proceed as follows:

• 

turn off and unplug the machine.

• 

loosen screw “F”, using allen key number 4 supplied with the accessories.

• 

remove the worn “t” probe.

• 

install the new “t” probe. Make sure that the rear part of the probe rests 

against the support “g”, and tighten screw “F”.

• 

after replacing the probe, it is recommended to carry out the “cutting depth 

adjustment”. this procedure is indicated in section 3.1.2 of this Manual.

G

T

F

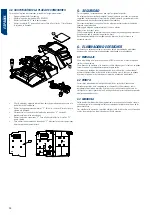
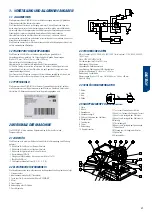
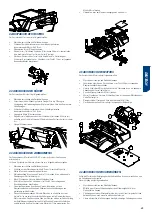
4.3 BRUSH REPLACEMENT

to replace the brush, proceed as follows:

• 

turn off and unplug the machine.

• 

insert rod “a” supplied with the accessories into the hole that blocks the 

rotation of the head. to find it, turn the head by hand.

• 

loosen screw “h”, using allen key number 4 supplied with the accessories.

• 

remove the worn brush “J”.

• 

install the new brush “J” and tighten it by tightening screw “h”. do not tighten 

it too hard, so that in the next replacement of the brush, the “h” screw can be 

easily released.

• 

remove rod “a”.

S

S

W

T

C

Summary of Contents for VOLGA BIT

Page 1: ...PLICADORA Manual de instrucciones KEY CUTTING MACHINE MUSER MANUAL Schl sselkopierfr se Anweisungshandbuch MACHINEAREPRODUIRE MANUEL D INSTRUCTIONS M QUINADUPLICADORA Manual de instru es maszyna do ko...

Page 2: ......

Page 3: ...Espa ol VOLGA BIT MANUAL DE INSTRUCCIONES M QUINA DUPLICADORA...

Page 4: ...eo del eje X 2 6 7 Bloqueo del eje Y 2 6 8 Carro REGATA opcional 3 OPERATIVIDAD Y FUNCIONAMIENTO 3 1 REGLAJES 3 1 1 Reglaje lateral 3 1 2 Reglaje de profundidad de corte 3 1 3 Reglaje del Tope Lateral...

Page 5: ...les del circuito el ctrico y electr nico son los siguientes 1 Toma de corriente 2 Interruptor puesta en marcha ROJO luminoso 3 Pulsador para el cepillo NEGRO 4 Motor 5 Transformador 6 Diodos LED de il...

Page 6: ...Basta con llevar el carro de la m quina hasta su posici n m s extrema en direcci n hacia el usuario para que notemos como el carro queda bloqueado por medio de un peque o resorte Para desbloquear el...

Page 7: ...oquear el eje X del carro actuando sobre la maneta 14 N2 C2 Q T R 3 2 CIFRADO 3 2 1 Cifrado de llaves tipo GORJA Amarrar la llave en la mordaza Dependiendo del tipo de llave que queramos duplicar el t...

Page 8: ...lave duplicada stas se eliminar n utilizando el cepillo 4 MANTENIMIENTO A la hora de ejecutar cualquier operaci n de mantenimiento es necesario cumplir los siguientes requisitos Nunca se debe efectuar...

Page 9: ...tor Z Para ello soltar los 4 tornillos que sujetan la base del motor a la bancada Extraer la polea Y Para ello soltar el tornillo prisionero X Para montar el nuevo motor efectuar las mismas operacione...

Page 10: ...gafas de protecci n aunque la m quina ya disponga de protecciones Aseg rese de que la m quina tenga toma a tierra Recomendamos trabajar con la m quina a una altura en la cu l el usuario se encuentre...

Page 11: ...english VOLGA BIT USER manual KEY CUTTING MACHINE...

Page 12: ...the X axis 2 6 7 Y axis locking 2 6 8 Clamp carriage for vertical cuts optional 3 OPERATION AND FUNCTION 3 1 ADJUSTMENTS 3 1 1 Side adjustment 3 1 2 Cutting depth adjustmen 3 1 3 Lateral Stop Adjustm...

Page 13: ...terpoints for special male keys 2 Rods to make the adjustment 5x70 1 Rod for the change of cutter or brush 7x70 1 Fixed key of 18 1 Set of Allen keys 2 2 5 3 4 5 6 2 2 ELECTRICAL CIRCUIT The main comp...

Page 14: ...lso facilitates the operation of fastening releasing the keys from its clamps by preventing the carriage from sliding to the sides 2 6 7 Y axis locking The machine also has a slight lock at the end of...

Page 15: ...he right side of the Lateral Stop N2 In this position of the internal bushing C2 lock it by means of the Q screw Now you can unlock the X axis of the carriage operating the handle 14 N2 C2 Q T R 3 2 E...

Page 16: ...eting the encryption of the vertical cuts of the key If during encryption burrs are produced in the cut key these will be eliminated using the brush 4 MAINTENANCE When executing any maintenance operat...

Page 17: ...the Z motor To do this loosen the 4 screws that hold the motor base to the bench Remove the Y pulley To do this loosen the grub screw X To mount the new motor carry out the same operations described...

Page 18: ...s Work with dry hands Always use protective glasses even if the machine already has protective panels Make sure the machine is earthed We recommend working with the machine at a height at which the us...

Page 19: ...deutsch VOLGA BIT Anweisungshandbuch KOPIERMASCHINE...

Page 20: ...der Y Achse 2 6 8 Schlitten f r vertikale Schnitte optional 3 FUNKTIONALIT T UND BETRIEB 3 1 EINSTELLELEMENTE 3 1 1 Seitliche Einstellung 3 1 2 Einstellung der Schnitttiefe 3 1 3 Seitenanschlag einst...

Page 21: ...erstellungsjahr angegeben sind 2 MERKMALE DER MASCHINE Die VOLGA BIT ist eine moderne Kopiermaschine f r Bartschl ssel und Pumpenschl ssel 2 1 ZUBEH R Die Maschine wird mit einer Reihe von Zubeh r f r...

Page 22: ...sterfederung bet tigt Die Tasterfederung erm glicht das Einf hren des Tasters zwischen die Schl sselz hne um die Fr se f hren zu k nnen 2 6 6 Verriegelung der X Achse Die Maschine VOLGA BIT verf gt be...

Page 23: ...n um den Seitenanschlag N1 zu befestigen Einen langen Schl ssel ohne Dornloch in die rechte Spannbacke einspannen sodass der Bart am Seitenanschlag N1 anliegt X Achse des Schlittens durch Bet tigung d...

Page 24: ...htern wird empfohlen die X Achse und die Y Achse der Maschine zu verriegeln Auf diese Weise bewegt sich der Hauptschlitten der Maschine nicht Die Ver und Entriegelung der Schlitten erfolgt durch Bet t...

Page 25: ...Schrauben l sen B rste J ausbauen Das Verfahren ist im Punkt 4 3 des vorliegenden Benutzerhandbuchs beschrieben Den alten Zahnriemen I ausbauen Um den Zahnriemen aus den Riemenscheiben herauszunehmen...

Page 26: ...ckung am Gestell befestigt ist Die drei Stecker von der Anschlussplatte V trennen nachdem die jeweilige Position notiert wurde Anschlussplatte V ausbauen Dazu die 4 Schrauben L2 l sen mit denen die Ab...

Page 27: ...Klassifizierung nach den geltenden Gesetzen in der EU zu sortieren und an die speziellen Entsorgungsanlagen zu bringen 6 3 MASCHINE Vor der Zerst rung der Maschine ist sie au er Betrieb zu setzen ind...

Page 28: ...deutsch 28...

Page 29: ...francaise VOLGA BIT MANUEL D INSTRUCTIONS MACHINE A REPRODUIRE...

Page 30: ...de l axe X 2 6 7 Blocage de l axe Y 2 6 8 Chariot de fixation pour COUPE VERTICALE en option 3 FONCTIONNEMENT 3 1 REGLAGES 3 1 1 R glage lat ral 3 1 2 R glage de la profondeur de coupe 3 1 3 R glage...

Page 31: ...fabrication 2 CARACTERISTIQUES DE LA MACHINE La VOLGA BIT est une machine moderne duplicatrice de cl s gorge et de cl s frontales 2 1 ACCESSOIRES La machine est fournie avec divers accessoires con us...

Page 32: ...ner le ressort du palpeur L actionnement du ressort du palpeur permet de faciliter l insertion du palpeur entre les dents de la cl pour ensuite guider la cl vers la fraise 2 6 6 Blocage de l axe X La...

Page 33: ...1 sur le culot interne C1 Une fois sur cette position fixez la but e lat rale N1 en serrant la vis R Fixez une cl de type m le longue dans l tau c t droit en faisant buter le panneton contre la but e...

Page 34: ...loquer l axe X et l axe Y de la machine Cela permet de maintenir immobile le chariot principal de la machine Pour rel cher ou fixer le chariot BIT ou COUPE VERTICALE utilisez la manette 13 Pour retire...

Page 35: ...re reportez vous la section 4 3 de ce manuel Retirez la courroie usag e I Pour retirer la courroie des poulies faites tourner la courroie avec la main tout en for ant le bord Installez la courroie neu...

Page 36: ...capot au b ti K N Faites pivoter la machine et appuyez la sur le c t droit afin de pouvoir acc der la partie inf rieure de la machine Retirez la plaque de protection inf rieure P Pour ce faire d viss...

Page 37: ...s au rebut dans les installations normales d limination de d chets 6 2 COPEAUX Les r sidus issus de la duplication de cl s sont class s comme tant des d chets sp ciaux et sont par cons quent consid r...

Page 38: ...francaise 38...

Page 39: ...portuguese VOLGA BIT Manual de instru es M QUINA DUPLICADORA...

Page 40: ...7 Bloqueio do eixo Y 2 6 8 Carro de fixa o para cortes verticais opcional 3 OPERACIONALIDADE E FUNCIONAMENTO 3 1 REGULA OS 3 1 1 Regula o lateral 3 1 2 Regula o de profundidade de corte 3 1 3 Regula...

Page 41: ...ra 570 mm Profundidade 570 mm Altura 380 mm Peso incluindo a embalagem 28 Kg Quando retirar a m quina da embalagem inspecione a cuidadosamente para ver se sofreu danos durante o transporte Caso encont...

Page 42: ...a chave em dire o fresa 2 6 6 Bloqueio do eixo X A m quina VOLGA BIT disp e da maneta 14 que bloqueia desbloqueia o movimento do carro na dire o X A fun o de bloqueio do eixo X til quando queremos que...

Page 43: ...ar a chave da morda a do lado direito e fix la na morda a do lado esquerdo de tal maneira que o palpador T entre na ranhura que j fizemos na chave Nesta posi o da chave apoiar o lateral esquerdo do Ba...

Page 44: ...S O palhet o da chave deve bater contra a parte inferior da morda a O palhet o da chave deve apoiar contra a parede vertical da morda a Iniciar a rota o da fresa acionando o respetivo interruptor Com...

Page 45: ...J I O 4 5 SUBSTITUI O DO MOTOR Para substituir o motor proceder da seguinte forma Desligar a m quina e tirar a ficha da tomada el trica Retirar a correia I O procedimento est indicado no ponto 4 4 de...

Page 46: ...m as m os secas Utilize sempre culos de prote o mesmo que a m quina tenha prote es Verifique se a m quina tem liga o terra Recomendamos trabalhar com a m quina a uma altura em que o operador se sinta...

Page 47: ...portuguese 47...

Page 48: ...portuguese 48...

Page 49: ...POLISH VOLGA BIT PODR CZNIK U YTKOWNIKA maszyna do kopiowania...

Page 50: ...ta 2 6 6 Blokada osi X 2 6 7 Blokada osi Y 2 6 8 W zek dla kluczy NACINANYCH PIONOWO opcjonalny 3 STEROWANIE I OBS UGA 3 1 REGULACJA 3 1 1 Regulacja boczna 3 1 2 Regulacja g boko ci ci cia 3 1 3 Regul...

Page 51: ...jne urz dzenia nazwa i adres producenta oznakowanie CE oraz rok produkcji 2 W A CIWO CI URZ DZENIA VOLGA BIT to nowoczesne urz dzenie do kopiowania kluczy zasuwowych i nacinanych czo owo 2 1 AKCESORIA...

Page 52: ...nie blokowa a mocowania kluczy o jakiejkolwiek d ugo ci 2 6 5 Spr ynowanie pilota Urz dzenie VOLGA BIT posiada d wigni oznaczon numerem 15 kt ra uruchamia spr ynowanie pilota Spr ynowanie pilota u at...

Page 53: ...nale y przeprowadzi w nast puj cy spos b Oprze prawy bok ogranicznika bocznego oznaczonego symbolem N1 o wewn trzn tulej oznaczon symbolem C1 W tym po o eniu docisn rub oznaczon liter R w celu stabil...

Page 54: ...iowania mo na je usun za pomoc szczotki 3 2 3 Kopiowanie ci PIONOWYCH Wymieni w zek BIT na w zek do kluczy nacinanych pionowo Dla wi kszej wygody podczas wymiany w zk w zalecamy blokad osi X i Y urz d...

Page 55: ...H Nie nale y dociska ruby H zbyt mocno aby mo na j by o wzgl dnie atwo poluzowa przy okazji kolejnej wymiany szczotki Usun dr ek A A J H 4 4 WYMIANA PASA Urz dzenie VOLGA BIT jest wyposa one w pas ela...

Page 56: ...ka Usun os on frezu D W tym celu poluzowa 3 ruby mocuj ce go do podstawy Odkr ci 2 kable ta my diod LED oznaczonej numerem 9 z listwy przy czeniowej Oderwa ta m diod LED oznaczon numerem 9 od podstawy...

Page 57: ...a porzucone 6 1 OPAKOWANIE Urz dzenie VOLGA BIT dostarczane jest w opakowaniu kartonowym przeznaczonym do recyklingu Opakowanie por wnywane jest do sta ych odpad w komunalnych dlatego nale y je wyrzuc...

Page 58: ...I 107 TI 107 DX 140 NT 34 DX 142 DX 122 NT 54 DX 123 DX 123 TI 118 NT 58 DX 140 NT 35 DK 200 TI 114 NT 17 NT 16 TI 114 DX 139 NT 33 TI 107 NT 47 EC 215 EC 215 NT 32 DX 140 DX 140 DX 139 NT 47 TI 107 N...

Page 59: ...K 207 EC 255 PR 136 EC 77 NT 37 NT 56 EC 14 TI 118 NT 54 DX 123 EC 193 EC 195 DK 207 EC 255 PR 143 EC 198 DX 118 EC 196 EC 197 PR 143 EC 198 NT 48 DK 197 DK 207 DK 198 EC 206 EC 207 ECO 607 EC 207 NT...

Page 60: ...44 FP 19 TI 73 TI 72 DX 87 DX 89 DX 140 DX 88 DX 87 NT 25 DK 200 TIN 45 C 3 DX 98 TIN 43 NT 6 EC 191 NT 72 AVN 202 EC 90 DK 193 NT 19 NT 52 GOR 515 CP 101 DX 118 PR 295 NT 61 DK 207 PR 144 PR 301 NT...

Page 61: ...cos www jma ma jma jma ma JMA MEXICO LLAVES ALTUNA DE MEXICO S A de C V Tel 52 33 3777 1600 Fax 52 33 3777 1609 Av Aviaci n No 5520 Col San Juan de Ocot n C P 45019 Zapopan Jalisco www jma com mx vent...

Reviews: