background image

NT–2000 REF Manual 

Typical NAVTEX Message Screen 


1-1

1.  Typical NAVTEX Message Screen 


1 . 1 .   I n t ro du c ti o n  

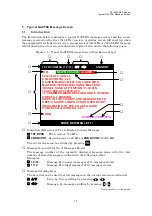
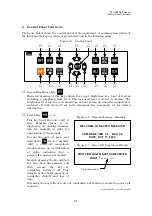
The illustration below represents a typical NAVTEX message screen, showing a new 

message received on the first (518 kHz) receiver. A similar screen will show up when 

the equipment is switched to receive a second receiver (490 kHz or 4209.5 kHz) message. 

A brief description of on–screen indications is given below and in the following pages. 


Figure 1-1    Typical NAVTEX Message Screen (First Receiver Page) 


  Indication of Receiver in Use to Display Current Messages 


1ST RCVR

:    First receiver, 518 kHz 


2ND RCVR 1

: Second receiver, 490 kHz or 

2ND RCVR 2

:

4209.5 kHz 


The two receivers can be switched by pressing 

   Message No. and Total No. of Messages Stored 


The message number of the currently displayed message along with the total 

number of stored messages is indicated in the following format: 

 Examples: 


1 2 / 12

Message #12 (newest message) of 12 messages stored 


1 / 1 2

Message #1 (oldest message) of 12 messages stored 


  Message Scrolling Keys 


The keys that can be used to scroll messages on the current screen are indicated. 




Line–by–line scrolling by pressing

/




Message–by–message scrolling by pressing

/


(

continued on next page

1ST RCVR MSG (1 2 / 1 2 ) 







STANDBY 

I D 2 1


I

NEW MESSAGE

I

I

ALARM

!

II


091230 UTC AUG 05 
COLLISION NO, 223 
KAISHIN MARU/JL5989 COLLIDED WITH 
MALTESE VESSEL WEI HANG. MALTESE 
VESSEL SANK AT POSITION 35-32.03N 
140-47.08E AT 212010 UTC. 
16 CREWMEN WERE RESCUED AND 5 OTHERS 
ARE STILL MISSING. 
SHIPS IN THE VICINITY ARE REQUESTED TO 
KEEP A SHARP LOOKOUT AND REPORT ANY 
INFORMATION TO THE COAST GUARD. 
CANCEL COLLISION NO. 221. 


NNNN 

STORED (CER= 00%)

MORE NEW MSG LEFT !


Summary of Contents for DEBEG 2902

Page 1: ...ation Installation for MODEL NT 2000 DEBEG 2902 Dual Channel NAVTEX Receiver Receiver Unit PROTECTED EQUIPMENT UNDER IEC 60945 2002 Antenna Unit EXPOSED EQUIPMENT UNDER IEC 60945 2002 Valid for Softwa...

Page 2: ...thout our prior permission in writing Alterations resulting from technical progress are reserved WARRANTY The warranty terms and conditions for the DEBEG 2902 are given in a separate sheet attached to...

Page 3: ...receiver antenna User supplied software or interfacing Operation outside the environmental specifications listed in the manual or Improper installation The above warranty applies to the original user...

Page 4: ...Y THE MANUFACTURER S OR DEALER S WARRANTY 3 INSTALLATION OPERATING PROCEDURES ANY DAMAGE CAUSED BY INSTALLING OR OPERATING THE EQUIPMENT OUTSIDE THE SPECIFICATIONS DESCRIBED IN THIS MANUAL IS NOT COVE...

Page 5: ...LR TO ACKNLG The oldest message will then be erased from memory automatically after reception of a next new message As soon as you notice the above warning be sure to acknowledge each unread message b...

Page 6: ...ng Protection Tag 3 6 4 Customizing Operation via Menu System 4 1 4 1 Introduction 4 1 4 2 Accessing the Menu System 4 1 4 3 Selecting Screen Background Colors 4 2 4 4 Selecting Message Font Types 4 2...

Page 7: ...ating Self Diagnostic Function 4 25 4 12 3 Checking Test Results 4 26 4 13 Turning on off Message Alarms 4 27 4 14 Resetting the System 4 28 5 User Level Troubleshooting 5 1 5 1 Power Up Problems 5 1...

Page 8: ...ormat 7 15 7 4 2 NAVTEX Receiver Masks 7 16 7 4 3 Alarm Output Sentence Format 7 17 7 4 4 Alarm Acknowledgement 7 17 7 4 5 Proprietary Sentences 7 18 8 Summarized Theory of Operation 8 1 8 1 What is N...

Page 9: ...o of Messages Stored The message number of the currently displayed message along with the total number of stored messages is indicated in the following format Examples 12 12 Message 12 newest message...

Page 10: ...is currently displayed Message can be scrolled line by line by pressing STANDBY Receiver is idling waiting for a NAVTEX message transmission See above for details Message Identification Message ID The...

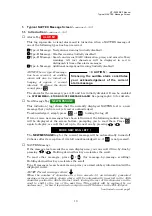
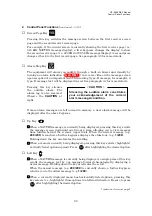
Page 11: ...r turning the tag off If two or more new messages have been left unread the following caution message will be displayed at the screen bottom prompting you to read them Press again to display or scroll...

Page 12: ...ved with a lower CER on the next transmission the previously stored message will be replaced with the new one When the CER exceeds 33 the message and its ID will not be stored in memory allowing a ret...

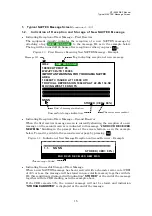
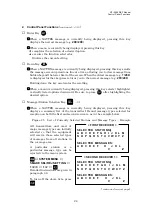
Page 13: ...h to the second receiver page by pressing Figure 1 4 Indication of New Message Reception on Second Receiver Example Indicating Successful Storage of New Message When a new NAVTEX message has been rece...

Page 14: ...2 Figure 2 2 Opening Message Example This key turns the unit on off A first keypress turns it on displaying an opening message like the example at right for approximately five seconds Figure 2 3 Powe...

Page 15: ...cluding a completely switched off level The last used level will be stored in memory When the equipment is switched off with the level at its minimum the keypad will be lit at the highest level at nex...

Page 16: ...rm message will be displayed after the above keypress Up Key When a NAVTEX message is currently being displayed pressing this key scrolls the message screen downward one line at a time allowing you to...

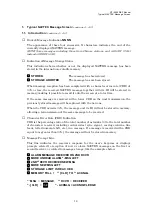
Page 17: ...Be sure to press after highlighting the desired option Message Station Selection Key 1 2 When a NAVTEX message is currently being displayed pressing this key displays a summary list of the transmitter...

Page 18: ...older message When the oldest message e g 1 200 is currently displayed further keypress returns you to the newest message e g 200 200 Holding down the key accelerates the scroll When a currently disp...

Page 19: ...ing will recall the next new message on to the screen It may also be displayed by pressing for line by line viewing or for message by message viewing If no additional new message is left in memory fur...

Page 20: ...instructions are given in paragraph 4 8 2 SECOND RECEIVER 1 490 kHz SECOND RECEIVER 2 4209 5 kHz The following message types cannot be rejected due to the relevant IMO resolutions and IEC regulations...

Page 21: ...menu is being displayed pressing this key produces three quick beeps to indicate an operational error The functions of are summarized in paragraph on the next page and described in details in various...

Page 22: ...H STORED MESSAGES Search stored messages by station and or message type 6 SELECT OUTPUT MESSAGES Selects messages to be output externally 7 SET OUTPUT PORTS Sets output ports on off selects protocols...

Page 23: ...prompt line screen s bottom line The message storage capacity will increase by 50 to 250 messages when 50 received messages are protected Clear Key The major functions this key provides are 1 removin...

Page 24: ...Window To turn the unit off press and hold down for two to three seconds until a power off countdown window shows up as illustrated at right indicating that a power off sequence has just started Keep...

Page 25: ...pressing The last used level will be stored in memory However if the minimum level was used last time it will return to the maximum level on next power up 3 5 Switching First and Second Receivers The...

Page 26: ...ypress displays the top line of the newest message e g 13 13 Message by message scrolling Pressing once scrolls the text by one message chronologically forward to show a next newer message as in the e...

Page 27: ...ssages are left unread in memory that condition will be indicated as in the example above Pressing again will recall the next unread alarm message onto the screen Figure 3 9 Visual Alarm Indication fo...

Page 28: ...ore messages are currently shown the ID of that message should be brought to the top message line as in the example at right Figure 3 11 Protecting a Specific Message from Automatic Erasure Step 2 2 P...

Page 29: ...wing steps 1 Using and or display the message from which you wish to remove the tag 2 Press This will cause the following caution window to pop up asking you to confirm your action 3 Press or to highl...

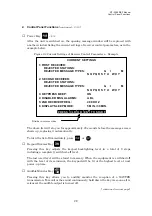
Page 30: ...Menu or Directly to Message Screen Menu options can be selected by pressing followed by continued on next page SYSTEM MENU 1 MAKE DISPLAY SETTINGS 2 SELECT 2ND RECEIVER FREQUENCIES 3 TURN ON OFF KEYP...

Page 31: ...by pressing and then 2 Select option 2 SELECT MESSAGE FONT TYPES in the same manner 3 Highlight 2 NORMAL by pressing again and then press 4 Press or to return to the text screen SYSTEM MENU 1 MAKE DI...

Page 32: ...the same manner The following options are now selectable 1 STANDARD 1 minute to reduced level 1 15 minutes to reduced level 2 2 USER DEFINED MODE times to reduced levels 1 and 2 are selectable in 1 m...

Page 33: ...France Portugal and U K are currently broadcasting national language messages on this channel catering mainly for local users The NAVTEX service on 4209 5 kHz is primarily intended for users in tropic...

Page 34: ...ess beep follow the steps given below 1 Highlight option 2 OFF by pressing followed by 2 Press or to return to the text screen continued on next page SYSTEM MENU 1 MAKE DISPLAY SETTINGS 2 SELECT 2ND R...

Page 35: ...HZ Makes settings for first receiver alone 3 SECOND RECEIVER Makes settings for second receiver alone Figure 4 9 Making Settings for Both Receivers Simultaneously or Separately Figure 4 10 Rejecting T...

Page 36: ...ect a station you rejected previously press instead of after selecting that station at step 3 Figure 4 12 Selecting Transmitters Example 1 SYNCHRONIZE BOTH RECEIVERS 1 STATIONSI 2 MESSAGES 1 STATIONS...

Page 37: ...Figure 4 14 Rejecting Message Types Step 1 2 Highlight the desired option and then press The example at right shows that you selected option 1 SYNCHRONIZE BOTH RECEIVERS to apply the same settings to...

Page 38: ...o return to the previous menu for selection rejection settings of transmitters or to return to the first receiver message page To Select Rejected Message Type Again To select a message type you reject...

Page 39: ...message types The wild card represents all message types 4 Using select the desired message type If you wish to specify all message types from the station selected at step 2 highlight 5 Press This all...

Page 40: ...Messages selected by specifying receiver 4 MSG SELECTED BY STATION Messages selected by specifying transmitter 5 MSG SELECTED BY TYPE Messages selected by specifying message type 6 DISPLAYED MSG All...

Page 41: ...eceiver as illustrated below Figure 4 19 Outputting Live NAVTEX Message 3 Using select the desired receiver and then press The equipment will then start outputting live messages from the receiver sele...

Page 42: ...hen be output one by one Figure 4 20 Outputting All Stored Messages The following window will pop up to indicate the outputting action in progress The window will be turned off automatically upon comp...

Page 43: ...ts first receiver messages 2 SECOND RECEIVER Outputs second receiver messages Figure 4 21 Outputting Stored Messages of First Receiver Example 2 Highlight the desired option and then press The followi...

Page 44: ...e example illustrated below Figure 4 22 Outputting Stored Messages Received from Station D Example 2 Using highlight the desired ID and then press The following window will pop up to indicate the outp...

Page 45: ...llustrated below Figure 4 23 Outputting Stored Messages of Message Type D Example 2 Using highlight the desired message type and then press The following window will pop up to indicate the outputting...

Page 46: ...d messages or to cancel the function The previous message screen will return automatically upon completion of the output KB53 020310 UTC JUL 05 IMPORTANT WARNING FOR KUSHIRO NAVTEX AREA STATIONARY FRO...

Page 47: ...ht the ID of the desired message as in the example above and then press To cancel the function press instead of KB53 020310 UTC JUL 05 IMPORTANT WARNING FOR KUSHIRO NAVTEX AREA STATIONARY FRONT FROM 3...

Page 48: ...d port 3 SET BIT FORMAT RATE Sets correct bit format and data rate 4 11 2 Enabling Disabling I O Ports 4 11 2 1 RS 232C Port The RS 232C port is mainly designed as a printer interface and is initially...

Page 49: ...ted from the ship s ground by opto isolators 4 11 2 3 I O DATA Port The I O DATA port is also initially enabled so that the messages selected in paragraphs 4 10 2 through 4 10 8 will be output via thi...

Page 50: ...for Selection of Protocols for I O DATA Port 2 To change the protocol for the I O DATA port to the IEC 61162 1 press highlighting option IEC 61162 as shown below Figure 4 31 Selecting Protocol for I O...

Page 51: ...llows Figure 4 33 Checking Current Parameters for RS 232C Data Bits 8 bits Stop Bits 1 bit Parity None Bit Rate 110 baud The current parameter values can be checked by selecting 1 RS 232C as shown at...

Page 52: ...rs for the RS 422 port are initially set as follows Figure 4 35 Checking Current Parameters for RS 422 Data Bits 8 bits Stop Bits 1 bit Parity Odd parity Bit Rate 4800 baud The current parameter value...

Page 53: ...e changed using and in the same man ner as in the example given in paragraph 4 11 4 2 Be sure to press after selecting the desired value SYSTEM MENU 1 MAKE DISPLAY SETTINGS 2 SELECT 2ND RECEIVER FREQU...

Page 54: ...12 2 Activating Self Diagnostic Test Function 1 Allow the equipment to warm up for at least 30 minutes before activating the test function 2 Press to open the system menu highlight 8 START SELF DIAGN...

Page 55: ...unit was tested shortly after power up Completed Tested is completed for test items 4 and 5 The user should check whether the tested hardware component functioned correctly 1 Result of Audible Alarm...

Page 56: ...d message type with and then highlight status indication ON by pressing as in the example below Figure 4 40 Enabling Alarm for Type B Messages Be sure to press after selecting the desired setting 4 Pr...

Page 57: ...s will reset initialize all the settings you have made and then return you automatically to the first receiver text page Attention to Printer Users If you are using an optional PR 900 printer or other...

Page 58: ...e equipment was working correctly for some time after its initial installation Symptom Suggested Solution The equipment cannot be turned on 1 Check if the power cord is plugged into the three pin rear...

Page 59: ...in paragraph 4 8 1 No messages can be received despite correct selection settings No NAVTEX messages can be received regardless of the correct selection settings for all desired messages or transmitte...

Page 60: ...tation selection settings 1 Check if the antenna cable is correctly plugged into the appropriate rear apron BNC connector receptacle 2 Check if the connector BNC plug is properly installed onto the ca...

Page 61: ...messages can be received at any time on the first or the second receiver with a good replacement antenna plugged in and the results of the self diagnostic tests are FAILED for both receivers 30 minut...

Page 62: ...check the related wiring harnesses to from the receiver PCB or replace the PCB 3 Check if you have recently installed an electronic device near the receiver cabinet receiver or near the antenna Turn o...

Page 63: ...o replace the PCB if necessary 5 6 Uncontrollable Screen Brightness The following description of the symptom assumes that your NAVTEX receiver was properly working for some time after initial installa...

Page 64: ...lowing description of the symptom assumes that your NAVTEX receiver was properly working for some time after initial installation time Symptom Suggested Solution No audible or visual alarm indication...

Page 65: ...d wiring harness terminations 5 11 No External Outputs The following description of the symptom assumes that your NAVTEX receiver was properly working for some time after initial installation time Sym...

Page 66: ...ations protocol of your application matches that of the RS 422 port See paragraph 4 11 2 2 for details 3 Check the bit format and baud rate of your application match those of the RS 422 port parameter...

Page 67: ...t is recommended Cleaning the acrylic filter on the LCD screen should be a maintenance routine to avoid using a high brightness level To clean the screen filter use a piece of slightly wet cloth If st...

Page 68: ...h neutral household detergent while checking for any sign of damage Check to be sure that the housing is securely screwed onto the pole if installed on a marine mount or the mounting hardware is prope...

Page 69: ...1 3 Coaxial Cable Plug Extension PL 259 1 Active Antenna Unit 4 Preamplifier Unit ANT 2000 3F 2 4 Whip Element 1 2m 410298B 1 Printed Circuit Boards PCBs First Receiver PCB NT 2000 A 1 5 Second Receiv...

Page 70: ...er onboard electronics especially those emitting pulsed signals such as echo sounders and radars 7 1 2 Mounting the Receiver Cabinet The receiver cabinet is primarily designed to be mounted on a table...

Page 71: ...wer cable fuses plugs etc and prevents the cabinet from leaning forward or backward with the clamping knobs tightened After tilting the cabinet to a desired viewing angle tighten the clamping knob fir...

Page 72: ...nge the internal wiring two jumpers on each receiver PCB in the cabinet and on the frequency converter board in the rear apron so that an input impedance match is achieved and that no DC voltage is pr...

Page 73: ...o that it can accept a 1 14 straight thread standard marine pole To prevent possible loosening apply a suitable locking compound over the threads before screwing the socket over the pole WARNING DO NO...

Page 74: ...the rear view of the equipment Overall connections are illustrated in Figure 7 5 A summary description of the necessary connections to each component is given in the next paragraphs CAUTIONS 1 All cab...

Page 75: ...NT 2000 REF Manual Installation 7 6 7 3 1 Introduction continued 2 2 Figure 7 5 Overall Connections...

Page 76: ...earth ground 1Nominal input voltage The equipment operates safely over the 11 to 36V range CAUTIONS 1 The DC power cable specified for the F 2000 F 3000W or DEBEG 4620 DEBEG 4630 cannot be plugged int...

Page 77: ...WARNING THE CENTER CONDUCTOR OF THE BNC RECEPTACLE IS AT 8V WHEN THE EQUIPMENT IS TURNED ON DO NOT SHORT THE CENTER CONDUCTOR TO GROUND OR DAMAGE TO INTERNAL PARTS MAY RESULT Antenna Receptacle BNC f...

Page 78: ...nments are illustrated below Figure 7 12 RS 422 Connector Pin Assignments Front View NOTES 1 This interface consists of a MAX3490 RS 422 transceiver Brief specs are given below For details see the par...

Page 79: ...NT 2000 REF Manual Installation 7 10 7 3 2 Connector Pin Assignments and Connections continued 4 8 RS 422 Transceiver Data Sheet 1 3...

Page 80: ...NT 2000 REF Manual Installation 7 11 7 3 2 Connector Pin Assignments and Connections continued 5 8 RS 422 Transceiver Data Sheet 2 3...

Page 81: ...NT 2000 REF Manual Installation 7 12 7 3 2 Connector Pin Assignments and Connections continued 6 8 RS 422 Transceiver Data Sheet 3 3...

Page 82: ...t is enabled as per paragraph 4 11 2 and that a correct set of parameters is selected as per paragraphs 4 11 3 and 4 11 4 for your applications Connections to PR 900 The connections from the RS 232C p...

Page 83: ...LARM Output Connector The ALARM output connector provides an on off make break alarm output simultaneously via two pairs of replay contacts electrically isolated from each other and from the equipment...

Page 84: ...indication Status A reception of NAVTEX message in correct format Status V reception of NAVTEX message in incorrect format Message body first line of message text characters A forced carriage return...

Page 85: ...nding bit should be set to 1 To reject a station its corresponding bit should be set to 0 For example to select stations E J M and T only set the bit masks as follows 00081210 hex 0 0 0 8 1 2 1 0 hex...

Page 86: ...shold exceeded i e alarm condition exists V threshold not exceeded i e alarm condition is non existent Alarm acknowledgement status A acknowledged V unacknowledged Alarm description text Checksum 03 N...

Page 87: ...at sentence are supported to externally switch the second receiver frequency PJMCR 0 1 hh CR LF Receiver index 0 Second receiver 1 to 9 Reserved Receive frequency index 1 490 kHz 2 4209 5 kHz Checksum...

Page 88: ...e of the signal often travels more than double the daytime coverage by being reflected a number of times between the surface and the ionosphere a band of ionized atmospheric layers 50 to 400 km above...

Page 89: ...0 characters received on the first and second receivers are separately stored and then automatically erased from memory 60 hours after the time of reception on a first in first out basis However up to...

Page 90: ...fted 85 Hz RF NAVTEX signal into a stream of baseband DC pulses at 100 baud using a quadrature detection technique The detected output is then fed to the CPU via opto isolator K2 To test whether each...

Page 91: ...erformance specifications are fully met Should the power line polarity be reversed accidentally diode D1 will cause the fuse F1 3A to blow thereby protecting the input circuit from possible damage The...

Page 92: ...NT 2000 REF Manual Theory of Operation 8 5 8 Summarized Theory of Operation continued 5 6 Figure 8 1 Interconnections continued on next page...

Page 93: ...NT 2000 REF Manual Theory of Operation 8 6 8 Summarized Theory of Operation continued 6 6 Figure 8 2 Antenna Switching Circuit...

Page 94: ...tension Option Preamplified 1 2m glass fiber whip ANT 900 for reception of 518 kHz with 30 meter RG 58 U cable Option Preamplified 1 2m glass fiber whip ANT 2002 for reception of 490 kHz and 4209 5 kH...

Page 95: ...r error rate CER XX readout 16 Message Scrolling Live Messages Automatic line by line scrolling Stored Messages Manual line by line or page by page scrolling 17 Message Storage Capacity 200 messages a...

Page 96: ...s choice by specifying frequency transmitter or message type 21 External I O Interfaces Printer Interface RS 232C port MAX3232 transceiver IBS INS RS 422 port MAX3490 transceiver with input lines opti...

Page 97: ...dition Cabinet with Bracket 80 cm standard 45 cm steering Cabinet only 60 cm standard 40 cm steering 26 Ambient Temperatures 15 to 55 C cabinet operating 25 to 70 C cabinet storage 25 to 55 C active a...

Page 98: ...ed 10 2 Operational Alarms Storage Limit Alarm Enabled Disabled Status Enabled at all times Triggering Condition To be triggered when protecting NAVTEX messages for permanent storage in excess of 50 U...

Page 99: ...C operating system for IBM compatibles DRAM Dynamic Random Access Memory EMC Electromagnetic compatibility EN Europ ische Norm European Standard ENT Entry key F Frequency FEC Forward error correction...

Page 100: ...ion ITU Recommendation REF Reference REJ Reject REV Revision software revision number RH Relative humidity ROM Read Only Memory embedded in CPU chip RTC Real time clock RX Receive RMRS Russian Maritim...

Page 101: ...Types A B C D E F H J K L V Z Rejected Types G I M N O P Q R S T U W X Y Second Receiver Selected Types A B C D E F H J K L V Z Rejected Types G I M N O P Q R S T U W X Y Output Port Settings On Off...

Page 102: ...dealer for details Receiver Console Cabinet NT 2000 Standard 1 set Active Antenna Assembly ANT 2000 Standard 1 set Preamplifier with 1 10m coax cable terminated in BNC plug Whip 1 2m Receiver Mountin...

Reviews: