background image

4.3.4.6 LCD system Settings
The battery setting in the system setting requires the password to enter.
The default password is 0000.
When using lead-acid batteries, set the BMS enabling item to disabled.
When lithium battery is used, BMS enabling item should be set as
enabling, and corresponding BMS type and PACK number should be
selected. The all-in-one machine is connected to lithium battery BMS
through external communication interface. Support BMS for Anxuan
AX-485, CSW-485, CSW-V20 and NG-CAN only.
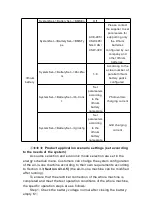
Table 4-11 LCD fault information display in case of communication
failure of lithium batteries (XX represents serial number of batteries in
parallel)

BMS type

Communication failure fault

code

solution

NG-CAN

502 BMS communication failure

Check for loose

communication lines

Check

whether the communication

line is connected correctly

Check whether the lithium

battery model is selected

correctly

AXE-485

502 BMS communication failure

CSW-485

PXX-31 communication failure

CSW-V20

PXX-81 communication failure

The backlight time in the system setting is the LCD keyless operation
backlight time.

Summary of Contents for JNF3KLF24V-A-V2

Page 1: ...User Manual PV Off Grid Inverter With Controller JNF3KLF24V V2 JNF3KLF48V V2 JNF4KLF48V V2 JNF5KLF48V V2 JNF3KLF24V A V2 JNF3KLF48V A V2 JNF4KLF48V A V2 JNF5KLF48V A V2 JNF5KLF V2 EN V2 0 ...

Page 2: ...plier This document relates to the patents and confidential information of Supplier It is not allowed to copy take pictures and distribute online without the permission of supplier Supplier has rights to modify the user manual ...

Page 3: ...V Input Connection 13 3 4 2 AC Input Connection 14 3 4 3 Battery Connection 18 3 4 4 AC Output Connection 20 3 4 5 Communication Ports Connection 23 4 Commissioning 25 4 1 Electrical Connection Inspection before Commissioning 25 4 2 Charging Commissioning 25 4 2 1 PV Charging Commissioning 25 4 3 Liquid crystal operation instructions 29 4 3 1 All in one LCD display 29 4 3 2 LIQUID crystal display ...

Page 4: ......

Page 5: ...to moderate accident of injuries equipment moderate damage or part of the business interruption if safety warning is ignored Note Means that the content is additional information Inverter Controller related symbol Symbol Meaning Direct current DC Alternating current AC Protecting Earthing PE Refer to relevant instructions Can t discard inverter together with domestic garbage Beware of dangerous hi...

Page 6: ...echnical personnel The professional and technical personnel shall Passed specialized training Please read this manual and master the operation of the relevant security matters completely If not in accordance with the manual installation and operation of the machine is damaged It will not in the scope of the warranty 1 Before installation Notice When you receive the product please check the damage ...

Page 7: ...ive place or store with flammable and explosive articles Do NOT install the device in an explosive place Do NOT install the device in areas where lightning strikes may occur Do not install the device in place where have much salt fog During running the device please ensure good ventilation Inverter should be installed erectly and ensure the heat sink fans etc are without shelter Electrical connect...

Page 8: ...iate specifications firm connection and good insulation 3 In operation Danger Please do NOT open the device cover when the device is with electricity 4 Repair Danger Maintenance work should be carried out by professional maintenance technicians ...

Page 9: ...ery inverter can transform battery s DC power into single phase AC power to drive household loads work To meet the power demand of customers in areas without electricity and poor power This system can meet the demands of electric power in the areas that without grid electricity or lack of electricity Meanwhile in the area of having Grid power and Diesel Generator input if grid power is not stable ...

Page 10: ...el generator L1 is AC source live wire 1 phase L2 is AC source live wire 2 phase n is AC source zero line voltage between L1 and L2 is 230VAC voltage between L1 and N is 115VAC voltage between L2 and N is 115VAC AC Output Common machine AC output connection load L is output live line n is output zero line PE is grounding protection American Standard Machine AC output connection load L1 is output l...

Page 11: ...ole system 8 Protection cover of terminals Protection cover of terminal PV and BAT protect terminals from corrosion and person from electric shock 9 Control Interface TB is the connecting interface of temperature sensor be used to monitor battery s temperature to prolong battery lifespan NO NC is dry contactor control terminal can connect diesel generator and control its start 10 Power Button Inve...

Page 12: ...order to meet the voltage requirements of different national power grids the all in one machine models are divided into two series ordinary and American Standard General machine model JNF__ KLF__ V v2 series American Standard Machine Model JNF__ KLF__ V a v2 series The difference between ordinary machines and American standard machines lies in the different input voltage levels of AC source and th...

Page 13: ... in good condition Standard inverter controller and some common used accessories are as follows specific models and qty please check up with installation list Figure 3 1 Inverter Controller and standard accessories Diagram 3 1 Inverter Controller and Accessories sheet No Description Dispatch status 1 Inverter Controller Standard 2 M6 16 cross head combination screw and matching nut Standard 3 Expa...

Page 14: ...river Φ4 Use for cable installation hydraulic tongs M2 5 M8 Use for cool pressing terminal installation Crimping Pliers M2 5 M8 Use for connecting with battery terminals adjustable spanner 300mm Use for nut assembly inverter controller installation Impact drill Φ8 Use for drilling hole and inverter controller installation Wire stripping pliers M1 5 M8 Use for connecting PV cable Hammer 6Pounds Use...

Page 15: ...tion holes drill 4 holes accordingly Diameter 10mm Depth 80mm As shown in the figure Figure 3 3 Hang position diagram Follows are wall hanging sizes of different inverter controller models Diagram 3 3 Fixed position sizes chart Position size Model of Inverter Controller L 349mm H 316mm JNF3KLF24V V2 JNF3KLF24V A V2 JNF3KLF48V V2 JNF3KLF48V A V2 JNF4KLF48V V2 JNF4KLF48V A V2 JNF5KLF48V V2 JNF5KLF48...

Page 16: ...del PV AC BAT Loa d1 Loa d2 PV AC BAT Load 1 Load 2 JNF3KLF24V V2 JNF3KLF24V A V2 50 32 125 16 16 10 12 3 13 13 JNF3KLF48V V2 JNF3KLF48V A V2 50 32 80 16 16 8 10 6 13 13 JNF4KLF48V V2 JNF4KLF48V A V2 63 32 100 20 20 6 9 5 12 12 JNF5KLF48V V2 JNF5KLF48V A V2 63 32 100 25 25 6 7 4 10 10 Note AWG of cable selection means American Standard indicating diameter of cable 1 Drill hole around 80mm deep by ...

Page 17: ...ray s max open circuit voltage must less than inverter controller s max allowable input voltage Step 2 Make PV connectors and cable connecting of PV input side please according to following steps 4 Screw M6 16 and M6 nut are used to fix the cable inserted into the protective cover corresponding to the terminals connected to PV and PV screen printing in the case then tighten the 1 Use stripping pli...

Page 18: ...V input side is as follows Figure 3 6 PV Input Side Cable Connecting Diagram 3 4 2 AC Input Connection Inverter Controller can accept two kinds of AC power input one is single phase grid power and another is single phase diesel generator power Please select corresponding connection mode according to the specific connection 3 4 2 1Grid Power Input connection Please make sure Grid power in off state...

Page 19: ...rid Common machine Connect the cables at the end of the power grid to the air switch according to L fire line and N zero line respectively and PE ground Keep ac side space open and off 3 Screw down the cable inserted into the protective cover corresponding to the terminal connected to the box AC IN screen printing and tighten it with a word screw driver then tighten the protective cover on the cov...

Page 20: ...able Connecting Diagram 3 4 2 2Diesel Generator Connection Please ensure inverter controller in power off state Step 1 Refer to diesel generator s user manual to find its start mode is NO normally open or NC normally close Step 2 If diesel generator s start mode is NO normally open then insert diesel generator s NO terminal into inverter controller s NO terminal accordingly If diesel generator s s...

Page 21: ...de cable connection Diesel generator input side cable connection diagram as follows 1 Use stripping pliers to strip the cable for 10mm 2 According to the starting signal of the diesel engine insert the cable into the NO terminal or the NC terminal and tighten the screw 3 Insert the screwed terminals into the NO and NC terminals of the all in one machine to complete the terminal connection of the d...

Page 22: ...t circuit during its installation Step 1 According to nameplate to confirm the battery pack voltage PV hybrid power generating system s battery pack voltage could refer to follow sheet Diagram 3 5 Battery Pack Voltage Selection List Battery Pack Voltage Inverter Controller Model No 24V JNF3KLF24V V2 JNF3KLF24V A V2 48V JNF3KLF48V V2 JNF4KLF48V V2 JNF5KLF48V V2 JNF3KLF48V A V2 JNF4KLF48V A V2 JNF5K...

Page 23: ... Press the upper terminal with line clamp 1 Use stripping pliers to strip the cable for 10mm 4 Screw M6 16 and M6 nut to fix the cable inserted into the protective cover on the terminals connected to the box BAT and BAT screen printing then tighten the protective cover on the cover to complete the terminal connection of the battery ...

Page 24: ...nd open and disconnected Then connect the other end of the cable made in Step 2 to the open air and check whether the connection is correct and firm The wiring diagram of battery input terminal is as follows Figure 3 12 Battery Input Side Cable Connecting Diagram 3 4 4 AC Output Connection Inverter controller is in power off switch off state Step 1 Making AC output side terminals according to foll...

Page 25: ...loads terminals Making and Cable Connecting Diagram 3 Screw down the cable inserted into the protective cover corresponding to the terminal connected to the AC OUT screen printing in the case and tighten the word screw driver then tighten the protective cover on the cover to complete the AC output terminal terminal connection ...

Page 26: ...er grid are connected to the air switch according to L1 fire line 1 phase L2 fire line 2 phase and N zero line respectively and PE is earthed Keep the load side open and open Step 3 Connect the other end of the cable made in Step 1 to the open air to check whether the connection is correct and firm The wiring diagram of AC output terminal is as follows Figure 3 14 AC Output Side Cable Connecting D...

Page 27: ... communication interface terminals according to following methods Figure 3 17 Communication Interface Terminal Making and Cable Connection Diagram Blue and Blue White Line order 4 5 corresponding to communication port A and B of 485 3 Finished view 2 Insert communication cable into corresponding communication port of inverter controller 1 Prepare a communication cable such as network cable 1 2 3 4...

Page 28: ... of 485 Step 3 Connecting appliances needed for communication such as computer communication module etc with inverter controller through COM interface Follows are control interface connection figure Figure 3 18 Control Interface Connecting General Diagram Computer Convertor Control port input ...

Page 29: ...ect 7 Check control interface is firm and correct 4 2 Charging Commissioning 4 2 1 PV Charging Commissioning matters need attention All in one machine factory system configuration default for lead acid battery ac source for the power grid operation mode for the economic model 1 economic model all in one maximum use of solar energy factory default mode 2 backup mode when all in one priority use ac ...

Page 30: ...mSet ySet BatterIb Cons t 0 80A PV charging current Set 15A for 100AH capacity battery set constant charge current value in proportion to the actual battery capacity and the maximum value shall not exceed the set range 3 klf24v series 4 klf48v series 5 klf48v series 0 60A 3KLF48Vseries SystemSet BatterySet Igridchg 0 40A Grid charging current Set 15A for 100AH capacity battery set the charging cur...

Page 31: ...idchg Set parameters according to the lithium battery nameplate Grid charging current Product application scenario settings set according to the needs of the system Ac source selection and economic mode selection are set in the energy schedule menu Customers can change the system configuration of the all in one machine according to their own requirements according to Section 4 3 Section 4 3 4 5 th...

Page 32: ...face AC light will be ON then turn ON the ON OFF switch at the bottom of the machine Step 4 Check the AC load meet the load power not exceeding the rated power of the all in one machine then close the ac output side of the air switch K4 and observe the liquid crystal display information As shown in the figure below when the light is on the trial run is successful and can run normally FIG 4 1 is a ...

Page 33: ... The display panel is shown as follows Figure 4 2 shows the schematic diagram of the panel Table 4 2 Meaning table of LED lightss Logo condition describe PV Green flashing Pv online Stop charging PV charging close PV Don t online AC Green flashing Grid online Stop charging Grid charging close Grid Don t online INV Green Inverter working close Inverter to stop BYPASS Green grid bypass is open close...

Page 34: ...the page 2 Data reduction ENTER Go to the next level menu Set values to modify and save DOWN ENTER Press at the same time to return to the priority screen 4 3 2 LIQUID crystal display interface The following is the general block diagram of LIQUID crystal display to understand the distribution of liquid crystal operation in a simple and clear way ...

Page 35: ... CONTENTS of LCD display After the LCD is powered on Welcome to use will appear After 3 seconds the priority screen interface will jump to the following figure Figure 4 4 LCD priority screen interface display Table 4 4 LCD priority screen display contents ...

Page 36: ... at work Pout Displays the power value of the connected load at work After opening the priority screen and pressing ENTER ENTER the first level menu as shown in the figure below Figure 4 5 Display of first level menu interface Table 4 5 LCD first level menu display contents first level menu function declaration RunInfo Displays the current state of the machine FaultInfo Displays the machine s curr...

Page 37: ...d crystal function information 4 3 4 1 Operating information of LIQUID crystal The information status of the main parameters of the current system is displayed Figure 4 6 Operation information operation interface ...

Page 38: ...t cell temperature during BMS communication Uinv Display ac output voltage value during operation Iinv1 Display the ac output current value at work The American standard shows the L1 output current Iinv2 According to 0 The American standard shows L2 output current Pinv Display ac output power value at work Finv Display the ac output frequency value at work Tmosu Displays the current MOSU temperatu...

Page 39: ... and so on When the yellow lamp fails the LCD displays the alarm information and the buzzer does not sound When the red light fails the LCD displays the alarm information and the buzzer rings all the time If you want to turn off the buzzer you can choose to turn off the buzzer in system Settings Buzzer Settings Figure 4 7 Operation interface of fault information Table 4 7 Contents of LCD fault inf...

Page 40: ...address is the device address for external Modbus communication and the default is 10 Figure 4 9 LCD system information operation interface Table 4 9 Contents displayed on the LCD system information operation interface secondary menu System Information function declaration VerLcd Displays the current machine LCD version number VerChg Displays the current machine charging version number VerInv Disp...

Page 41: ...iesel engine is connected to the input end of the AC source without passing through other input ends Operating mode Settings change Power scheduling Operating mode economy and backup Default economic mode according to customer needs can be changed to backup mode In the economic mode the all in one machine maximizes the utilization of photovoltaic energy factory default mode Backup mode when the al...

Page 42: ...dvance to charge the battery please increase this value It is recommended to adopt 40 of factory parameters HighSOC Economic mode the power grid has electricity SOC this value switching from the state of the grid bypass to the contravariant If you need to use the power grid to charge the battery more please enlarge this value but if you enlarge this value you may waste the power of the power grid ...

Page 43: ...BMS for Anxuan AX 485 CSW 485 CSW V20 and NG CAN only Table 4 11 LCD fault information display in case of communication failure of lithium batteries XX represents serial number of batteries in parallel BMS type Communication failure fault code solution NG CAN 502 BMS communication failure Check for loose communication lines Check whether the communication line is connected correctly Check whether ...

Page 44: ...xternal Modbus communication LcdLight Set the backlight lighting time when the all in one machine is working Language Settings show Chinese and English toggle Buzzer Setting and its buzzer switch ClearEneData The calculated generation and consumption of electricity will be cleared to zero ClearFaultData The statistical history fault will be cleared Factory reset Restores parameters to factory valu...

Page 45: ...is disconnected and the battery voltage drops to the set value the charging function is restored T Comp Set the temperature compensation coefficient when charging the battery Ut Top Set the upper limit of temperature compensation coefficient when charging the battery Ut Down Set the lower limit of temperature compensation coefficient when charging the battery Igridchg Set the charging current of t...

Page 46: ... fault information for an all in one machine Module Fault code Implication Possible reason Solution Memo Charger fault 100 Charging soft overcurrent Excessive charging current Restart and observe whether the fault repeats 101 Charge hard overcurrent 102 Mos overheating Fan failure or ventilation block 1 Check whether there is any shielding around the chassis 2 Check whether the inlet and outlet of...

Page 47: ...ing 108 PV array overvoltage PV input voltage too high Check whether input voltage is higher than 180V 109 Bat overvoltage Whether the battery is connected Cell aging Abnormal battery voltage causes machine damage 1 Check whether the battery side switch is closed 2 Check the battery voltage level Check the battery for aging 24V machine overpressur e point 32V Overpressu re point of 48V machine 64V...

Page 48: ...ltage level 2 Check whether the battery is overreleased 3 check whether the battery is aging 24V machine overpressur e point 32V Overpressu re point of 48V machine 64V 202 Invert output hard overcurrent Excessive load current Short circuit of load 1 Observe whether the fault is automatically restored 2 Check whether the load is too heavy or short circuit 203 Invert output soft overcurrent 204 Inve...

Page 49: ...dware failure contact the customer service 213 Short circuit fault Load connection short circuit Check the load connection for short circuit 214 Invert current zero error hardware failure contact the customer service 215 Invert voltage zero error 300 AC undervoltage Power gateway outage moment The power grid is not connected 1 Check whether the grid side switch is closed 2 When the power gateway i...

Page 50: ...rolled by itself without operation 402 Total undervoltage Start the power grid charging stop the inverter Please charge in time when the battery is low 403 Single undervoltage Start the power grid charging stop the inverter Please charge in time when the battery is low 404 Dsicharge high temperature Stop the inverter contact the customer service 405 Charge high temperature Stop charging contact th...

Page 51: ...ngle voltage difference Battery imbalance Please contact the manufacturer to replace the battery pack 600 Cell overvoltage Stop charging and discharging of the battery disconnect the main circuit of the battery and resume after a delay of 1h The inverter is controlled by itself without operation 601 Cell undervoltage Stop the battery charging and discharging and the main circuit of the battery is ...

Page 52: ...d discharging and the main circuit of the battery is disconnected Restart inverter power is low please charge in time 607 Bat High Temperature Stop charging and discharging of the battery disconnect the main circuit of the battery and resume after a delay of 1h contact the customer service 608 Bat Low Temperature Stop the battery charging and discharging and the main circuit of the battery is disc...

Page 53: ...attery main loop open The inverter is controlled by itself without operation 614 Bat undervoltage Stop the battery discharge and send the emergency charging protocol frame to the inverter at the same time The main circuit of the battery keeps on The inverter is controlled by itself without operation 615 Battery temperature warning Stop charging and discharging the battery The battery s main circui...

Page 54: ...n cloudy and rainy days or there is no pv input at night Check whether the photovoltaic input has power If the photovoltaic input has power but still reports failure you can contact customer service Failure with yellow light 501 Inverter dsp comm fault The inverter ON OFF switch is not ON or the battery side input has no power Check whether the ON OFF switch is ON and whether there is power ON the...

Page 55: ...rter is controlled by itself without operation PXX 03 Total overvoltage Start the power grid charging stop the inverter Please charge in time when the battery is low PXX 04 Total undervoltage The discharge overcurrent is detected continuously for 10s and the inverter is stopped The alarm is detected continuously for 3 times within 2 minutes Restart the inverter PXX 05 Charge high temperature The d...

Page 56: ...d by itself without operation PXX 54 Power high temperature Start the power grid charging stop the inverter The battery is low please charge it in time PXX 55 Charge overcurrent stop charging The inverter is controlled by itself without operation PXX 56 Dsicharge overcurrent Start the power grid charging stop the inverter The battery is low please charge it in time PXX 57 Level2 overcurrent stop c...

Page 57: ...it indoors PXX 63 power of high temperature Stop charging stop inverter contact the customer service PXX 64 charging current is too strong The charging overcurrent was detected continuously for 10s stopped charging detected continuously for 3 times within 70S and the alarm was locked Please properly configure the photovoltaic panels PXX 65 discharge current is too strong The discharge overcurrent ...

Page 58: ... whether the time setting is accurate Check whether the fan is running normally and whether there is foreign body blockage Every six months to once a year the following inspections shall be carried out on the all in one machine Check the humidity and dust of the environment around the all in one machine If the dust is too much the all in one machine can be cleaned Check whether the cable connectio...

Page 59: ...80A Maximum charging efficiency 97 Battery Information Gel lithium Inverter output Max short circuit current 3000VA 3000VA 4000VA 5000VA Peak output capacity 9000VA 9000VA 12000VA 15000VA Rated output linear load 3000W 3000W 4000W 5000W Output voltage to meet the voltage requirements of different countries 230Vac 20 rated frequency 50 60Hz 3 Standby Power 10W Maximum Efficiency 93 waveform sine wa...

Page 60: ...60dB Cooling Method forced cooling operating temperature 20 50 critical temperature 25 70 status indicator LCD LED port RS485 CAN Optional altitude 2000m 2000m Derating work American standard machine model JNF3KLF24V A V 2 JNF3KLF48V A V 2 JNF4KLF48V A V 2 JNF5KLF48V A V 2 PV Input Maximum input DC voltage 180Vdc Recommended input power 3500W 5000W 7000W 7000W MPPT working voltage range 35 170Vdc ...

Page 61: ...voltage to meet the voltage requirements of different countries L1 L2 230Vac 20 L N 115Vac 20 rated frequency 50 60Hz 3 Standby Power 10W maximum efficiency 93 waveform sine wave THD 3 rated current 13 5A 13 5A 18A 22 5A Peak output current coefficient 3 1 overload 125 rated power 70s 150 rated 20s 200 rated 5s over 300 rated 0s AC input alternating voltage L1 L2 230Vac 20 L N 115Vac 20 AC Frequen...

Page 62: ...58 dBA 60dB cooling method forced cooling operating temperature 20 50 critical temperature 25 70 status indicator LCD LED port RS485 CAN Optional altitude 2000m 2000m Derating work ...

Page 63: ...pany has the right not to conduct quality assurance Transport damage Improperly installed modified or used The whole machine and parts have exceeded the free warranty period Very harsh operating environment beyond the description in this manual Machine failure or damage caused by repair replacement or disassembly not by our service organization or personnel Damage caused by abnormal natural enviro...

Page 64: ...g Fan running condition Group information Solar panel model Solar panel configuration Battery information Battery model Battery configuration After sales service requirements userinfo username User contact information customer address postcode Product improvement Suggestions If you still can t solve the problem by contacting the customer service please fill in this form and describe the fault in d...

Reviews: