background image

CLIZIA D 24 AS

18

EN

cod. 3541C810  -  Rev. 00 - 09/2012

4.2 Startup
Before lighting the boiler

Check the seal of the gas system.

Check correct prefilling of the expansion tank.

Fill the water system and make sure all air contained in the boiler and the system
has been vented.

Make sure there are no water leaks in the system, DHW circuits, connections or boiler.

Check correct connection of the electrical system and efficiency of the earthing system.

Make sure the gas pressure for heating is that required.

Make sure there are no flammable liquids or materials in the immediate vicinity of
the boiler

Checks during operation

Switch the unit on.

Check the tightness of the fuel circuit and water systems.

Check the efficiency of the flue and air/fume ducts while the boiler is working.

Make sure the water is circulating properly between the boiler and the systems.

Make sure the gas valve modulates correctly in the heating and domestic hot water
production stages.

Check correct boiler lighting by performing various tests, turning it on and off with
the room thermostat or remote control.

Make sure the fuel consumption indicated on the meter matches that given in the
technical data table in cap. 5.

Make sure that with no demand for heating, the burner lights correctly on opening a
hot water tap. Check that in heating mode, on opening a hot water tap, the heating
circulating pump stops and there is regular production of hot water.

Make sure the parameters are programmed correctly and carry out any required
customisation (compensation curve, power, temperatures, etc.).

4.3 Maintenance
Periodical check

To ensure correct operation of the unit over time, have qualified personnel carry out a
yearly check, providing for the following:

The control and safety devices (gas valve, flow meter, thermostats, etc.) must func-
tion correctly.

The fume exhaust circuit must be perfectly efficient.
(Sealed chamber boiler: fan, pressure switch, etc. -The sealed chamber must be
tight: seals, cable glands, etc.)
(Open chamber boiler: anti-backflow device, fume thermostat, etc.)

The air-fume end piece and ducts must be free of obstructions and leaks

The burner and exchanger must be clean and free of deposits. For possible cleaning
do not use chemical products or wire brushes.

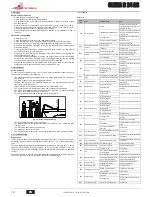
The electrode must be properly positioned and free of scale.

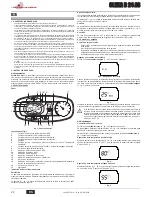
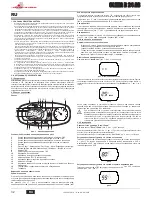
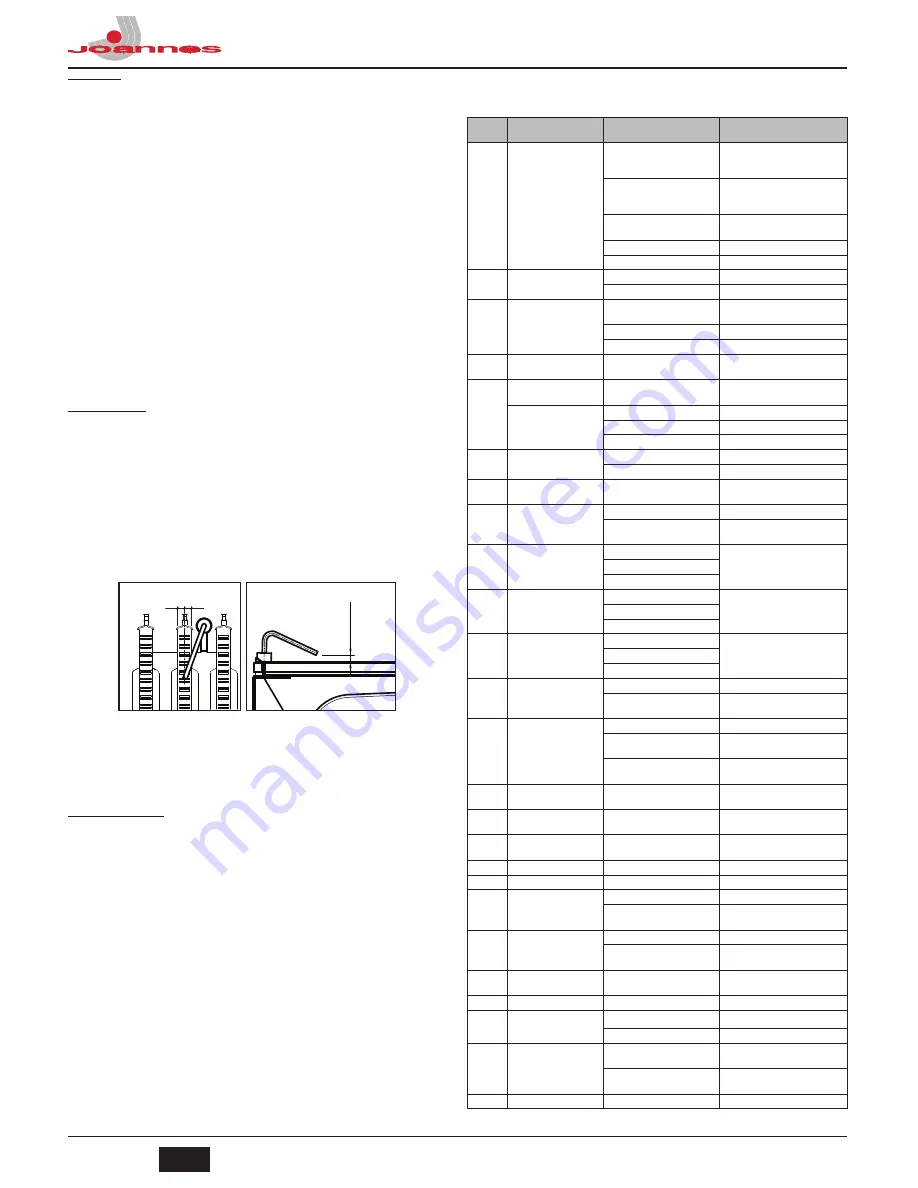
fig. 20 - Electrode positioning

The gas and water systems must be airtight.

The water pressure in the cold water system must be about 1 bar; otherwise, bring
it to that value.

The circulating pump must not be blocked.

The expansion tank must be filled.

The gas flow and pressure must correspond to that given in the respective tables.

4.4 Troubleshooting
Diagnostics

The boiler is equipped with an advanced self-diagnosis system. In case of a boiler fault,
the display will flash together with the fault symbol (detail 11 - fig. 1) indicating the fault
code.
There are faults that cause permanent shutdown (marked with the letter "

A

"): to restore

operation, press the RESET button (detail 6 - fig. 1) for 1 second or RESET on the op-
tional remote timer control if installed; if the boiler fails to start, it is necessary to eliminate
the fault.
Faults marked with the letter "

F

" cause temporary shutdowns that are automatically reset

as soon as the value returns within the boiler's normal working range.

List of faults

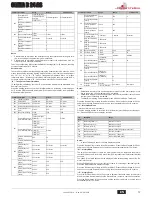
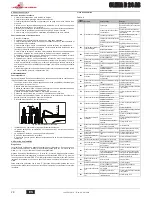
Table. 9

±

 0,5

=

=

Code

fault

Fault

Possible cause

Cure

      A01

No burner ignition

No gas

Check the regular gas flow to the 
boiler and that the air has been elimi-
nated from the pipes

Ignition/detection electrode fault

Check the wiring of the electrode and 
that it is correctly positioned and free 
of any deposits

Faulty gas valve

Check the gas valve and replace it if 
necessary

Gas valve wiring disconnected

Check the wiring

Ignition power too low

Adjust the ignition power

A02

Flame present signal with 
burner off

Electrode fault

Check the ionisation electrode wiring

Card fault

Check the card

A03

Overtemperature protection 
activation

Heating sensor damaged

Check the correct positioning and 
operation of the heating sensor

No water circulation in the system Check the circulating pump
Air in the system

Vent the system

F04

Card parameter fault

Wrong card parameter setting

Check the card parameter and modify 
it if necessary

F05

Card parameter fault

Wrong card parameter setting

Check the card parameter and modify 
it if necessary

Fan fault

Wiring disconnected

Check the wiring

Defective fan

Check the fan

Card fault

Check the card

A06

No flame after the ignition 
phase

Low pressure in the gas system

Check the gas pressure

Burner minimum pressure setting Check the pressures

F07

Card parameter fault

Wrong card parameter setting

Check the card parameter and modify 
it if necessary

A09

Gas valve fault

Wiring disconnected

Check the wiring

Faulty gas valve

Check the gas valve and replace it if 
necessary

F10

Delivery sensor 1 fault

Sensor damaged

Check the wiring or replace the sensor

Wiring shorted
Wiring disconnected

F11

DHW sensor fault

Sensor damaged

Check the wiring or replace the sensor

Wiring shorted
Wiring disconnected

F14

Delivery sensor 2 fault

Sensor damaged

Check the wiring or replace the sensor

Wiring shorted
Wiring disconnected

A16

Gas valve fault

Wiring disconnected

Check the wiring

Faulty gas valve

Check the gas valve and replace it if 
necessary

F20

Combustion control fault

Fan fault

Check the fan and fan wiring

Faulty baffle

Check the baffle and replace it if nec-
essary

Flue not correctly sized or 
obstructed

Check the flue

A21

Poor combustion fault

Fault F20 generated 6 times in the 
last 10 minutes

See fault F20

A23

Card parameter fault

Wrong card parameter setting

Check the card parameter and modify 
it if necessary

A24

Card parameter fault

Wrong card parameter setting

Check the card parameter and modify 
it if necessary

F34

Supply voltage under 180V. Electric mains trouble

Check the electrical system

F35

Faulty mains frequency

Electric mains trouble

Check the electrical system

F37

Incorrect system water pres-
sure

Pressure too low

Fill the system

Water pressure switch damaged 
or not connected

Check the sensor

F39

External probe fault

Probe damaged or wiring shorted Check the wiring or replace the sensor
Probe disconnected after activat-
ing the sliding temperature

Reconnect the external sensor or dis-
able the sliding temperature

A41

Sensor positioning

Delivery sensor or DHW sensor 
detached from the pipe

Check the correct positioning and 
operation of the sensors

F42

Heating sensor fault

Sensor damaged

Replace the sensor

F43

Exchanger protection trips.

No H

2

O system circulation

Check the circulating pump

Air in the system

Vent the system

F50

Gas valve fault

Modulating Operator wiring dis-
connected

Check the wiring

Faulty gas valve

Check the gas valve and replace it if 
necessary

A51

Poor combustion fault

Inlet/exhaust flue obstruction

Check the flue

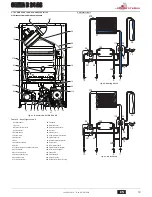
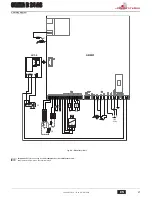
Summary of Contents for Clizia 24 AS

Page 1: ...D E F A B C 85 115 91 109 195 266 A B C D F E 58 5 178 126 76 54 51 80 5 80 330 700 400 30 30 24 5 24 5 24 5 F A B C D E 117 93 mm 114 mm 770 mm 791 mm IT ISTRUZIONE PER L USO L INSTALLAZIONE E LA MAN...

Page 2: ...Economy Comfort on off apparecchio 8 Simbolo acqua calda sanitaria 9 Indicazione funzionamento sanitario 10 Indicazione modalit Estate 11 Indicazione multi funzione 12 Indicazione modalit Eco Economy...

Page 3: ...LI E SECONDO LE REGOLE DELLA BUONA TECNICA 3 2 Luogo d installazione Il circuito di combustione dell apparecchio stagno rispetto l ambiente di installazione e quindi l apparecchio pu essere installato...

Page 4: ...schema elettrico alla fig 24 fig 8 Accesso alla morsettiera 3 6 Condotti fumi Avvertenze L apparecchio di tipo C a camera stagna e tiraggio forzato l ingresso aria e l uscita fumi devono essere colle...

Page 5: ...eti opposte C6X Aspirazione e scarico con tubi certificati separatamente EN 1856 1 B2X Aspirazione dal locale di installazione e scarico a parete o tetto IMPORTANTE IL LOCALE DEVE ESSERE DOTATO DI VEN...

Page 6: ...vola gas La scheda si porta sull impostazione q02 visualizzando con una pressione dei ta sti sanitario il valore attualmente salvato Se la pressione letta sul Manometro diversa dalla pressione massima...

Page 7: ...remendo per 3 secondi il tasto Eco comfort sar possibile cancellare tutte le anomalie memorizzate nel Men History automaticamente la scheda uscir dal Men Service in modo da confermare l operazione L u...

Page 8: ...cata accensione del bru ciatore Mancanza di gas Controllare che l afflusso di gas alla caldaia sia regolare e che sia stata eli minata l aria dalle tubazioni Anomalia elettrodo di rivelazione accensio...

Page 9: ...14 Valvola di sicurezza 74 Rubinetto di riempimento impianto 16 Ventilatore 81 Elettrodo d accensione e rilevazione 19 Camera combustione 95 Valvola deviatrice 22 Bruciatore 114 Pressostato acqua 27...

Page 10: ...m3 h 2 73 Portata gas min G20 m3 h 0 88 Ugelli bruciatore G31 n x 11 x 0 79 Pressione gas alimentazione G31 mbar 37 Pressione gas max al bruciatore G31 mbar 35 0 Pressione gas min al bruciatore G31 mb...

Page 11: ...a elettrico fig 24 Circuito elettrico A Attenzione Prima di collegare il termostato ambiente o il cronocomando re moto togliere il ponticello sulla morsettiera 81 1kW L N 230V 50 Hz 16 N L 32 L N T T...

Page 12: ...de 13 Heating 14 Heating symbol 15 Burner lit and actual power level flashing during combustion fault function 16 Service Tool connection 17 Water gauge Indication during operation Heating A heating d...

Page 13: ...AND THE RULES OF PROPER WORKMANSHIP 3 2 Place of installation The combustion circuit is sealed with respect to the place of installation therefore the unit can be installed in any room However the pla...

Page 14: ...the various connections is also given in the wiring diagram in fig 24 fig 8 Accessing the terminal block 3 6 Fume ducts Important The unit is a C type with sealed chamber and forced draught the air i...

Page 15: ...6X Intake and exhaust with separately certified pipes EN 1856 1 B2X Intake from installation room and wall or roof exhaust IMPORTANT THE ROOM MUST BE PROVIDED WITH APPROPRIATE VENTILATION CLIZIA D 24...

Page 16: ...om the nominal maximum pressure pro ceed by increases decreases of 1 or 2 units of parameter q02 by pressing the DHW buttons the value is stored after each modification wait 10 seconds for the pressur...

Page 17: ...l automatically exit the Service Menu in order to confirm the operation Press the Reset button for 20 seconds to exit the card Service Menu or exiting occurs automatically after 15 minutes b05 Relay c...

Page 18: ...de fault Fault Possible cause Cure A01 No burner ignition No gas Check the regular gas flow to the boiler and that the air has been elimi nated from the pipes Ignition detection electrode fault Check...

Page 19: ...not supplied 14 Safety valve 74 System filling cock 16 Fan 81 Ignition and detection electrode 19 Combustion chamber 95 Diverter valve 22 Burner 114 Water pressure switch 27 Copper exchanger for heati...

Page 20: ...ax gas delivery G20 m3 h 2 73 Min gas delivery G20 m3 h 0 88 Burner nozzles G31 no x 11 x 0 79 Gas supply pressure G31 mbar 37 Max gas pressure at burner G31 mbar 35 0 Min gas pressure at burner G31 m...

Page 21: ...ring diagram fig 24 Electrical circuit A Important Before connecting the room thermostat or the remote timer con trol remove the jumper on the terminal block 81 1kW L N 230V 50 Hz 16 N L 32 L N T T 27...

Page 22: ...mbolo de calefacci n 15 Indicaci n de quemador encendido y potencia actual parpadeante durante la funci n de anomal a de combusti n 16 Conexi n para Service Tool 17 Higr metro Indicaci n durante el f...

Page 23: ...stalaci n por lo cual el aparato puede instalarse en cualquier habitaci n No obstante el local de instalaci n debe ser lo suficientemente aireado para evitar situaciones de peligro si hubiera una p r...

Page 24: ...l ctrica 3 6 Conductos de humos Advertencias El equipo es de tipo C con c mara estanca y tiro forzado la entrada de aire y la salida de humos deben conectarse a sistemas como los que se indican m s ad...

Page 25: ...con tubos certificados separados EN 1856 1 B2X Aspiraci n del ambiente de instalaci n y evacuaci n en pared o techo IMPORTANTE EL LOCAL DEBE ESTAR DOTADO DE VENTILACI N APROPIADA CLIZIA D 24 AS Longi...

Page 26: ...o aumentar o disminuir el par metro q02 en pasos de 1 o 2 unidades mediante las teclas de ajuste del agua sanitaria Despu s de cada modificaci n el valor se guarda en la memoria esperar 10 segundos a...

Page 27: ...tecla Eco Comfort durante 3 segundos se borran todas las anomal as me morizadas en el Men Historial la tarjeta sale del men Service para confirmar que se ha realizado la operaci n La salida del men Se...

Page 28: ...n encendido Controlar que el electrodo est bien colocado y conectado y que no tenga incrustaciones V lvula del gas averiada Controlar la v lvula del gas y cam biarla si es necesario Cableado de la v...

Page 29: ...de seguridad 74 Llave de llenado de la instalaci n 16 Ventilador 81 Electrodo de encendido y detecci n 19 C mara de combusti n 95 V lvula desviadora 22 Quemador 114 Presostato del agua 27 Intercambia...

Page 30: ...or con G20 mbar 1 5 Caudal m ximo gas G20 m3 h 2 73 Caudal m nimo de gas G20 m3 h 0 88 Inyectores quemador G31 n x 11 x 0 79 Presi n de alimentaci n gas G31 mbar 37 Presi n gas m x en el quemador con...

Page 31: ...trico fig 24 Circuito el ctrico A Atenci n Antes de conectar el termostato de ambiente o el reloj programa dor a distancia quitar el puente de la regleta de conexiones 81 1kW L N 230V 50 Hz 16 N L 32...

Page 32: ...1 1 2 3 4 5 6 7 8 9 10 11 12 Eco 13 14 15 16 17 11 1 d2 11 1 d1 Comfort 11 1 cap 4 4 11 1 d3 d4 2 3 5 7 1 5 2 7 1 5 3 B sez 3 3 2 4 6 1 2 10 1 6 1 2 3 4 1 30 C 80 C 45 C 4 40 C 55 C 1 2 1 5 0 1 4 2 3...

Page 33: ...1 3 1 5 6 1 CU 1 1 1 10 0 3 1 OF 1 1 6 5 6 1 6 A 1 1 17 1 1 0 F37 1 7 7 3 3 1 3 2 2009 142 EN 297 pr A6 5 C A 3 3 B B 25 Fr 1 F 10 CaCO3 3 4 ECO 7 1 7 1 20 30 40 50 60 70 80 90 85 20 10 0 10 20 1 2 3...

Page 34: ...C Cny A B 9 2 3 4 1 2 3 4 5 6 72 139 138 3 4 A 1 1 2 2 4 3 3 5 6 B C1X C3X 010006X0 08522870 10 010008X0 08522880 11 010007X0 12 08522890 13 60 100 80 125 5 10 90 1 0 5 45 0 5 0 25 0 2 O 43 0 3 O 43...

Page 35: ...2 0 2 1KWMA06K 2 0 2 0 4 0 45 1KWMA01K 1 2 2 2 45 1KWMA65A 1 2 2 2 90 1KWMA02K 2 0 3 0 90 1KWMA82A 1 5 2 5 90 1KWMA70U 1 5 2 5 1KWMA16U 0 2 0 2 1KWMA55U 3 0 T 1KWMA05K 7 0 1KWMA85A 2 0 1KWMA86A 5 0 8...

Page 36: ...2 10 3 1 q01 q01 1 2 10 Eco Comfort 2 TEST TEST cap 4 1 TEST sez 4 1 3 1 00 100 5 TEST sez 4 1 10 7 b 0 1 4 2 3 reset eco comfort I I I I I I I I I I I I I I I I I I I I I I I I I I I I I I I I I I I...

Page 37: ...P05 31 85 C 80 C 80 C P06 0 100 100 100 P07 b02 1 0 0 0 1 2 5 3 10 4 20 b02 2 0 0 1 2 5 3 10 4 20 b02 3 0 4 C 2 C b02 4 0 4 C 2 C P08 b02 1 0 60 30 60 b02 2 0 60 60 b02 3 0 60 30 b02 4 0 60 30 P09 b02...

Page 38: ...38 RU cod 3541C810 Rev 00 09 2012 4 2 cap 5 4 3 20 1 4 4 11 1 A RESET 6 1 1 RESET F 9 3 0 5 A01 A02 A03 F04 F05 A06 F07 A09 F10 1 F11 F14 2 A16 F20 A21 F20 10 F20 A23 A24 F34 180 F35 F37 F39 A41 F42 F...

Page 39: ...3 5 38 7 39 8 42 9 44 10 56 11 72 14 74 16 81 19 95 22 114 27 138 28 139 29 187 32 194 36 241 37 278 44 32 114 36 14 19 27 28 56 29 5 16 81 95 278 42 38 37 10 8 7 9 11 194 39 74 187 22 56 27 14 74 32...

Page 40: ...30 90 5 92 42 EEC NOx 3 150 NOx G20 x O 11 x 1 35 G20 20 0 G20 12 0 G20 1 5 G20 3 2 73 G20 3 0 88 G31 x O 11 x 0 79 G31 37 G31 35 0 G31 5 0 G31 2 00 G31 0 65 3 PMS 0 8 C 90 tmax 1 0 8 1 9 PMW 0 25 t...

Page 41: ...CLIZIA D 24 AS 41 RU cod 3541C810 Rev 00 09 2012 5 5 24 A 81 1kW L N 230V 50 Hz 16 N L 32 L N T T 278 T 42 4 3 2 1 44 38 114 ABM01 LC32 3 2 1 95 72 139 138...

Page 42: ...rmit Il costruttore dichiara che questo apparecchio conforme alle seguenti direttive CEE Direttiva Apparecchi a Gas 2009 142 Direttiva Rendimenti 92 42 Direttiva Bassa Tensione Direttiva Compatibilit...

Page 43: ......
Page 44: ...95 GRUGLIASCO TORINO ITALIA TEL 011 40221 CAS POSTALE 1393 10100 TORINO TELEX 220364 IOTERM I TELEGR TF78 42 42 JOANNES TORINO TELEFAX 011 780 40 59 BRUCIATORI DI GASOLIO GAS NAFTA CALDAIE MURALI A GA...

Reviews: