background image


17 


WARNING:


When servicing, use only 

JobMate™ replacement parts. Use of any 

other parts may create a safety hazard or cause damage to the tool. 
 
Any attempt to repair or replace electrical parts on this power tool may create a safety 
hazard unless repair is performed by a qualified technician.


Always order by PART NUMBER, not by key number. 


Key # 

Part # 

Part Name 

Quantity 

321000 

Rubber cap 

520033 

Ball bearing  

163633 

Switch  

320024 

Switch cover 

234507 

Cooling fan  

520012 

Ball bearing  

110070 

Stator 

520007 

Ball bearing  

342006 

Carbon brush 

10 

222806 

Brush holder  

11 

314506 

Brush holder support  

12 

100105 

Rotor assembly 

13 

300106 

Housing 

14 

500200 

Tapping screw 

15 

153513 

Terminal block 

16 

315001 

Cord clamp 

17 

500201 

Tapping screw 

18 

160205 

UL plug & power cable 

19 

322004 

Cord guard 

20 

315911 

Vacuum adapter 

22 

315872 

Dust collection sleeve 

23 

311660 

Rubber foot 

24 

318017 

Backing plate 

25 

5000 

Tapping screw 

26 

341015 

Hook & loop sheet 

27 

341014 

Sponge board 

28 

318001 

Sole plate 

29 

340014 

Gasket ring  

30 

500206 

Tapping screw 

31 

311659 

Rubber foot 

32 

300106 

Housing  


PARTS LIST 

– MODEL 054-7236-0 

Summary of Contents for 054-7236-0

Page 1: ...feuil Toronto Canada M4S 2B8 PRODUCT SPECIFICATIONS Rating 120 V 60 Hz AC Amperes 1 1 A Oscillation speed 12000 OPM no load Sanding pad style Hook loop Sanding pad shape Delta Sanding pad size 5 x 3 1...

Page 2: ...ty 5 Personal safety 5 6 Tool use and care 6 Service 6 Specific safety rules 7 Extension cord safety 7 Symbols 8 Know your detail sander 9 Accessories and carton contents 10 Assembly and operation 11...

Page 3: ...use permanent eye damage Prescription eyeglasses ARE NOT a replacement for proper eye protection WARNING Non compliant eyewear can cause serious injury if broken during operation of a power tool SAVE...

Page 4: ...ed by power sanding sawing grinding drilling and other construction activities contains chemicals known to cause cancer birth defects or other reproductive harm Some examples of these chemicals are Le...

Page 5: ...and grounded power supply system Avoid body contact with grounded surfaces such as pipes radiators ranges and refrigerators There is increased risk of electric shock if your body is grounded Do not ex...

Page 6: ...h is dangerous and must be repaired Disconnect the plug from the power source before making any adjustments changing accessories or storing the tool Such preventive safety measures reduce the risk of...

Page 7: ...tion When using an extension cord be sure to use one of heavy enough gauge to carry the current the tool will draw An undersized cord will cause a drop in line voltage resulting in loss of power and o...

Page 8: ...onstruction splash proof construction watertight construction protective earthing at earthing terminal Class I tools revolutions or reciprocations per minute diameter off position arrow warning symbol...

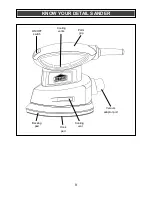
Page 9: ...9 KNOW YOUR DETAIL SANDER Backing pad ON OFF switch Cooling vent Vacuum adaptor port Cooling vents Palm grip Hook pad...

Page 10: ...ing or damaged do not plug the detail sander into the power source until the missing or damaged part is replaced CARTON CONTENTS Carefully unpack the detail sander Compare against the Detail Sander Co...

Page 11: ...SANDPAPER To remove the sandpaper 1 simply peel the sandpaper away from the hook pad 2 Fig 2 INSTALLING VACUUM ADAPTOR The detail sander can be used with the vacuum attachment to assist in removing th...

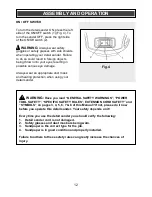
Page 12: ...ion when using your detail sander ASSEMBLY AND OPERATION Fig 4 WARNING Have you read GENERAL SAFETY WARNINGS POWER TOOL SAFETY SPECIFIC SAFETY RULES EXTENSION CORD SAFETY and SYMBOLS on pages 3 4 5 6...

Page 13: ...In general coarse grit will remove most material and finer grit will produce the best finish in all sanding operations The condition of the surface to be sanded will determine which grit will do the b...

Page 14: ...he complete sanding pad surface is in contact with the workpiece Turn the detail sander ON by pressing on the bottom of the ON OFF switch Move the detail sander slowly over workpiece making successive...

Page 15: ...accelerated wear and possible premature failure when they are used on fiberglass boats and sports cars wallboard spackling compounds or plaster The chips and grindings from these materials are highly...

Page 16: ...16 PARTS DIAGRAM MODEL 054 7236 0...

Page 17: ...12 Ball bearing 1 7 110070 Stator 1 8 520007 Ball bearing 1 9 342006 Carbon brush 2 10 222806 Brush holder 2 11 314506 Brush holder support 2 12 100105 Rotor assembly 1 13 300106 Housing 1 14 500200 T...

Page 18: ...ctive product free of charge with the same model or one of equal value or specification within the stated warranty period when returned by the original purchaser with proof of purchase This product is...

Reviews: