background image


7.


Spare Parts 

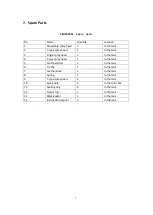
SKU234815    Spare    parts 


No. 

Name 

Quantity 

Location 

Adjustable spray head 

In the tank 

Y-type spray head 

In the tank 

Single spray head 

In the tank 

3-way spray head 

In the tank 

Switch splitter 

In the tank 

Fix Clip 

In the tank 

Leather Bowl 

In the tank 

Spring 

In the tank 

T-type spray head 

In the tank 

10 

Spray pole 

In the color box 

11 

Sealing ring 

In the tank 

12 

Plastic clip- 

In the tank 

13 

Black gasket 

In the tank 

14 

Instruction manual 

In the tank 


Summary of Contents for 234815

Page 1: ...i 16L KNAPSACK SPRAYER SKU 234815 INSTRUCTION MANUAL ...

Page 2: ...uctions 2 3 Main Components 2 4 Assembley Instructions 3 4 1 Fitting the Fiberglass Wand 3 4 2 Fitting the Multiple Sprayer Jet Adaptors 4 4 3 Check the Support Strap is Attached 5 5 Usage and Problem Solving 5 5 1 Usage How to Pump and Spray 5 5 2 Problem Solving 6 6 Cleaning and Storage 6 7 Spare Parts 7 ...

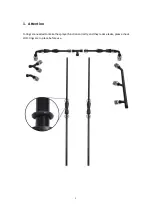
Page 3: ...1 1 Attention O rings are needed to make the sprayer function correctly and they reduce leaks please check all O rings are in place before use ...

Page 4: ...before using it Check that the tank is empty and clean before filling it with a new fluid Before use check that all couplings and covers are properly sealed Otherwise fluid may leak out from the couplings and covers which could be hazardous to your health If the tank is pressurised the contents may escape when the tank lid is removed Discharge pressure from the tank using the trigger on the spray ...

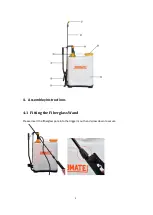
Page 5: ...3 4 Assembley Instructions 4 1 Fitting the Fiberglass Wand Please insert the fiberglass pole into the trigger mouth and screw down to secure ...

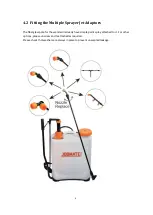
Page 6: ...er Jet Adaptors The fiberglass pole for the wand will already have simple point spray attached to it For other options please unscrew and reattached as required Please check that washers are always in place to prevent unwanted leakage ...

Page 7: ... pour the spray for use into the tank 9 Replace the lid Adjust the shoulder straps to a suitable length and put the tank on your back Pump the pump handle 5 up and down to create pressure in the pump unit 3 Direct the sprayer pole 2 towards the area to be sprayed and press the trigger 6 to start spraying Pump the pump handle again when the pressure drops and spraying stops The backpack sprayer s n...

Page 8: ... Storage Empty the tank after use Always dispose of unused mixed spray chemicals in a safe and responsible matter Clean the tank and the tank cap thoroughly inside and out after use Read the manufacturer s instructions on your sprayed chemical for information on the type of cleaning required Do not use steel brushes scouring pads or strong or acidic cleaning agents The pump unit and spray pole can...

Page 9: ...head 1 In the tank 4 3 way spray head 1 In the tank 5 Switch splitter 1 In the tank 6 Fix Clip 1 In the tank 7 Leather Bowl 1 In the tank 8 Spring 1 In the tank 9 T type spray head 1 In the tank 10 Spray pole 2 In the color box 11 Sealing ring 4 In the tank 12 Plastic clip 2 In the tank 13 Black gasket 1 In the tank 14 Instruction manual 1 In the tank ...

Reviews: