background image


User Manual LiVE 2T-A / LiVE 3T-A (AGO) 


Manufacturer  Johannus Orgelbouw B.V. 


Address 

Keplerlaan 2 


6716 BS EDE 


Country 

The Netherlands 


Telephone 

+31 (0)318 63 74 03 


Fax 

+31 (0)318 62 22 38 


E-mail 

inform@johannus.com 


Website 

www.johannus.com 


Version 

2.2 


Date 

August 2019 


© 2019 Johannus Orgelbouw B.V. 

All rights reserved. Nothing in this publication may be reproduced, stored in a 
data file or made public in any form or in any way either electronically, 
mechanically by way of photocopying, recording or in any other way without the 
prior written permission of Johannus Orgelbouw B.V. 


Summary of Contents for LiVE 2T-A

Page 1: ...2T A 3T A...

Page 2: ...il inform johannus com Website www johannus com Version 2 2 Date August 2019 2019 Johannus Orgelbouw B V All rights reserved Nothing in this publication may be reproduced stored in a data file or made...

Page 3: ...esk 14 2 2 Switch on 14 3 DESCRIPTION OF THE ORGAN 15 3 1 Overview of the components 15 3 2 Overview of controls 16 3 3 Connect and switch on the peripherals 19 3 4 External connections 19 4 OPERATION...

Page 4: ...biance 39 5 6 2 Default Organ 40 5 6 3 Headphones Aux Out 40 5 6 4 Keyboard Mode 41 5 6 5 Reset 41 5 6 6 Side Speakers Level 42 5 6 7 Rear Speakers Level optional 42 5 6 8 Tone Control 43 5 6 9 Versio...

Page 5: ...tall near any heat sources such as radiators heat registers stoves or other apparatus including amplifiers that produce heat 9 Do not defeat the safety purpose of the polarized or grounding type plug...

Page 6: ...an equilateral triangle is intended to alert the user to the presence of uninsulated dangerous voltage within the product s enclosure that may be of sufficient magnitude to constitute a risk of electr...

Page 7: ...place containers with liquid on Organ Do not put anything that contains water on this Organ Also avoid the use of insecticides perfumes alcohol nail polish spray cans etc near the Organ Swiftly wipe a...

Page 8: ...gan in locations where children are present be careful so no mishandling of the Organ can take place An adult should always be on hand to provide supervision and guidance Do not connect this Organ to...

Page 9: ...t interfere with its proper ventilation Manage cables for safety Try to prevent cords and cables from becoming entangled Also all cords and cables should be placed so they are out of the reach of chil...

Page 10: ...cessive heat can deform or discolor the Organ Do not allow rubber vinyl or similar materials to remain on this Organ for long periods of time Such objects can discolor or otherwise harmfully affect th...

Page 11: ...ny hearing loss or ringing in the ears you should immediately stop using the Organ and consult an audiologist To avoid disturbing others nearby try to keep the Organ s volume at reasonable levels You...

Page 12: ...e 2 Lean the organ slightly backward 3 Slide the AGO pedal board D against the organ 2 Set the organ upright 3 Install the music desk A on the top of the organ See 2 1 2 Installation music desk 4 Plac...

Page 13: ...e music desk 4 Firmly tighten the screws with a screw driver until the music desk is securely fastened 2 2 Switch on On the right hand side bottom of the keybed you will find the on off switch of the...

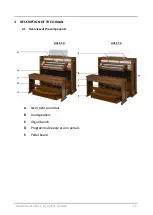
Page 14: ...nual LiVE 2T A LiVE 3T A AGO 15 3 DESCRIPTION OF THE ORGAN 3 1 Overview of the components LiVE 3T A LiVE 2T A A Near field soundbar B Loudspeakers C Organ bench D Programmable expression pedals E Peda...

Page 15: ...Pedal 1 to 6 AB PL Plenum J Oct P Octave coupler for pedal T Tutti K Capture memory locations Manual I 1 to 6 RO Reeds Off L Sub I coupler for Manual I AC Capture memory locations General M Oct I coup...

Page 16: ...tom of the keybed E Headphones connection AA Display F SET AB USB port G SEQ sequence function AC Couplers H KT Keyboard Transfer AD PL Plenum I Capture memory locations Pedal 1 to 6 T Tutti J Oct P O...

Page 17: ...change S and pistons AM S S All Swells to Swell T ENTER AN Optional Solo voices U MENU for Premium Platinum only V CAN all stops off AO Optional Orchestral voices for Platinum only On Off switch mains...

Page 18: ...n external device through the amplifiers of the organ For example an expander connected to the organ through the MIDI MOD can be played through the instrument s loudspeakers AUX OUT A stereo audio out...

Page 19: ...ith the LIVEreverb IITM system This system produces a natural reverb using recordings of the acoustics of existing international pipe organs 4 3 1 Sample sets A sample set is a USB drive containing a...

Page 20: ...th the LIVEreverb IITM to position the organ sound in the church It lets you choose where to sit in the church to enjoy the sound of the organ The Johannus LiVE 2T A 3T A gives you essentially four di...

Page 21: ...t both the Diapason 8 of the Cavaill Coll organ in the Notre Dame in Paris and the Principal 8 of the B tz organ in the Dom Church in Utrecht If you tap on any stop tab then the name of the tab appear...

Page 22: ...stop switches See 3 2 Overview of Controls table 4 7 Accessories Sequence SEQ Sequence is a function to sequential selecting capture memory locations See also 4 9 Capture memory Sequence is a function...

Page 23: ...dropped until a new lowest key is played Activate the Manual Bass with the MB piston Cantus Firmus CF Cantus firmus Latin for fixed voice or in organs solo voice or melody coupler Couples Manual II m...

Page 24: ...0 locations per sample set Thus the total amount of free programmable capture memory places in the LiVE 2T A 3T A is 400 locations times 5 Sample banks equals 2000 Programming a capture memory locatio...

Page 25: ...crescendo pedal are deactivated 4 10 Quick Access Quick Access is a function to quickly access certain functions of the organ 4 10 1 Programming mode crescendo pedal With the SEQ piston a sequential...

Page 26: ...multaneously with a piston of a solo or orchestral voice for example Panflute 2 The current assignment appears on the display 3 Press a key of the manual or the pedal on which the solo or orchestral v...

Page 27: ...tings Crescendo Datadump Expression Pedals Intonation Key Volumes MIDI Config Orchestrals Reset Sample Set Version 5 5 System Settings Default Ambiance Default Organ Headphones Aux Out Keyboard Mode R...

Page 28: ...nt transposer setting Trans c 5 3 Temperaments The Temperaments function sets the temperament The set temperament can be read on the display behind the Temp text There are twelve different temperament...

Page 29: ...f the middle octave 9 Press the MENU piston three times to exit the Johannus Menu 5 4 Upload Organ With the function Upload Organ you can copy a USB drive containing full recordings of pipe organs int...

Page 30: ...nu consists of the following sub functions Crescendo 5 5 1 Datadump 5 5 2 Expession Pedals 5 5 3 Intonation 5 5 4 Key Volumes 5 5 5 MIDI Config 5 5 6 Orchestrals 5 5 7 Reset 5 5 8 Sample Set Version 5...

Page 31: ...xample is properly connected 8 Press the ENTER piston When data is being sent Busy appears on the display 9 If the data dump is complete the Datadump menu appears on the display 10 Press the MENU pist...

Page 32: ...n The available expression pedals appear on the display 6 Use the and pistons to select the expression pedal of which the function must be changed 7 Press the ENTER piston The available possibilities...

Page 33: ...dump is complete the Intonation menu appears on the display 10 Press the MENU piston three times to exit the Johannus Menu b Uploading intonation data to the organ 1 Follow the steps 1 to 5 as above...

Page 34: ...p A question to press a key appears on the display 9 Press one key on the corresponding division and hold the key The display will now show following Key the key indicator and following Vol the volume...

Page 35: ...lumes menu 12 Press the MENU pistons three times to exit the Johannus Menu c Reset ALL stops The Reset ALL stops function resets the key volumes of all stops to the factory setting 1 Press the MENU pi...

Page 36: ...appears on the display 6 Activate the MIDI stop which has to be configured The settings of the corresponding MIDI stop appear on the display An pointer is located in front of the value of the MIDI cha...

Page 37: ...1 Press the MENU piston 2 Use the and pistons to select the Organ Settings function on the display 3 Press the ENTER piston A list with available Organ Settings appears on the display 4 Use the and p...

Page 38: ...ENTER piston A list with available Organ Settings appears on the display 4 Use the and pistons to select the Sample Set Version function on the display 5 Press the ENTER piston The data of the sample...

Page 39: ...ailable System Settings appears on the display 4 Use the and pistons to select the Default Organ setting 5 Press the ENTER piston A list with available sample sets appears on the display with a pointe...

Page 40: ...respond when touched very lightly Low The keys respond when pressed further Velocity The keys are touch sensitive 9 Press the ENTER piston to program the settings The available manuals appear on the d...

Page 41: ...ngs function Rear Speakers Level determines the volume level of the external Rear Surround Loudspeakers at startup of the organ display 1 Press the MENU piston 2 Use the and pistons to select the Syst...

Page 42: ...illiance behind it is the current brilliance level 17 Use the and pistons to select the function of which the level has to be changed 18 Press the ENTER piston The pointer jumps to the set level 19 Us...

Page 43: ...on on the display 5 Press the ENTER piston The Version menu appears on the display 6 Use the and pistons to select the Update organ function on the display 7 Make sure the desired storage medium the U...

Page 44: ...iginal CF function for organ and Platinum voices 6 2 Platinum Voice Package The Platinum Voice Package consists of the solo voices of the Premium Voice Package plus the following orchestral voices Gos...

Page 45: ...hes with car polish 7 2 Problems Overview Symptom Cause Solution Pedal board does not work properly The pedal magnet is making poor contact with the magnetic switch at the rear of the pedal front cove...

Page 46: ...FF 9nH v 0 9nH v 0 8nH v Velocity OFF irrelevant After Touch Keys Channels N N Fine Tune Bend N Control Change 7 11 100 101 6 38 100 101 6 Y Y Y Y General Volume Expr pedals Fine Tune Transposer Progr...

Page 47: ...ansposer values 56 38h 72 48h Transposer value 64 40h A center The following applies to the transposer LSB 100 64h 2 02H and the MSB 101 65h 0 00h Control changes recognized Controller 7 07h General v...

Page 48: ...n the instrument are switched off Pushbutton values When a piston is pressed a sys ex code is transmitted with the value of the piston that is pressed for example PP 00 P 01 through the MIDI MOD outpu...

Page 49: ...hout Orchestral voices Platinum optional for LiVE 3T A Has both options Solo voices Orchestral voices Power consumption 190 W 80 W idle Mode Operational Ambient Temperature Range 32 113 o F 0 45 o C S...

Page 50: ...the following measures Reorient or relocate the receiving antenna Increase the separation between the equipment and receiver Connect the equipment into an outlet on a circuit different from that to w...

Page 51: ...User Manual LiVE 2T A LiVE 3T A AGO 51 For China For EU This product complies with the requirements of EMCD 2014 30 EU and LVD 2014 35 EU...

Page 52: ...or colored GREEN or GREEN AND YELLOW The wire which is colored BLUE must be connected to the terminal which is marked with the letter N or colored BLACK The wire which is colored BROWN must be connec...

Page 53: ...User Manual LiVE 2T A LiVE 3T A AGO 53...

Page 54: ...User Manual LiVE 2T A LiVE 3T A AGO 54...

Reviews: