background image


User Manual Vivaldi 150/250/350 


1


SAFETY 

1.1


Safety instructions 


1.2


Symbols on the organ 

  Warning 


  Warning for electric shock 


  Warning for static-sensitive components 


1.3


Symbols in this manual 

  Warning or important information 


  Note 


1.4


Transport and storage 

Pay attention to the following during transport and storage: 
1.  Remove the music desk and the pedal board from the organ. 
2.  Relative humidity within the storage area: 40 to 60%. 


Position the organ on a stable, horizontal surface.  


Connect the organ to a grounded power socket. 


Turn off the organ when it is not in use. 


Do not place the organ in a damp area.  


Do not expose the organ to liquids.  


Follow the instructions and precautionary measures in this user manual.  


Keep this user manual with the organ.  


The organ may only be opened by a technician authorized by Johannus 
Orgelbouw b.v. The organ contains static-sensitive components. The warranty 
is void if the organ is opened by a non-authorized person. 


Summary of Contents for Vivaldi 150

Page 1: ...150 250 350...

Page 2: ...l inform johannus com Website www johannus com Version 2 0 Date April 2012 2012 Johannus Orgelbouw b v All rights reserved Nothing in this publication may be reproduced stored in a data file or made p...

Page 3: ...tions 14 4 OPERATION 15 4 1 Volume controls 15 4 2 Expression pedal 15 4 3 Cathedral 15 4 4 Adaptive Ambiance System 16 4 5 Intonations 17 4 6 Stops 17 4 7 Couplers 17 4 8 Accessories 18 4 9 Pre progr...

Page 4: ...CKAGES 42 6 1 Characteristics per voice 42 6 2 Exclusions 48 7 MAINTENANCE TROUBLESHOOTING AND WARRANTY 49 7 1 Maintenance 49 7 1 1 Maintenance of the cabinet 49 7 1 2 Maintenance of the manuals 49 7...

Page 5: ...gan 2 Relative humidity within the storage area 40 to 60 Position the organ on a stable horizontal surface Connect the organ to a grounded power socket Turn off the organ when it is not in use Do not...

Page 6: ...backward 3 Slide the pedal board D against the organ 4 Set the organ upright 5 Put the music desk A in the groove on the cover of the organ 6 Place the organ bench C over het pedal board 7 Make sure...

Page 7: ...witch on Switch on the organ with the on off piston at the right next to the manuals Wait several seconds Starting the control functions and the settings will take some time The lights of the 0 piston...

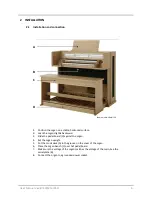
Page 8: ...SCRIPTION OF THE ORGAN 3 1 Overview of the components 3 1 1 Vivaldi 150 A Music desk B Loudspeakers C Surround loudspeakers D Organ bench E Swell pedal F Crescendo pedal G Pedal board A B C D E F G Sh...

Page 9: ...9 3 1 2 Vivaldi 250 A Music Desk B Tweeters C Loudspeakers D Surround loudspeakers E Organ bench F Swell pedals G Crescendo pedal H Pedal board A B C D E F G H Shown model Vivaldi 250 with Luxury Pac...

Page 10: ...10 3 1 3 Vivaldi 350 A Music Desk B Tweeters C Loudspeakers D Surround loudspeakers E Organ bench F Swell pedals G Crescendo pedal H Pedal board A B C D E F G H Shown model Vivaldi 350 with Luxury Pac...

Page 11: ...emory locations H Pre programmed memory locations I 0 Recall Reset J RO Reeds Off K CH Chorus L MB Manual Bass M CF Cantus Firmus N TRANS Transposer O and pistons P CR Crescendo Q MENU R Manual Great...

Page 12: ...emory locations I Pre programmed memory locations J 0 Recall Reset K RO Reeds Off L CH Chorus M MB Manual Bass N CF Cantus Firmus O TRANS Transposer P and pistons Q CR Crescendo R MENU S Manual Great...

Page 13: ...pture memory locations K Pre programmed memory locations L 0 Recall Reset M RO Reeds Off N CH Chorus O MB Manual Bass P CF Cantus Firmus Q TRANS Transposer R and pistons S CR Crescendo T MENU U Manual...

Page 14: ...MIDI output for connecting a Johannus Sequencer or PC with the optional Johannus Intonat program for example AUX IN A stereo audio input for playing the sound of an external device through the amplifi...

Page 15: ...ry Package an extra expression pedal is available This expression pedal standard is configured as swell pedal for the Great and Pedal Vivaldi 150 250 or Choir Great and Pedal Vivaldi 350 This function...

Page 16: ...msterdam 5 5s St Peter Bonn Vilich 6s Kruisverheffingskerk Raalte 6 5s Bovenkerk Kampen 7s glise Notre Dame La Grand Combe 8s 4 4 Adaptive Ambiance System Adaptive Ambiance System is a function which...

Page 17: ...Activates the stops associated with the Swell Solo and orchestral voices optional If the organ is equipped with the optional Premium or Platinum Voice Package a number of solo and orchestral voices a...

Page 18: ...us Firmus with the CF piston 4 8 Accessories Keyboard Transfer KT Vivaldi 350 only Keyboard Transfer is a function to switch the manuals of the Choir and the Great When Keyboard Transfer is active man...

Page 19: ...stops light up Programming a pre programmed memory location 1 Select the desired stops 2 Press the SET piston Hold in the piston 3 Press the desired pre programmed memory location PP T 4 Release the...

Page 20: ...n be used to activate 20 registrations step by step These registrations start with very quiet pianissimo to very loud tutti The default registrations of the 20 steps can be changed See 5 2 Crescendo A...

Page 21: ...olo or orchestral voice directly to a manual or the pedal 1 Press the SET piston simultaneously with a piston of a solo or orchestral voice for example Panflute 2 The actual assignment appears on the...

Page 22: ...emperaments 5 14 Tracker action 5 15 Tuning 5 16 Tweeter settings 5 17 5 1 Ambiance Adaptive Ambiance System is a function which works with LIVEreverb to position the organ sound in the church There i...

Page 23: ...teps has to be changed 7 Press the MENU piston 3x to exit the Johannus Menu 5 3 Datadump The Datadump function sends several settings from the organ to a storage medium the Johannus Sequencer for exam...

Page 24: ...splay of the organ 4 When the upload is completed the main screen of the display appears automatically 5 4 Demo Songs The Demo Songs function plays twelve different demo songs 1 Press the MENU piston...

Page 25: ...s the MENU piston 2 Use the and pistons to select the Display Contrast function on the display 3 Press the SET piston The current contrast level appears on the display 4 Use the and pistons to select...

Page 26: ...ression pedal which has to be changed Expression pedal 2 for example 5 Press the SET piston The first possibility for the expression pedal appears on the display The possibilities are Ch swell pedal f...

Page 27: ...display 6 Use the and pistons to select a setting for the operation of the keys Automatic The manual has been set to High When activating a programmable MIDI stop or optional solo or orchestral voice...

Page 28: ...the desired volume 10 Press the SET piston to save the change The display requests confirmation Use the and pistons to select No or Yes 11 Press the SET piston to confirm 12 Press the MENU piston to...

Page 29: ...ppears on the display 6 Use the and pistons to select the Reset one stop sub function on the display 7 Press the SET piston A question to select a stop to reset appears on the display 8 Activate one s...

Page 30: ...to select No or Yes 8 Press the SET piston to confirm and to return to the Key Volumes menu 9 Press the MENU piston 2x to exit the Johannus Menu 5 9 MIDI Config MIDI is a protocol for communication b...

Page 31: ...d pistons to select the desired Msb setting 8 Press the SET piston The display shows Swell Lsb 9 If needed use the and pistons to select the desired Lsb setting 10 Press the SET piston The display sho...

Page 32: ...s a key on the manual or pedal on which the solo or orchestral voice has to be assigned The new assignment appears on the display 7 Press the MENU piston 3x to exit the Johannus Menu 5 11 Reset Proced...

Page 33: ...display 6 Use the and pistons to select No or Yes Press the SET piston to confirm and to return to the Reset Procedures menu 7 Press the MENU piston 2x to exit the Johannus Menu 5 12 Reverb Settings T...

Page 34: ...Use the intonation style and variation pistons to activate an intonation style or variation the reverberation of which has to be changed 2 Press the MENU piston 3 Use the and pistons to select the Rev...

Page 35: ...MENU piston 2x to exit the Johannus Menu b Default Intonation Startup Setting Default Intonation determines which intonation style is selected at startup of the organ 1 Press the MENU piston 2 Use the...

Page 36: ...esired level for example 20 7 Press the SET piston to confirm and to return to the Startup Settings menu 8 Press the MENU piston 2x to exit the Johannus Menu d Side Speakers Startup Setting Side Speak...

Page 37: ...enabling the following functions are to set Reverb Program Reverb Length ASR 12 reverb only Reverb Volume Reverb 3D Surround effect ASR 12 reverb only Tweeter Volume Setting 1 Press the MENU piston 2...

Page 38: ...and to return to the Special Settings menu 11 Press the MENU piston 2x to return to the Startup Settings menu Go to step 12 12 Use the and pistons to select Disabled to disable the Special Stops func...

Page 39: ...to select the Tracker Action function on the display 3 Press the SET piston The selected intonation style appears on the first line of the display The setting of the first manual appears on the second...

Page 40: ...r setting 1 Press the MENU piston 2 Use the and pistons to select the Tuning function on the display 3 Press the SET piston The actual Tuning setting appears on the display 4 Use the and pistons to se...

Page 41: ...Disabling tweeters 1 Press the MENU piston 2 Use the and pistons to select the Tweeter Settings function on the display 3 Press the SET piston The actual intonation style appears on the first line of...

Page 42: ...the user via Quick Access see 4 13 2 Keyboard assignment Orchestrals and via the Johannus Menu see 5 10 Orchestrals 6 1 Characteristics per voice Explanation of used terminology The compass of the sol...

Page 43: ...ft touch low volume mellow sound long delay for vibration less chiff strong touch strong volume bright sound short delay for vibration more chiff Details Panflute Compass g c Use with couplers normal...

Page 44: ...h strong volume bright sound Details Clarinet Compass C c Use with couplers normal Velocity behavior soft touch low volume mellow sound strong touch strong volume bright sound Details Strings Compass...

Page 45: ...p the strings with his hands to keep a transparant sound To make this possible on the organ the f key on the pedal board can be used as a damper pedal The underlying f key can be used as a rest for th...

Page 46: ...abled See 5 13 Startup Settings sub e Special Stops Sustain pedal An essential part of playing the piano is the use of the sustain pedal To make this possible on the organ the f key on the pedal board...

Page 47: ...way it is possible to play the full compass of a piano keyboard Special Stops When using the piano special settings for reverb and tweeters are enabled See 5 13 Startup Settings sub e Special Stops S...

Page 48: ...ng to another manual is not possible Coupling to the pedal activates a special Gospel Organ Pedal sound on the pedal The manual sound of the Gospel Organ is not coupled to the pedal Velocity behavior...

Page 49: ...Problems Overview Symptom Cause Solution Pedal board does not work properly The pedal magnet is making poor contact with the magnetic switch at the rear of the pedal front cover Reposition the pedal b...

Page 50: ...1 127 9nH v 0 8nH v Velocity ON Velocity OFF irrelevant After Touch Keys Channels N N Pitch Bend N Control Change 7 11 100 101 6 100 101 6 Y Y Y Y General Volume Expr pedals Pitch Transposer Program C...

Page 51: ...changes recognized Controller 7 07h General volume with volume values 0 00h 127 7Fh Volume values less than 40 28h are treated as 40 28h Controller 11 0Bh Swell pedal with volume values 0 00h 127 7Fh...

Page 52: ...e piston that is pressed for example PP 00 P 01 through the MIDI MOD output These sys ex codes are only important when the Johannus sound module CSM 128 is connected to your instrument Other MIDI code...

Page 53: ...User Manual Vivaldi 150 250 350 53...

Page 54: ...User Manual Vivaldi 150 250 350 54...

Page 55: ...User Manual Vivaldi 150 250 350 55...

Page 56: ...User Manual Vivaldi 150 250 350 56...

Reviews: