Before you begin
…
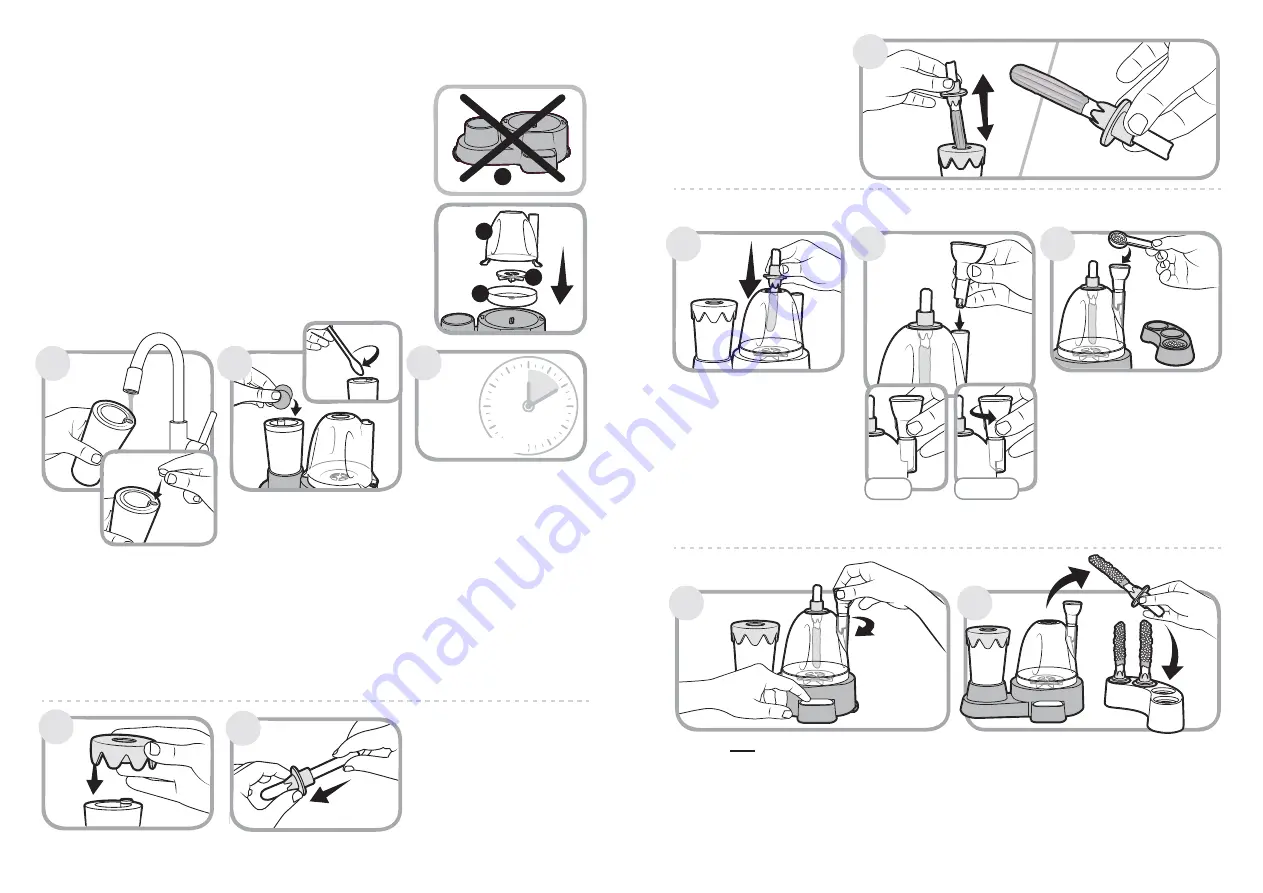
Melt...
Ask an adult to fill the
chocolate melter (
B
), as
shown, with hot tap water
then carefully secure using
the plug (
C
).
IMPORTANT!
DO NOT use boiling water.
Carefully place your
chocolate coated breadstick
inside the sprinkle dome (
G
).
IMPORTANT!
Ensure your
breadstick is not touching
the spinner.
Add the funnel (
H
) and ensure
it is in the closed positon.
When ready, take one scoop of
sprinkles and pour into the
funnel (
H
).
IMPORTANT!
To
avoid the motor jamming, only
use one scoop of sprinkles per
breadstick. If it does jam simply
remove the dome lid (
G
) and
spinner (
F
), empty the sprinkles
from the dome base and
reassemble.
Secure lid (
D
) onto chocolate
melter (
B
).
Take a breadstick and break so
approximately 11 cm in length
(use the guide on the front page).
Now slide the breadstick into the
breadstick holder (
K
), again,
using the guide on the front
page for correct positioning.
IMPORTANT!
Ensure there is
no water inside the chocolate
melter as this may spoil the
melted chocolate.
Place chocolate melter (
B
) into
base unit (
A
). Add a few
chocolate buttons or
chocolate pieces into the
melter. Use the stirrer and, as
the chocolate melts, keep
adding more chocolate until
the melter is two thirds full.
IMPORTANT!
It may take 5-10
minutes to melt the chocolate.
Ensure chocolate is a smooth
consistency before you move
to the next step. You can also
melt chocolate spread in the
same way.
WARNING!
DO NOT PLACE
CHOCOLATE MELTER IN
MICROWAVE.
We do not
recommend using a
microwave to melt chocolate
as the chocolate will become
too warm.
•
Read through the instructions before starting to make your Chocolate Sprinkle Stix.
•
Protect the floor beneath your workspace in case any chocolate
spills onto it.
•
Place the unit and all the other parts on a clean flat surface
(ideally a kitchen worktop or table covered with a wipe clean cloth).
•
IMPORTANT!
When using this product for the first time, hand wash
all parts except the base unit (
A
).
WARNING! DO NOT WASH THE
BASE UNIT
(
A
)
AS IT CONTAINS ELECTRICAL COMPONENTS,
SIMPLY WIPE CLEAN WITH A DAMP CLOTH.
•
Position the dome base (
E
) onto the base unit (
A
) then click the
spinner (
F
) in place. Now secure the dome lid (
G
) by twisting
anti-clockwise.
•
Fill your sprinkle tray (
L
) with sprinkles.
IMPORTANT!
Do not
overfill the tray as sprinkles will only spill when you first scoop.
Insert the breadstick into the
chocolate melter, then gently
squeeze the breadstick holder
before slowly lifting your
breadstick out. Your breadstick
should be covered with an
even coating of chocolate.
Press and hold power button with one hand until
the spinner is fully spinning, then turn the funnel
with the other hand to release the sprinkles into
the dome. Once all sprinkles have been released
turn the funnel to the closed position. Hold
power button for approximately 10 seconds or
until your bread stick has a good coverage of
sprinkles. Release button to stop.
Carefully remove your finished Chocolate
Sprinkle Stix and place in the display stand
(
M
) or eat straight away!
1
2
4
5
3
8
9
Dip...
Blast!
10
11
Sprinkle...
10
MINUTES
10
MINUTES
6
7
OPEN
CLOSED
A
E
F
G


