01
02
Light fitting (D)
1
Top cap (E)
3
Shade (F)
3
Wall plugs
4
Screws
4
Parts
list
Qty
Introduction
Thank you for purchasing this Baldwin Diner Pendant.
Please read the instructions carefully before
use to ensure safe and satisfactory operation
of this product.
Warnings
This is a Class 1 product and must be earthed.
For your safety, this product must be installed in accordance with local Building
Regulations. If in any doubt, or where required by the law, consult a competent
person who is registered with an electrical self-declaration scheme. Further
information is available online or from your Local Authority.
To prevent electric shock switch off at mains supply before installing or maintaining
this fitting.
Ensure other persons cannot restore the electrical supply without your knowledge.
This light fitting should be connected to a 5 amp fused circuit..
This product is suitable for installation on surfaces with normal flammability e.g.
wood, plasterboard, masonry. It is not suitable for use on highly flammable surfaces
(e.g. polystyrene, textiles).
Ensure the correct fixings are used for the installation surface.
For your safety, always switch off the supply before cleaning or adjusting.
This product is dimmable.
Recommended bulb
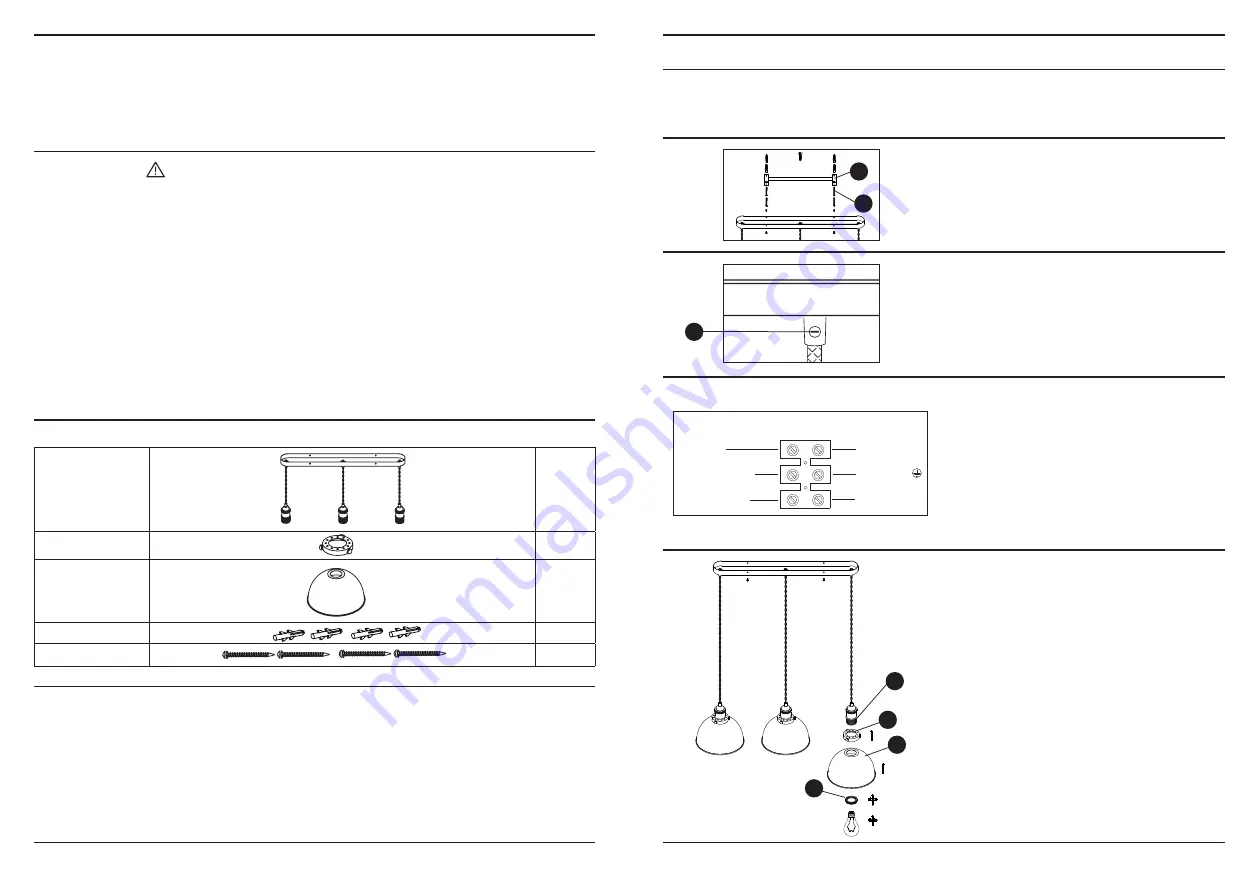
Product assembly
1
5
2
B
A
NEUTRAL
EARTH
SWITCHED LIVE
BLUE (N)
GREEN/YELLOW
or METALLIC EARTH
BROWN (L)
HOUSEHOLD SUPPLY
LIGHT FITTING
CONNECTION
Recommended bulb (not included)
1 x 7W E27 LED Energy Efficient GLS, or
1 x 28W E27 Eco Halogen GLS, or
1 x 40W (Max.) E27 GLS
When changing a bulb, always switch off at the mains and allow the bulb to cool
before handling. Dispose of used bulbs carefully. Do not exceed the rated power
stated or use a different shape bulb from that indicated on the fitting.
Having identified the household wiring from your
existing light fitting, connect to the connection block
inside the product in the following way.
Check that:
You have correctly identified the house wires.
•The connections are tight.
•No loose strands have been left out of the
connection block.
Carefully unpack the carton, making sure all the parts are
present before assembly. Before removing the existing
fitting, carefully note the position of each set of wires.
Remove the fixing bracket (A) from the ceiling cover
by the removing side screws (B).
Attach to the ceiling using the screws provided.
Ensure there is a joist at the point of fixing to support
the weight of the product. Take care to avoid damaging
any concealed wiring and pipes.
4
F
Re-attach the product to the fixing bracket and tighten
the screws.
To attach the shade remove the shade ring (G)
from the threaded body (D), place the top cap (E)
and the shade (F) over the threaded body and secure
with the shade ring (G), tightening with light pressure.
Fit the recommended bulb.
Your light is now ready to use.
E
D
G
The length of drop of this product can be adjusted.
Work out the new height at which the product will
hang, to reduce the length of drop unscrew the clamp
screw (C) on the ceiling cover and feed the excess cable
up into the ceiling cover and retighten the clamp screw
once desired drop is reached.
C
3


