background image

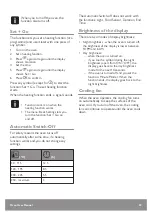
3. Set the temperature above 80 °C.
4. Press 

 again and again until the display

shows: Heat + Hold.

5. Press 

 to confirm.

When the function ends, a signal sounds.

Time Extension

The function: Time Extension makes the heating

function continue after the end of Duration.

Applicable to all heating functions

with Duration or Weight

Automatic.

Not applicable to heating functions

with the core temperature sensor.

1. When the cooking time ends, a signal sounds.

Press any symbol.

The display shows the message.

2. Press 

 to turn on or 

 to cancel.

3. Set the length of the function.
4. Press 

.

Oven User Manual

22

Summary of Contents for JLBIOS634

Page 1: ...JLBIOS634 JLBIOSB650 JLBIOSS650 User Manual Oven ...

Page 2: ...xtension 22 Automatic programmes 23 Recipes online 23 Recipes with Recipe Automatic 23 Using the accessories 24 Food sensor 24 Inserting the accessories 25 Telescopic runners inserting the accessories 26 Trivet and Grill Roasting pan 27 Additional functions 28 Favourites 28 Using the Child Lock 28 Function Lock 28 Set Go 29 Automatic Switch Off 29 Brightness of the display 29 Cooling fan 29 Hints ...

Page 3: ...lf supports 49 Pyrolysis 50 Removing and installing the door 50 How to replace Lamp 51 Troubleshooting 53 What to do if 53 Service data 54 Energy efficiency 55 Product Information and Product Information Sheet 55 Energy saving 55 Repairs after sales service 57 ...

Page 4: ...rning the use of the appliance in a safe way and understand the hazards involved Children between 3 and 8 years of age and persons with very extensive and complex disabilities shall be kept away from the appliance unless continuously supervised Children of less than 3 years of age should be kept away from the appliance unless continuously supervised Do not let children play with the appliance Keep...

Page 5: ... Do not use harsh abrasive cleaners or sharp metal scrapers to clean the glass door since they can scratch the surface which may result in shattering of the glass If the mains power supply cable is damaged it must be replaced by the manufacturer its Authorised Service Centre or similarly qualified persons to avoid an electrical hazard Excessive spillage must be removed before the pyrolytic cleanin...

Page 6: ... of the appliance 576 mm Width of the front of the appliance 549 mm Width of the back of the appliance 548 mm Depth of the appliance 567 mm Built in depth of the appli ance 546 mm Depth with open door 1017 mm Ventilation opening mini mum size Opening placed on the bottom rear side 550 x 20 mm Mounting screws 4 x 12 mm Electrical connection Warning Risk of fire and electric shock All electrical con...

Page 7: ...s with alcohol can cause a mixture of alcohol and air Do not let sparks or open flames to come in contact with the appliance when you open the door Do not put flammable products or items that are wet with flammable products in near or on the appliance Warning Risk of damage to the appliance To prevent damage or discoloration to the enamel do not put ovenware or other objects in the appliance direc...

Page 8: ...ventilation during and after the first use at maximum temperature operation Unlike all humans some birds and reptiles can be extremely sensitive to potential fumes emitted during the cleaning process of all Pyrolytic Ovens Remove any pets especially birds from the vicinity of the appliance location during and after the Pyrolytic cleaning and first use maximum temperature operation to a well ventil...

Page 9: ... Electronic programmer 3 Socket for the core temperature sensor 4 Heating element 5 Lamp 6 Fan 7 Shelf support removable 8 Shelf positions Accessories Wire shelf For cookware cake tins roasts Grill Roasting pan To bake and roast or as a pan to collect fat Trivet Oven User Manual 9 ...

Page 10: ...sting and grilling Use the trivet only with the Grill Roasting pan Food Sensor To measure the temperature inside food Telescopic runners To insert and remove trays and wireshelf more easily Oven User Manual 10 ...

Page 11: ...s Heating Functions Assisted Cooking To turn on or off the light press the field for 3 seconds 3 Back To go back one level in the menu To show the main menu touch the field for 3 seconds 4 Temperature selec tion Fast Heat Up To set the temperature or show the current temperature in the oven Press the field for 3 seconds to turn on or off the function Fast Heat Up 5 Favourites To save and access yo...

Page 12: ... day C Heat up indicator D Temperature E Duration time or end time of a function Other indicators of the display Symbol Function Minute Minder The function works Time of day The display shows the current time Duration The display shows the necessary time for cook ing End Time The display shows when the cooking time is complete Temperature The display shows the temperature Time Indication The displ...

Page 13: ...n Fast Heat Up The function is on It decreases the heat up time Weight Automatic The display shows that the automatic weight system is on or that weight can be changed Heat Hold The function is on Oven User Manual 13 ...

Page 14: ...the oven and the accessories before the first use Put the accessories and the removable shelf supports back to their initial position First Connection When you connect the oven to the mains or after the power cut you have to set the language the display contrast the display brightness and the time of the day 1 Press or to set the value 2 Press to confirm Oven User Manual 14 ...

Page 15: ...ional heating functions Symbol Menu item Application Assisted Cooking Contains recommended oven settings for a wide choice of dishes Select a dish and start the cooking process The temperature and time are only guidelines for a better result and can be adjusted They depend on the recipes and the quali ty and quantity of the used ingredients Submenu for Basic Settings Symbol Menu item Description S...

Page 16: ... configuration Factory Settings Resets all settings to factory settings Heating Functions Heating function Application True Fan Cooking To bake on up to three shelf positions at the same time and to dry food Set the tem perature 20 40 C lower than for the function Con ventional Cooking Pizza Function To bake food on one shelf position for a more intensive browning and a crispy bot tom Set the temp...

Page 17: ...omati cally turns off after 30 sec onds The lamp may automatically deactivate at a temperature below 60 C during some oven functions Specials Heating function Application Keep Warm To keep food warm Plate Warming To preheat plates for serv ing Heating function Application Preserving To make vegetable pre serves e g pickles Dehydrating To dry sliced fruit vegeta bles and mushrooms Dough Proving To ...

Page 18: ...ategory Meat Dish Beef Braised meat Meatloaf Roast beef Rare Rare Medium Medium Well done Well done Dish Scandinavian beef Rare Medium Well done Pork Spare ribs Pork knuckle pre cooked Pork joint Loin of pork Pork neck Pork shoulder Veal Veal knuckle Loin of veal Roast veal Lamb Leg of lamb Saddle of lamb Lamb joint medium Game Hare Leg of hare Saddle of hare Venison Haunch of venison Saddle of ve...

Page 19: ...eira cake Tarte Swiss Tarte sweet Almond cake Muffins Pastry Dish Pastry strips Cream puffs Puff pastry Eclairs Macaroons Short pastry biscuits Christmas stollen Apple strudel frozen Cake on tray Sponge dough Yeast dough Cheese cake tray Brownies Swiss roll Yeast cake Crumble cake Sugar cake Flan base Short pastry flan base Sponge mixture flan base Fruit flan Short pastry fruit flan Sponge mixture...

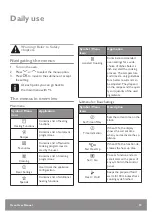
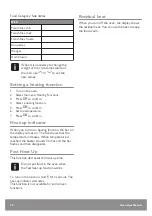
Page 20: ... Heat up indicator When you turn on a heating function the bar on the display comes on The bar shows that the temperature increases When temperature is reached the buzzer sounds 3 times and the bar flashes and then disappears Fast Heat Up This function decreases the heat up time Do not put food in the oven when the Fast heat up function works To turn on the function hold for 3 seconds The heat up ...

Page 21: ...function and temperature first The oven turns off automatically You can use the functions Duration and End Time at the same time if you want to automatically turn on and turn off the oven on a given time later The functions Duration and End Time do not work when you use the core temperature sensor 1 Set a heating function 2 Press again and again until the display shows the necessary clock function...

Page 22: ...ion makes the heating function continue after the end of Duration Applicable to all heating functions with Duration or Weight Automatic Not applicable to heating functions with the core temperature sensor 1 When the cooking time ends a signal sounds Press any symbol The display shows the message 2 Press to turn on or to cancel 3 Set the length of the function 4 Press Oven User Manual 22 ...
Page 23: ...heck the PNC number on the rating plate on the front frame of the oven cavity Recipes with Recipe Automatic This oven has a set of recipes you can use The recipes are fixed and you cannot change them 1 Turn on the oven 2 Select the menu Recipes Press to confirm 3 Select the category and dish Press to confirm 4 Select a recipe Press to confirm Oven User Manual 23 ...

Page 24: ... The appliance calculates an approximate end of cooking time It depends on the quantity of food the set oven function and temperature Food categories meat poultry and fish 1 Activate the appliance 2 Insert the tip of the food sensor into the centre of meat or fish in the thickest part if possible Make sure that at least 3 4 of the food sensor is inside of the dish 3 Put the plug of the food sensor...

Page 25: ...sh 4 Cover the food sensor with the remaining ingredients 5 Put the plug of the food sensor into the socket located in the front frame of the appliance The display shows the food sensor symbol 6 Press or in less than 5 seconds to set the food core temperature 7 Set a heating function and if necessary the oven temperature 8 To change the food core temperature press When the dish is at the set tempe...

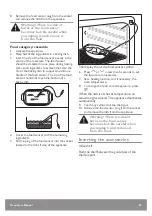
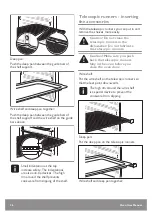
Page 26: ...serting the accessories With the telescopic runners you can put in and remove the shelves more easily Caution Do not clean the telescopic runners in the dishwasher Do not lubricate the telescopic runners Caution Make sure you push back the telescopic runners fully in the oven before you close the oven door Wire shelf Put the wire shelf on the telescopic runners so that the feet point downwards The...

Page 27: ...es of meat or poultry on one shelf position 1 Put the trivet into the deep pan so that the supports of the wire shelf point up 2 Put the deep pan into the oven on the necessary shelf position You can use the trivet to grill flat dishes in large quantities and to toast 1 Put the trivet into the deep pan so that the supports of the wire shelf point down 2 Put the deep pan into the oven on the necess...

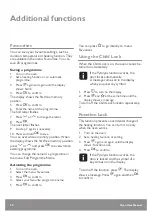
Page 28: ...ating the programme 1 Turn on the oven 2 Select the menu Favourites 3 Press to confirm 4 Select your favourite programme name 5 Press to confirm You can press to go directly to menu Favourites Using the Child Lock When the Child Lock is on the oven cannot be turned on accidentally If the Pyrolysis function works the door locks automatically A message comes on in the display when you press any symb...

Page 29: ...ng function works and you do not change any settings C h 30 115 12 5 120 195 8 5 200 245 5 5 250 maximum 3 The Automatic Switch off does not work with the functions Light Food Sensor Duration End Time Brightness of the display There are two modes of display brightness Night brightness when the oven is turned off the brightness of the display is lower between 10 PM and 6 AM Day brightness when the ...

Page 30: ...matically to 70 C Place plates and dishes in stacks evenly on the wire shelf Use the first shelf position After half of the warming time switch their places Dough Proving The function allows you to rise yeast dough Put the dough into a big dish and cover it with a wet towel or plastic foil Set function Dough Proving and the cooking time Defrost Remove the food packaging and put the food on a plate...

Page 31: ... bakes unevenly The oven temperature is too high and the baking time is too short Set lower oven temperature and longer baking time The cake batter is not evenly dis tributed Next time spread the cake batter evenly on the baking tray The cake is not ready in the baking time specified in a rec ipe The oven temperature is too low Next time set a slightly higher oven tem perature Baking on one level ...

Page 32: ...0 20 1 then 160 180 30 60 Cream puffs Eclairs Conventional Cook ing 190 210 20 35 3 Swiss roll Conventional Cook ing 180 200 10 20 3 Cake with crumble top ping preheating is not needed True Fan Cooking 150 160 20 40 3 Buttered almond cake Sugar cakes Conventional Cook ing 190 210 20 30 3 Fruit flans preheating is not needed Conventional Cook ing 180 35 55 3 Yeast cakes with deli cate toppings e g ...

Page 33: ... 20 30 Rolls preheat the empty oven Conventional Cooking 190 210 10 25 Bakes and gratins Use the first shelf position C min Pasta bake Conventional Cooking 180 200 45 60 Lasagne Conventional Cooking 180 200 25 40 Vegetables au gratin preheat the empty oven Turbo Grilling 160 170 15 30 Baguettes with melted cheese True Fan Cooking 160 170 15 30 Milk rice Conventional Cooking 180 200 40 60 Fish bake...

Page 34: ... C min Puff pastries preheat the empty oven 170 180 30 50 Rolls 180 20 30 Tips on Roasting Use heat resistant ovenware Roast lean meat covered Roast large meat joints directly in the tray or on the wire shelf placed above the tray Put some water in the tray to prevent dripping fat from burning Turn the roast after 1 2 2 3 of the cooking time Roast meat and fish in large pieces 1 kg or more Baste m...

Page 35: ... Roast beef or fillet well done preheat the empty oven 1 cm thick Turbo Grilling 170 180 8 10 PORK Use the function Turbo Grilling kg C min Shoulder Neck Ham joint 1 1 5 160 180 90 120 Chops Spare rib 1 1 5 170 180 60 90 Meatloaf 0 75 1 160 170 50 60 Pork knuckle precooked 0 75 1 150 170 90 120 VEAL Use the function Turbo Grilling kg C min Roast veal 1 160 180 90 120 Oven User Manual 35 ...

Page 36: ...illing kg C min Lamb leg Roast lamb 1 1 5 150 170 100 120 Lamb saddle 1 1 5 160 180 40 60 GAME kg C min Saddle Hare leg preheat the empty oven 1 Conventional Cook ing 230 30 40 Venison saddle 1 5 2 Conventional Cook ing 210 220 35 40 Haunch of venison 1 5 2 Conventional Cook ing 180 200 60 90 Oven User Manual 36 ...

Page 37: ...ulard 1 1 5 190 210 50 70 Duck 1 5 2 180 200 80 100 Goose 3 5 5 160 180 120 180 Turkey 2 5 3 5 160 180 120 150 Turkey 4 6 140 160 150 240 FISH kg C min Whole fish 1 1 5 Conventional Cook ing 210 220 40 60 Bread Baking Preheating is not recommended Use the second shelf position BREAD C min White bread 180 200 40 60 Oven User Manual 37 ...

Page 38: ...0 Wholemeal bread 180 200 50 70 Whole grain bread 170 190 60 90 Bread rolls 190 210 20 35 Crispy baking with Pizza Function PIZZA Use the first shelf position C min Tarts 180 200 40 55 Spinach flan 160 180 45 60 Quiche lorraine Swiss flan 170 190 45 55 Apple pie covered 150 170 50 60 Oven User Manual 38 ...

Page 39: ...0 45 55 Flammkuchen 230 250 12 20 Pierogi 180 200 15 25 Vegetable pie 160 180 50 60 Grill Put the pan into the first shelf position to collect fat Preheat the empty oven before cooking GRILL C min 1st side min 2nd side Roast beef 210 230 30 40 30 40 2 Beef fillet 230 20 30 20 30 3 Pork loin 210 230 30 40 30 40 2 Veal loin 210 230 30 40 30 40 2 Lamb saddle 210 230 25 35 20 25 3 Oven User Manual 39 ...

Page 40: ...oasting pan or directly on the wire shelf Put a tray below the wire shelf to collect fat Always cook without a lid while using this function 3 Use Food Sensor 4 Select the function Slow Cooking You can set the temperature between 80 C and 150 C for the first 10 minutes The default is 90 C Set the temperature for Food Sensor 5 After 10 minutes the oven automatically lowers the temperature to 80 C S...

Page 41: ...agne Cannelloni fresh 170 190 35 45 2 Lasagne Cannelloni frozen 160 180 40 60 2 Baked cheese 170 190 20 30 3 Chicken wings 190 210 20 30 2 Defrost Remove the food packaging and put the food on a plate Use the first shelf position Do not cover the food as this can extend the defrost time kg min Defrosting time min Further de frosting time Chicken 1 100 140 20 30 Put the chicken on an upturned sauce...

Page 42: ...han six one litre preserve jars on the baking tray Fill the jars equally and close with a clamp The jars cannot touch each other Put approximately 1 2 litre of water into the baking tray to give sufficient moisture in the oven When the liquid in the jars starts to simmer after approximately 35 60 minutes with one litre jars stop the oven or decrease the temperature to 100 C see the table Set the t...

Page 43: ... the drying time open the door and let it cool down for one night to complete the drying For 1 tray use the third shelf position For 2 trays use the first and fourth shelf position VEGETABLES C h Beans 60 70 6 8 Peppers 60 70 5 6 Vegetables for soup 60 70 5 6 Mushrooms 50 60 6 8 Herbs 40 50 2 3 Set the temperature to 60 70 C FRUIT h Plums 8 10 Apricots 8 10 Apple slices 6 8 Pears 6 9 Food Sensor B...

Page 44: ...oached 75 78 82 VEAL Food core temperature C Less Medium More Roast veal 75 80 85 Veal knuckle 85 88 90 MUTTON LAMB Food core temperature C Less Medium More Mutton leg 80 85 88 Mutton saddle 75 80 85 Roast lamb Lamb leg 65 70 75 GAME Food core temperature C Less Medium More Hare saddle Venison saddle 65 70 75 Hare leg Hare whole Venison leg 70 75 80 Oven User Manual 44 ...

Page 45: ...sted 60 64 68 CASSEROLES PRE COOKED VEGETABLES Food core temperature C Less Medium More Zucchini casserole Broccoli casserole Fennel casserole 85 88 91 CASSEROLES SAVOURY Food core temperature C Less Medium More Cannelloni Lasagne Pasta bake 85 88 91 CASSEROLES SWEET Food core temperature C Less Medium More White bread casserole with without fruit Rice porridge casserole with with out fruit Sweet ...

Page 46: ...er Ceramic 8 cm diameter 5 cm height Dark non reflective 28 cm diameter Moist Fan Baking For the best results follow suggestions listed in the table below Use the third shelf position C min Pasta gratin 200 220 45 55 Potato gratin 180 200 70 85 Moussaka 170 190 70 95 Lasagne 180 200 75 90 Cannelloni 180 200 70 85 Bread pudding 190 200 55 70 Rice pudding 170 190 45 60 Apple cake made of sponge cake...

Page 47: ...an Cooking 160 60 90 2 Apple pie 2 tins Ø20 cm Conventional Cooking 180 70 90 1 BAKING ON ONE LEVEL Biscuits Use the third shelf position C min Short bread Pastry strips True Fan Cooking 140 25 40 Short bread Pastry strips pre heat the empty oven Conventional Cooking 160 20 30 Small cakes 20 per tray preheat the empty oven True Fan Cooking 150 20 35 Small cakes 20 per tray preheat the empty oven C...

Page 48: ...rue Fan Cooking 140 25 45 1 4 1 3 5 Small cakes 20 per tray preheat the empty oven True Fan Cooking 150 23 40 1 4 GRILL Preheat the empty oven for 5 minutes Grill with the maximum temperature setting min Toast Grill 1 3 5 Beef steak turn halfway through Grill 24 30 4 Oven User Manual 48 ...

Page 49: ...rill pan Dry the cavity with a soft cloth after each use Accessories Clean all accessories after each use and let them dry Use a soft cloth with warm water and a cleaning agent Do not clean the accessories in a dishwasher Do not clean the non stick accessories using aggressive agents sharp edged objects or in a dishwasher How to remove shelf supports To clean the oven remove the shelf supports Cau...

Page 50: ...leaning 1 h 30 min Intense For a thorough cleaning 3 h 6 Press When the cleaning starts the oven door is locked and the lamp does not work To stop the cleaning before it is completed turn off the oven Warning After the function is completed the oven is very hot There is a risk of burns The door stays locked and some of the oven functions are not available after the cleaning is completed until temp...

Page 51: ...s C B and A back in the correct sequence First insert panel C which has a square printed on the left side and a triangle on the right side You will also find those symbols embossed on the door frame The triangle symbol on the glass must match the triangle on the door frame and the square symbol must match the square After that insert the other two glass panels A B C How to replace Lamp Warning Ris...

Page 52: ...blunt object e g a teaspoon to remove the glass cover 3 Clean the glass cover 4 Replace the lamp with a suitable 300 C heat resistant lamp 5 Install the glass cover 6 Install the left shelf support Oven User Manual 52 ...

Page 53: ...utomatic switch off The oven does not heat up The Child Lock is on Refer to Using the Child Lock The oven does not heat up The door is not closed correctly Fully close the door The oven does not heat up The fuse is blown Make sure that the fuse is the cause of the malfunction If the fuse is blown again and again contact a qualified electrician The lamp does not operate The lamp is defective Replac...

Page 54: ... oven for longer than 15 20 minutes af ter the cooking process ends The appliance is activated and does not heat up The fan does not oper ate The display shows Demo The demo mode is activated Refer to Basic Settings in Daily use chapter Service data If you cannot find a solution to the problem yourself contact your dealer or an Authorised Service Centre The necessary data for the service centre is...

Page 55: ...0 kg JLBIOSS650 36 0 kg For European Union according to EU Regulations 65 2014 and 66 2014 For Republic of Belarus according to STB 2478 2017 Appendix G STB 2477 2017 Annexes A and B For Ukraine according to 568 32020 Energy efficiency class is not applicable for Russia EN 60350 1 Household electric cooking appliances Part 1 Ranges ovens steam ovens and grills Methods for measuring performance Ene...

Page 56: ...n use that heat to keep the food warm When the cooking duration is longer than 30 minutes reduce the oven temperature to minimum 3 10 minutes before the end of cooking The residual heat inside the oven will continue to cook Use the residual heat to warm up other dishes Keep food warm Choose the lowest possible temperature setting to use residual heat and keep a meal warm The residual heat indicato...

Page 57: ...e will be made even if the appliance is under guarantee Spare parts Always insist on genuine spare parts An authorised service engineer should service this product and only genuine spare parts should be used Under no circumstances should you attempt to repair the appliance yourself Repairs carried out by inexperienced persons may cause injury or serious malfunctioning Please contact John Lewis tec...

Page 58: ...t home John Lewis Ashford 01233 811 010 John Lewis Chester 01244 393 880 John Lewis Chichester 01243 813 030 John Lewis Croydon 020 8662 4730 John Lewis Horsham 01403 214 740 John Lewis Ipswich 01473 275 850 John Lewis Newbury 01635 263 980 John Lewis Poole 01202 756 020 John Lewis Swindon 01793 733 180 John Lewis Tamworth 01827 300 580 John Lewis Tunbridge Wells 01892 506 830 John Lewis York 0190...

Page 59: ...to recycle it Help protect the environment and human health by recycling waste of electrical and electronic appliances Do not dispose of appliances marked with the symbol with the household waste Return the product to your local recycling facility or contact your municipal office Oven User Manual 59 ...

Page 60: ...867353431 A 432019 Subject to change without notice ...

Reviews: