background image

Before using for the first time

Warning!


Remove all packaging,

both inside and outside the oven,
before using the oven.

When the oven is first connected to the
electrical supply, the display will automatically
show 12:00 and the symbol   flashes.
Ensure the correct time of day is set before
using the oven.

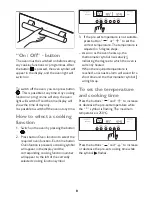
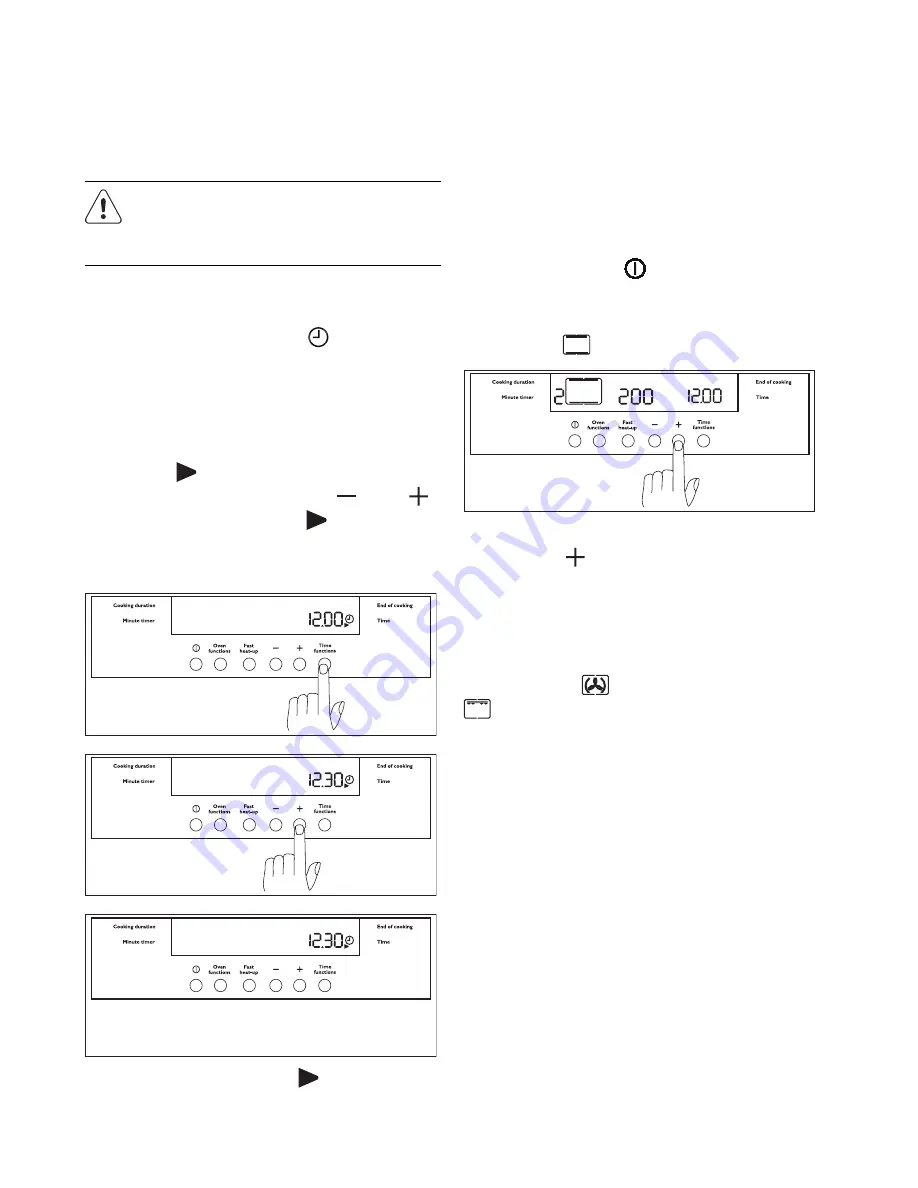
Setting the clock:
1. Press Time function button and, while the

symbol   is flashing, set the correct time
of day by pressing buttons “   ” or “   ”
The time arrow symbol   will disappear
about 5 seconds after the correct time is
displayed.

2. As soon as the symbol   stops flashing,

press Time function button twice.

Then, proceed as described in point 1.

Before the first use, the oven should be heated
while empty.
1. Press the button   to switch on the oven.
2. Press button Oven function twice and

select the "Conventional Cooking"
function 

 .

3. Set the temperature to 250°C by using the

button “   ”.

4. Allow the oven to run 

empty

 for

approximately 45 minutes.

5. Open a window for ventilation.
This procedure should be repeated with the
"Fan Cooking" 

 and "Full Grill" function

 for approximately 5-10 minutes.

During this time, an unpleasant odour may be
emitted. This is absolutely normal. It is caused
by manufacturing residues.
Once this operation is carried out, let the
oven cool down, then clean the oven cavity
with a soft cloth soaked in warm soapy water.
Before cooking for the first time, carefully
wash the oven accessories as well.
To open the oven door, always hold the
handle in the centre, until it is fully open.

7

Summary of Contents for JLBIOS662

Page 1: ...JLBIOS662 Built in oven Instruction manual...

Page 2: ...oven is designed to be operated by adults Do not allow children to play near or with the oven The oven gets hot whenit is in use Children should be kept away until it has cooled This appliance is not...

Page 3: ...s not come into contact with the hot surfaces of the oven Maintenance and Cleaning Only clean this oven in accordance with the instructions The oven should be kept clean at all times A build up of fat...

Page 4: ...The Cooling Fan 15 The Fan Oven 16 The Conventional Oven 17 Conventional Cooking and Fan Cooking 18 Grilling 23 Thermal grilling 24 Pizza 24 Defrosting 25 Care and cleaning 25 Cleaning the oven door...

Page 5: ...Description of the appliance General overview 2 1 4 3 5 7 6 1 Control panel 2 Air Vents for Cooling Fan 3 Grill 4 Oven light 5 Telescopic Shelf Supports 6 Rating plate 7 Fan 5...

Page 6: ...e 7 Fast Heat Up Function 8 Oven Function Control 9 ON OFF All the oven functions are controlled by an electronic programmer You can select any combination of cooking function cooking temperature and...

Page 7: ...e the firstuse the ovenshouldbe heated while empty 1 Press the button to switch on the oven 2 Press button Oven function twice and select the Conventional Cooking function 3 Set the temperature to 250...

Page 8: ...sed a cooking symbol will appear in the display and the corresponding cooking function number will appear to the left of the currently selected cooking function symbol 3 If the pre set temperature is...

Page 9: ...r around the food Pre set temperature 180 C Highest temperature 200 C Pizza Oven The bottom element provides direct heat to the base of pizzas quiches or pies while the fan ensures air is circulated t...

Page 10: ...tch off if in use The minute minder function can be used as well when the oven is off To use or to change the minute minder setting Press button Time functions until the symbols and flash Now you can...

Page 11: ...time 3 Push the button to select the required end of cooking time 4 Once the setting has been made the programmer will wait 3 seconds and then start running 5 The oven will switch on and off automatic...

Page 12: ...Heat Up function can be used 1 Switch the oven on by pressing button 2 Set the required cooking function and temperature as explained in the previous pages 3 Set the temperature by pressing button or...

Page 13: ...1 Press the buttons Oven functions and at the same time and keep them pressed for about 3 seconds The alarm signal beeps once To disable the beep on touch 1 With the oven switched on press the button...

Page 14: ...On 2 and 4 shelf levels there are telescopic shelf supports installed With telescopic shelf supports you can insert and remove the shelves more easily 1 Pull out the right and left hand telescopic she...

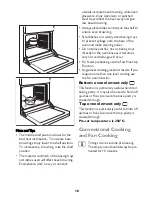
Page 15: ...at the back of the oven or placed on the oven base Do not use baking trays larger than 30 cm x 35 cm 12 in x 14 in as they will restrict the circulation of heat and may affect performance The effects...

Page 16: ...results are achieved if the oven is preheated first e g bread pastries scones souffles etc Lower Temperatures Fan oven cooking generally requires lower temperatures than conventional cooking Follow th...

Page 17: ...rature if necessary Remember to reduce temperatures by about 20 25 C for your own conventional recipes When roasting do use the trivet in the meat tin Fat and meat juices will drain into the meat tin...

Page 18: ...ase of the oven and make cleaning easier Do not place dishes tins or baking trays directly on the oven base as it becomes very hot and damage will occur For faster preheating use the Fast Heat Up Func...

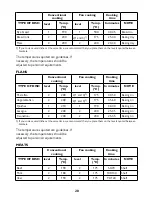
Page 19: ...ke tin Plum cake 1 175 2 160 50 60 Bread tin Small cakes 3 170 2 160 20 35 Baking tray Biscuits 2 160 2 1 and 3 1 150 20 30 Baking tray Meringue 2 135 2 1 and 3 1 150 60 90 Baking tray Fancy biscuits...

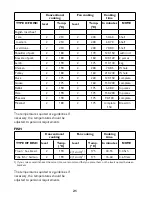
Page 20: ...me TYPE OF DISH level Temp C level Temp C In minutes NOTE Pasta flan 2 200 2 1 and 3 1 175 40 50 Baking tin Vegetable flan 2 200 2 1 and 3 1 175 45 60 Baking tin Quiches 1 210 1 190 30 40 Baking tin L...

Page 21: ...80 In pieces Hare 2 190 2 175 150 200 In pieces Pheasant 2 190 2 175 90 120 complete Meatloaf 2 180 2 175 complete 150 Bread tin The temperatures quoted are guidelines If necessary the temperatures s...

Page 22: ...TURE SELECTION 200 C 250 C How to Use the Inner Grill The inner grill provides quick direct heat to the central area of the grill pan Use the inner grill element for cooking small quantities it can he...

Page 23: ...uantities can be cooked at the same time 1 Switch the oven ON 2 Select the Thermal Grill Oven Function by pressing the button Oven function until the symbol appears on the display 3 If necessary press...

Page 24: ...wo 2 1000 3 200 25 30 20 30 Chicken drumsticks 6 3 200 15 20 15 18 Quail 4 500 3 200 25 30 20 25 Vegetable gratin 3 200 20 25 pieces Scallops 3 200 15 20 Mackerel 2 4 3 200 15 20 10 15 Fish slices 4 6...

Page 25: ...function until the symbol appears in the display 3 The display will show the indication def Hints and Tips Cover food with a lid aluminium foil or plastic film to prevent drying out during defrosting...

Page 26: ...nated pads unsuitable for non stick saucepans Brillo Ajax pads or steel wool pads Chemical oven pads or aerosols Rust removers Bath Sink stain removers Clean the outer and inner door glass using warm...

Page 27: ...e first opening position approx 45 Then pull forward and remove it from its seat 4 Place the door on a stable surface protected by a soft cloth 5 Release the locking system to remove the internal pane...

Page 28: ...fats when the oven temperature is raised to around 220 C To aid this process it is a good idea to run the oven for an hour or two per week without food to ensure continued good performance from the C...

Page 29: ...panels are not attached to the oven cavity and can fall out when you remove the shelf runners Warning Before maintenance make sure that the appliance is cool There is risk of burns because of residual...

Page 30: ...e or installation a charge will be made even if the appliance is under guarantee SYMPTOM SOLUTION The oven does not come on Check that both a cooking function and temperature have been selected Check...

Page 31: ...nt for the recycling of electrical and electronic equipment By ensuring this product is disposed of correctly you will help prevent potential negative consequences for the environment and human health...

Page 32: ...ust comply to the specifications given below For UK use only Connection via Min size Cable flex Cable flex type Fuse 13 A socket outlet 13 A spur box 2 5 mm 3 core butyl insulated 13 A min Oven Contro...

Page 33: ...talled it is easily accessible for the engineer in the event of a breakdown Building In The surround or cabinet into which the oven will be built must comply with these specifications the dimensions m...

Page 34: ...m Dimensions of the oven cavity Height 335 mm Width 395 mm Depth 400 mm Oven capacity 53 litres Heating elements rating Conventional Oven Top element Bottom element 1 800 W Top element 800 W Bottom el...

Page 35: ...ar and concise details of fault 4 The purchase date as found on your receipt 5 The model and serial number of the appliance found on the rating plate So that you always have these numbers at hand we r...

Page 36: ...John Lewis Partnership 171 Victoria Street London SW1E 5NN www johnlewis com 397126601 A 042009...

Reviews: