


JLTDC 06
condenser tumble dryer
JLTDC06
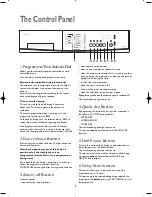
Delay
start
Synthetics
Door
Quick
Start/
Pause
Drying
Cooling
End
Filter
Full tank
Condenser
Dry time
Extra dry
Off
Store dry
Cupboard dry
Damp dry
Iron dry
Extra dry
Cupboard dry
Cottons
Iron dry
Half
power
Alarm
off
Extra damp
Easy iron
30 minutes
Refresh
Rack dry
Wool
Extra delicate
Instruction manual
1
125983041.qxp 2006-09-18 13:54 Page 1


