background image

• If you have washed your laundry with stain

remover you must execute an extra rinse
cycle before loading your tumble dryer.

• Please make sure that no gas lighters or

matches have accidentally been left in
pockets of garments incase they are loaded
into appliance

Warning!

Risk of fire!


Never stop a

tumble dry before the end of
the drying cycle unless all
items are quickly removed and
spread out so that the heat is
dissipated.

Lint must not be allowed to
accumulate around the
tumble dryer.

Risk of electric shock!

 Do not spray

down the appliance with jets of water.

• The final part of a tumble dryer cycle occurs

without heat ( cool down cycle ) to ensure
that the items are left at a temperature that
ensures that items will not be damaged.

• The tumble dryer is not to be used if

industrial chemicals have been used for
cleaning.

• Ensure you have good ventilation in the

installation room to avoid the back flow of
gases into the room from appliances
burning other fuels, including open fires.

Installation

• This appliance is heavy. Care should be

taken when moving it.

• When unpacking the appliance, check that

it is not damaged. If in doubt, do not use it
and contact the Service Centre.

• All packaging must be removed before use.

Serious damage can occur to the product
and to property if this is not adhered to. See
relevant section in the user manual.

• Any electrical work required to install this

appliance should be carried out by a
qualified electrician or competent person.

• If the machine is situated on a carpeted

floor, please adjust the feet in order to
allow air to circulate freely under the
appliance.

• After having installed the appliance, check

that it is not pressing or standing on its
electrical supply cable.

• If the tumble dryer is placed on top of a

washing machine, it is compulsory to use
the stacking kit (optional accessory).

Use

• This appliance is designed for domestic use.

It must not be used for purposes other than
those for which it was designed.

• Only wash fabrics which are designed to be

machine dried. Follow the instructions on
each garment label.

• Do not dry unwashed items in the tumble

dryer.

• Do not overload the appliance. See the

relevant section in the user manual.

• Clothes which are dripping wet should not

be placed in the dryer.

• Garments which have been in contact with

volatile petroleum products should not be
machine dried. If volatile cleaning fluids are
used, care should be taken to ensure that
the fluid is removed from the garment
before placing in the machine.

• Never pull the power supply cable to

remove the plug from the socket; always
take hold of the plug itself.

• Never use the tumble dryer if the power

supply cable, the control panel, the working
surface or the base are damaged so that the
inside of the tumble dryer is accessible.

3

Summary of Contents for JLTDC11

Page 1: ...JLTDC11 Condenser dryer with heat pump Instruction manual...

Page 2: ...screws stones or any other hard sharp material can cause extensive damage and must not be placed into the machine In order to avoid danger of fires caused by excessive drying do not use appliance to d...

Page 3: ...is is not adhered to See relevant section in the user manual Any electrical work required to install this appliance should be carried out by a qualified electrician or competent person If the machine...

Page 4: ...ramme overview Ensure you have good ventilation in the installation room Clean the micro fine filter and fine strainer after each drying cycle Spin the laundry well before drying Energy consumption de...

Page 5: ...he environment and human health which could otherwise be caused by inappropriate waste handling of this product For more detailed information about recycling of this product please contact your local...

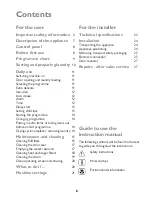
Page 6: ...cycle complete removing laundry 14 Maintenance and cleaning 15 Cleaning fluff filter 15 Cleaning the door seal 17 Emptying the water reservoir 17 Cleaning heat exchanger filters 18 Cleaning the drum...

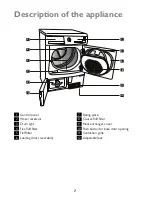
Page 7: ...10 1 Control panel 2 Water reservoir 3 Drum light 4 Fine fluff filter 5 Fluff filter 6 Loading door reversible 7 Rating plate 8 Course fluff filter 9 Heat exchanger cover 10 Push button for base door...

Page 8: ...ore first use Warning If the appliance was not transported in an upright position leave it to stand for 12 hours before connecting it to the electricity supply and using it for the first time so that...

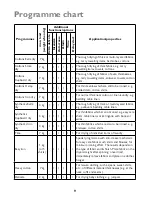
Page 9: ...thetics Extra dry 3 kg Thorough drying of thick or multi layered fabrics e g pullovers bedding table linen Synthetics Cupboard dry 3 kg For thin fabrics which are not ironed e g easy care shirts table...

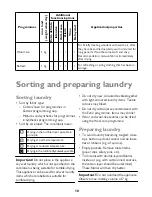
Page 10: ...mperature Drying in the tumble dryer not possible Important Do not place in the appliance any wet laundry which is not specified on the care label as being suitable for tumble drying This appliance ca...

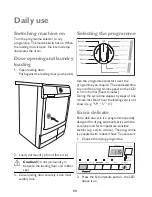
Page 11: ...ly lock Selecting the programme Use the programme selector to set the programme you require The estimated time to end of the programme appears in the LCD in h mm format hours minutes During the cycle...

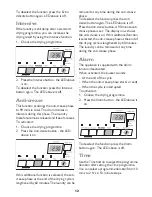
Page 12: ...he laundry can be removed at any time during the anti crease phase To deselect the function press the Anti crease button again The LED above is off Press the Anti crease button A 90 minute anti crease...

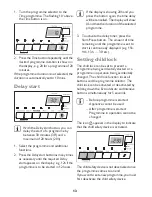
Page 13: ...splay will show 0 and then the duration of the selected programme 3 To activate the delay timer press the Start Pause button The amount of time remaining until the programme is set to start is continu...

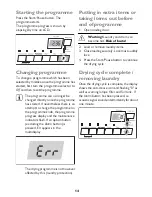
Page 14: ...tors flash If an option button excluding the Alarm button is pressed Err appears in the multidisplay The drying programme is not however affected by this laundry protection Putting in extra items or t...

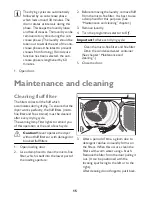
Page 15: ...ain the condensed water container See chapter Maintenance and cleaning 5 Close the door Maintenance and cleaning Cleaning fluff filter The filters collect all the fluff which accumulates during drying...

Page 16: ...but should be checked regularly and cleaned of fluff if necessary 7 To do this grip the top of the large mesh filter and pull it forwards until it comes loose from the two brackets 8 Remove fluff fro...

Page 17: ...condensed water is not suitable for drinking or for preparing foodstuffs 1 Take out drawer containing water reservoir completely 1 and pull up the water reservoir s drainage pipe as far as it will go...

Page 18: ...out the fluff filters Clogged filters cause higher energy consumption drying cycle elongation and dryer damage A dirty heat pump can only be cleaned up by means of a costly process 1 Open door in plin...

Page 19: ...ance base 6 As necessary approx once every 6 months remove the fluff from the heat exchanger using the sponge supplied When doing this please use rubber gloves Tip The fluff can be removed more easily...

Page 20: ...Max loading exceeded Respect max loading volume Covered ventilation grill Uncover ventilation grill in base area Residue inside the drum Clean the drum inside High water hardness Set suitable water h...

Page 21: ...can be obtained from your local Service Force Centre Important When the appliance is switched on the interior lighting switches itself off after 4 minutes when the door is open Warning Do not use stan...

Page 22: ...you to regulate the sensitivity of the drying sensor based on conductivity values of the water In order to establish the conductivity of the water in your area please contact your water board 1 Turn...

Page 23: ...Required fuse 13 A Total power 1350 W Energy efficiency class A Energy consumption 7 kg of cotton pre drained at 1000 rpm 2 2 35 kWh Use Domestic Permissible ambient temperature 5 C to 35 C Consumpti...

Page 24: ...ely all round the appliance Do not obstruct the front ventilation grille or the air intake grilles at the back of the machine To keep vibration and noise to a minimum when the dryer is in use it shoul...

Page 25: ...ce must not be installed behind the lockable door a sliding door a door with a hinge on the opposite side to that of the appliance in such a way that a full opening of the dryer is restricted Removing...

Page 26: ...MP BLUE If you fit your own plug the colours of the wires in the mains lead of your appliance may not correspond with the markings identifying the terminals in your plug Proceed as follows 1 Connect t...

Page 27: ...e Centre The engineer will carry out the door reversal at your cost Repairs after sales service Your appliance comes with a three year warranty If it is not working correctly consult the fault finding...

Page 28: ...rised service engineer should service this product and only genuine spare parts should be used Under no circumstances should you attempt to repair the appliance yourself Repairs carried out by inexper...

Page 29: ...29...

Page 30: ...30...

Page 31: ...31...

Page 32: ...John Lewis Partnership 171 Victoria Street London SW1E 5NN www johnlewis com 136909381 00 102009...
Reviews: