T606MSx-4 and T606MSx-4+PIR Series Multi-Stage Temperature and Humidity Controllers
Installation Instructions
18
Programming the Daily Schedule – Four-Event
(T606MSP-4 and T606MSP-4+PIR Models)
The schedule-setting menu is used to enter the
Occupied and Unoccupied states for each day of the
week. The schedule-setting menu reflects either a
two- or four-event schedule per day, based on what
was selected in the
2/4event
parameter during the
configuration process. If the schedule-setting menu
does not reflect a four-event schedule, select four
events in the
2/4event
parameter of the Installer
Configuration Menu.
When changing the time, press and release the
UP/DOWN
arrow keys once to change the time in
1-minute increments; press and hold down the keys to
change the time in 30-minute increments.
Note:
Programming one of the digital inputs to remote
NSB disables the menu.
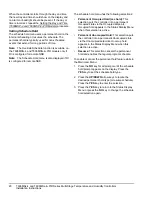
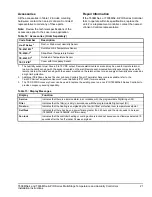
To set the time schedule for a four-event schedule,
follow the steps in Table 9. See Table 10 for an
example of a four-event office schedule.
After setting the schedule for all the
days of the week, following the last
entry for Sunday, press the
YES
key
to return to the Status Display Menu
or press the
NO
key to start again at
Monday.
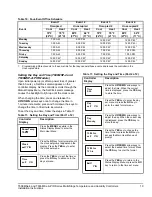
Table 9: Programming the Daily Schedule –
Four-Event (Part 1 of 2)
Controller
Display
Description
Press the
MENU
key from the Status
Display Menu to enter the Main User
Menu.
Press the
NO
key for all prompts until
the schedule set prompt appears on
the display. Press the
YES
key to
enter the scheduling menu.
Press the
YES
key to set the
schedule for Monday or press the
NO
key to advance to Tuesday.
Table 8: Programming the Daily Schedule –
Two-Event (Part 2 of 2)
Controller
Display
Description
Exit?
Y/N
RoomTemp
75.0
°
F
Schedule
set? Y/N
Monday
set? Y/N
Press the
YES
key to set the
Occupied start time for Monday or
press the
NO
key to advance to
Tuesday. Selecting
NO
leaves the
controller in the Unoccupied state for
the entire day.
Press the
UP/DOWN
arrow keys to
set the first Occupied start time.
Press the
YES
key to enter the time.
Press the
UP/DOWN
arrow keys to
set the first Unoccupied start time.
Press the
YES
key to enter the time.
Press the
UP/DOWN
arrow keys to
set the second Occupied start time.
Press the
YES
key to enter the time.
Press the
UP/DOWN
arrow keys to
set the second Unoccupied start
time. Press the
YES
key to enter the
time.
Press the
YES
key to set the
schedule for Tuesday or press the
NO
key to advance to Wednesday.
Press the
YES
key to copy the
schedule from the previous day.
Press the
NO
key to set a different
schedule.
If the
YES
key was pressed, the next
prompt is for Wednesday. Repeat the
procedure for all days of the week.
After setting the schedule for all the
days of the week, following the last
entry for Sunday, press the
YES
key
to return to the Status Display Menu
or press the
NO
key to start again at
Monday.
Table 9: Programming the Daily Schedule –
Four-Event (Part 2 of 2)
Controller
Display
Description
Occupied
day? Y/N
Occupied
12:00 AM
Unoccup
12:00 AM
Occupie2
12:00 AM
Unoccup2
12:00 AM
Tuesday
set? Y/N
Copy Y/N
previous
Wednesda
set? Y/N
Exit?
Y/N

