background image

697936-UIM-B-01211

Johnson Controls Unitary Products

15

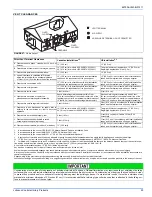
ACCESSORY CONNECTIONS

The furnace control will allow power-switching control of various acces-
sories. 

ELECTRONIC AIR CLEANER CONNECTION

Two 1/4” (6.4 mm) spade terminals (EAC and NEUTRAL) for electronic
air cleaner connections are located on the control board. The terminals
provide 115 VAC (1.0 amp maximum) during circulating blower opera-
tion.

HUMIDIFIER CONNECTION

Two 1/4” (6.4 mm) spade terminals (HUM and NEUTRAL) for humidifier
connections are located on the control board. The terminals provide 115
VAC (1.0 amp maximum) during heating system operation.

A mounting hole is provided on the control panel next to the furnace
control board for mounting a humidifier transformer if required.

TWINNING

These furnaces are not to be twinned. If more than one furnace is
needed in an application, each furnace must have its own complete
duct system and its own wall thermostat.

SECTION VI: CONDENSATE PIPING AND 

FURNACE VENTING CONFIGURATION

CONDENSATE DRAIN LOCATION

As shipped from the factory:

• For all 040, 060 & 080K input furnaces the main drain is plumbed

through the casing right-side opening when viewed from the front
of the furnace.

• For all 100 & 120 input furnaces the main drain is plumbed through

the casing left-side opening when viewed from the front of the fur-
nace.

The condensate hoses must slope downwards at all points.

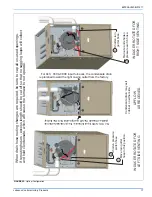
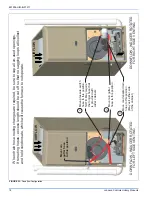
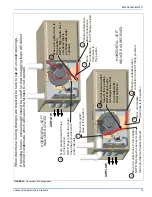
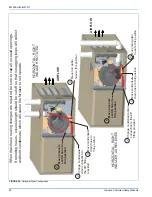
When drain hose routing changes are required (shown in Figures 22-
25), be sure to cap all un-used openings.

If rerouting hoses - excess length should be cut off so that no sagging
loops will collect and hold condensate - which will cause the furnace to
not operate.

No hose clamps are needed for connecting to the condensate pan.

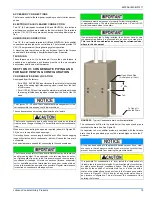
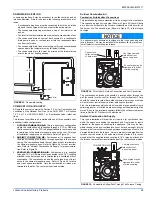
The condensate will flow to the drain better if an open stand pipe is
installed in the drain line. See Figure 20.

If evaporator coil or humidifier drains are combined with the furnace
drain, then the open stand pipe could be raised higher, above the 5”
minimum.

The Figures 22 - 25 show the condensate drain arrangement for the
various possible furnace and vent blower positions.

The furnace condensate pan is self priming and contains an internal
trap to prevent flue gas leaking. Do not install an external condensate
trap.

The furnace, evaporator coil, and humidifier drains may be combined
and drained together. The evaporator coil drain may have an exter-
nal, field-supplied trap prior to the furnace drain connection to prevent
conditioned air leakage. All drain connections (furnace, evaporator
coil, or humidifier) must be terminated into an open or vented drain as
close to the respective equipment as possible. Regular maintenance
is required on condensate drainage system.

NOTICE

Condensate must be disposed of properly. Follow local plumbing 
or wastewater codes. The drain line must maintain a 1/4" per foot (20
mm/m) downward slope to the drain.

If an external vent tee is being installed, then it must have its own
condensate trap before it is disposed into an open or vented drain.
This is not to be considered as a second trap as referenced else-
where in this document.

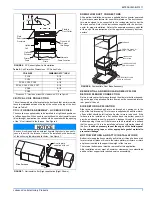
 FIGURE 20:  

Typical. Condensate drain, vertical installation

A loop has been added to the pressure switch vacuum hose. How-
ever, ensure that all pressure switch hoses are routed such that they
prevent any condensate from entering the pressure switch.

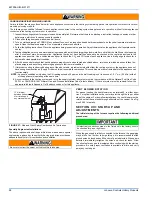
It is possible for condensation to form inside the combustion air
(intake) pipe in the summer months if significant length of combustion
air pipe passes through conditioned space. This problem can be
averted by the addition of a simple drain tee, or a drain tee with a
drain on the combustion air pipe as close to the furnace as possible,
as shown in Figure 21. This is true for all long horizontal venting in
any furnace configuration. This will prevent the condensate from
entering the furnace.

To Open Or
Vented Drain

Tee

5” Min.

Open Stand Pipe

(Anti-siphon air vent)

NOTICE

Summary of Contents for TM9X*MP

Page 1: ...Double Vertical Combustion Air Intake and Vent Termination 24 Downward Venting 25 Direct Vent Air Intake Connection and Vent Connection 25 Combustion Airflow Path Through The Furnace Casing 25 Outsid...

Page 2: ...ition input rate temperature rise and venting according to the manufacturer s instructions 10 When installed in a non HUD Approved Modular Home or building constructed on site combustion air shall not...

Page 3: ...urisdiction In the United States and Canada follow all codes and standards for the following using the latest edition available STEP 1 Safety US National Fuel Gas Code NFGC NFPA 54 ANSI Z223 1 and the...

Page 4: ...n FOR FURNACES INSTALLED IN THE COMMON WEALTH OF MASSACHUSETTS ONLY For all side wall horizontally vented gas fueled equipment installed in every dwelling building or structure used in whole or in par...

Page 5: ...access cover shall be attached in such a manner as to prevent leaks DUCT FLANGES Four flanges are provided to attach ductwork to the furnace These flanges are rotated down for shipment In order to use...

Page 6: ...ould always be installed on the side desig nated as top side See Figure 4 5 FURNACE ASSEMBLY PC SERIES COILS These upflow coils are designed for installation on top of upflow fur naces only If the coi...

Page 7: ...nace is to be installed on a flat solid surface this bottom panel will provide an adequate seal to prevent air leakage through the unused bottom opening However if the furnace is to be installed on a...

Page 8: ...e one support located approximately in the center of the furnace near the blower shelf and the third support should be at the return end of the fur nace Maintain a 6 15 2 cm minimum clearance between...

Page 9: ...densate Drain Optional Return Air Cutout Either side 29 5 For Cladded door add appoximately an additional 75 C SUPPLY END 56 56 20 B 3 23 8 56 Combustion Air Inlet Vent Outlet RETURN END B 24 25 Table...

Page 10: ...the instructions in this section specify the type of gas approved for this furnace only use those approved gases The instal lation of a drip leg and ground union is required Refer to Figure 16 FIGURE...

Page 11: ...opera tion and or the valve to leak Table 5 Nominal Manifold Pressure High Fire Manifold Pressures in w c Manifold Pressures kPa Altitude feet Altitude m 0 7999 8000 8999 9000 9999 0 2437 2438 2742 2...

Page 12: ...ONS Install the field supplied thermostat by following the instructions that come with the thermostat With the thermostat set in the OFF position and the main electrical source disconnected connect th...

Page 13: ...oner Single Stage Furnace HM1 Humidistat Y Full Stage Compressor G Fan PP11C70224 THERMOSTAT RH 24 Volt Hot Heat XFMR RC 24 Volt Hot Cool XFMR W Full Stage Heat Clipping Jumper W914 for electric heat...

Page 14: ...E B E ZD E R OD MODELS HGD HP RHS O Reversing Valve Energized in Cool C 24 Volt Common R 24 Volt Hot W1 66 out Heat Y Compressor DEMAND DEFROST CONTROL X L Malfunction Light W Auxiliary Heat SINGLE ST...

Page 15: ...ier drains are combined with the furnace drain then the open stand pipe could be raised higher above the 5 minimum The Figures 22 25 show the condensate drain arrangement for the various possible furn...

Page 16: ...ed to temperatures below freezing adequate measures must be taken to prevent the drain line from freezing Failure to provide proper protection from freezing can result in improper operation or damage...

Page 17: ...so that no sagging loops will collect and hold condensate which will cause the furnace to not operate Shorten pressure switch hose Re route and shorten pressure switch hose Shorten rain gutter hose M...

Page 18: ...itch hose to this position NOTE May require the longer hose that is provided with wider cabinets Move condensate drain hose to this position May exit either side of the cabinet Move rain gutter hose t...

Page 19: ...ose to this position NOTE May require the longer hose that is provided with wider cabinets Change condensate drain connection to the 90 fitting provided Move condensate drain hose to this position Mov...

Page 20: ...tting provided Move condensate drain hose to this position Move rain gutter hose to this position Change condensate drain connection to the 90 fitting provided Move condensate drain hose to this posit...

Page 21: ...where ABS pipe is joined to PVC pipe must be glued with cement that is approved for use with BOTH materials Metallic materials must not be used for venting or air intake 5 If a flexible connector is u...

Page 22: ...OMBUSTION AIR VENTING FIGURE 26 Dimensions TABLE 8 Elbow Dimensions Elbow A Dimension 2 Standard 2 5 16 3 Standard 3 1 16 2 Sweep 3 1 4 3 Sweep 4 1 16 TABLE 9 Equivalent Length of Fittings Fitting Equ...

Page 23: ...equirements of the gas supplier 12 30 5 cm or in accordance with local installation codes and the requirements of the gas supplier F Clearance to outside corner 12 30 5 cm or in accordance with local...

Page 24: ...rom inside the building The vent for a single pipe system must be installed as specified in the venting section of these instructions with the vent terminating as shown in Figure 28 Each furnace must...

Page 25: ...eric zone Refer to Figure 36 for attic and crawl space termination Only the combustion air intake may terminate in the attic The vent must terminate outside Outdoor Combustion Air Combustion Air Intak...

Page 26: ...on This type of installation requires that the supply air to the appliance s be of a sufficient amount to support all of the appliance s in the area Operation of a mechanical exhaust such as an exhaus...

Page 27: ...m2 per 0 879 kW of the total input rating of all equipment located in the enclosure b Not less than the sum of all vent connectors in the confined space 3 The duct shall be least the same cross sectio...

Page 28: ...RN ON any exhaust fans such as range hoods and bathroom exhausts so they shall operate at maximum speed Open the fireplace dampers Do not operate a summer exhaust fan 4 Follow the lighting instruction...

Page 29: ...eter 1 Turn off all other gas appliances and pilots 2 Run furnace for a minimum of 3 minutes in heating operation 3 Measure time in sec for gas meter to complete 1 revolution and note reading The 2 cu...

Page 30: ...300 750 78 46 92 231 25 144 288 720 80 45 90 225 26 138 277 692 82 44 88 220 27 133 267 667 84 43 86 214 28 129 257 643 86 42 84 209 29 124 248 621 88 41 82 205 30 120 240 600 90 40 80 200 31 116 232...

Page 31: ...essure by adjusting gas valve regulator screw for the appropriate gas per the following 4 After the manifold pressure has been adjusted re calculate the fur nace input to make sure you have not exceed...

Page 32: ...ings 60 90 120 and 180 seconds The fan off delay is factory set to 120 sec onds The fan off setting must be long enough to adequately cool the furnace but not so long that cold air is blown into the h...

Page 33: ...1203 1182 1150 1125 1095 1064 1031 980 Medium 1076 1059 1029 1007 973 946 908 883 843 800 Medium Low 988 967 936 903 875 838 806 765 737 685 Low 798 769 727 695 650 619 574 517 485 443 TM9X080B12MP11...

Page 34: ...off and a retry operation begins Also if the flame is lost for 2 seconds during the 10 second stabilization period the gas valve is shut off and a retry operation begins During a retry operation the...

Page 35: ...rmer wires Both heating and cooling operations will be affected Check polarity at furnace and branch Check furnace grounding Check that flame probe is not shorted to chassis The furnace will not start...

Page 36: ...ING FERRULE 3 req d GASKET FOAM Door 1 5 ft req d GROMMET 3 req d HARNESS WIRING HOSE CONDENSATE HOSE RAIN GUTTER KNOB QUARTER TURN 4 req d MOTOR MOUNT ORIFICE BURNER Natural 45 PAN CONDENSATE PLUG SE...

Page 37: ...r motor speed connections shown are typical but may vary by model and application LEGENDE DS Commutateur de porte MOT Moteur soufflerie TST Thermostat ROS Commutateur de roulement IDM D induct moteur...

Page 38: ...ge without notice Published in U S A 697936 UIM B 01211 Copyright 2011 by Johnson Controls Inc All rights reserved Supersedes 697936 UIM A 0711 Johnson Controls Unitary Products 5005 York Drive Norman...

Reviews: