background image

9

Installation (Continued)

YORK

®

 STACK FAN


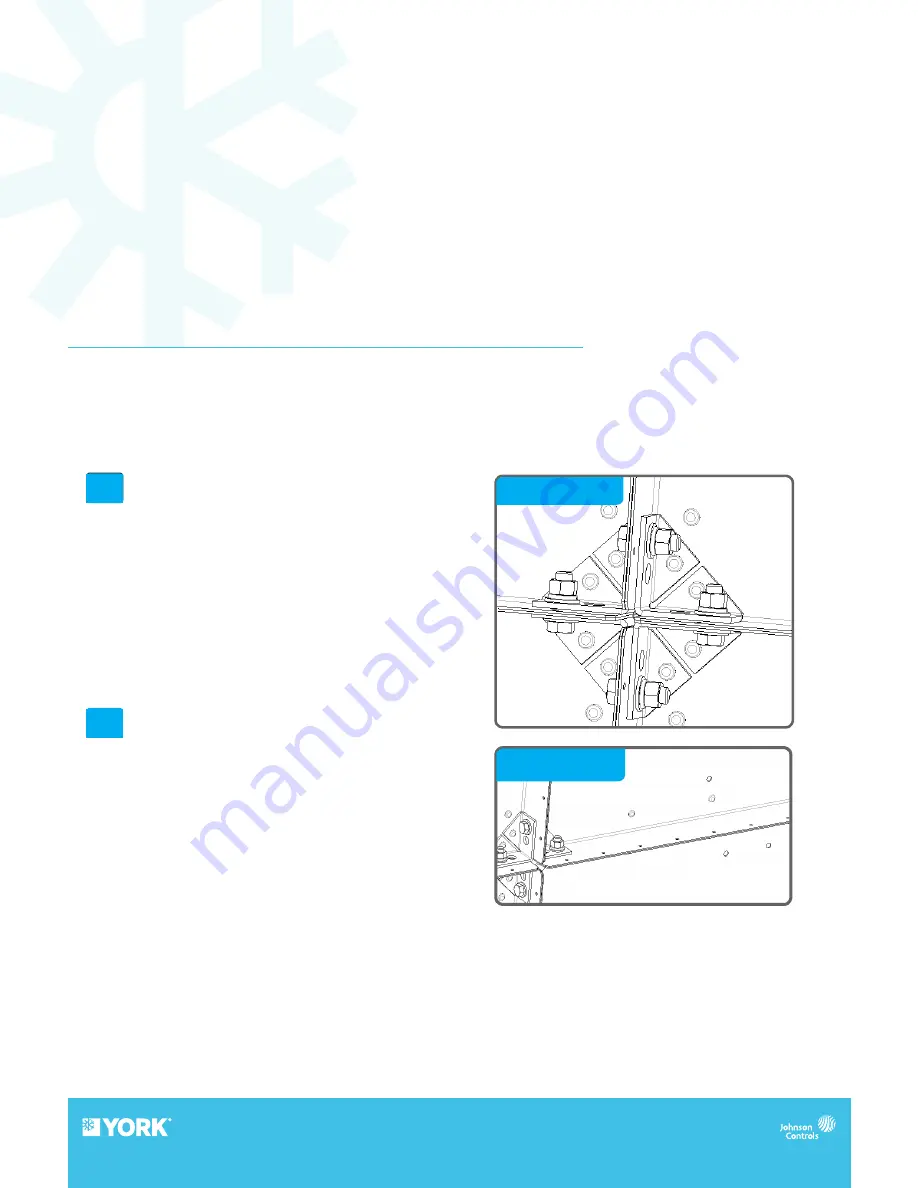
Top, Bottom and Side Connections 


*Intake Side Shown

• 

1/2-13 x 1.00 Grade 5 Hex Head Cap Screw (or  


  equivalent) 4 required (1 in each corner)

•  1/2 Flat Washer, 8 required (2 in each corner)

•  1/2-13 Hex Nut (or equivalent), 4 required (1 in each   
corner). Recommended torque setting of 18 (ft-lb)

•  Split Lock Washer (or equivalent), 4 required 
  (1 in each corner)


Middle Connections *Intake Side Shown

• 

Intake Side Panel Connection:

  A

 series of 

  .22” diameter holes, 3” on center are provided to 
  connect the front panel of the fan assembly to the    
  customer’s equipment. The holes are sized for 1/4” 
  sheet metal screws.

•  

All installation hardware supplied by end user. 

A

B


 *Intake Side


 *Intake Side

Summary of Contents for York Stack Fan

Page 1: ...York Stack Fan Installation Operating Manual ...

Page 2: ...D HANDLING All YORK products are carefully constructed and inspected before shipment to insure the highest standards of quality and performance Compare all components with the bill of lading or packing list to verify that the proper unit was received Check each unit for any damage that may have occurred in transit Any damage should be reported immediately to the carrier and the necessary damage re...

Page 3: ...le s is supported on a common base 1 Carefully remove any crate and packing materials 2 Place the bottom fans onto the mounting structure using the recommended lifting points as shown Lift each fan individually into position A B C Preferred lifting method Eyebolt with washers and nut Alternate lifting method S Hook Lifting Points 5 8 diameter holes A B C Clevis Hook 3 ...

Page 4: ...ble stored condition The fan and motor should be rotated several times by hand The fan impeller should be repositioned approximately 180 degrees from the previous month to prevent damaging the motor bearings BASES Foundation and Isolation Critical to every fan installation is a strong level foundation Structural bases must be sturdy enough to prevent flexing and vibration YORK recommends using a s...

Page 5: ... Recommended Torque JA 10 24 60 in lbs SD SDS 1 4 20 108 in lbs SK 5 16 18 180 in lbs SF 3 8 16 360 in lbs C Bushing Set Screw Bushing Type Screw Size Recommended Torque SD SDS 1 4 20 60 in lbs SK 5 16 18 110 in lbs SF 3 8 16 110 in lbs D When the unit is removed from storage all grease should be purged and replenished with fresh grease The following check list is recommended to ensure proper oper...

Page 6: ...rs 50 to 150 hp yearly See motor manufacturer specifications for recommended greases For motors in a dusty or dirty environment or running 24 hours a day divide the service interval by 2 If the environment is very dirty or high temperatures exist divide the service interval by 4 Lubrication requirements are normally attached to the motor Do not over lubricate The major cause of motor bearing failu...

Page 7: ... 5 Impeller mounted improperly or is rotating in reverse 6 Parts of system or fan have been damaged or need cleaning Noise Problems 1 Fan is not at design point of operation or fan is operating in an unstable flow region 2 Bearing failure Check bearings 3 Supply voltage high or inconsistent supply frequency Variable frequency controllers can generate motor noise 4 Object which are installed in a h...

Page 8: ...re and adjacent modules using the inlet and outlet mounting flanges The first row of modules should be securely installed before installing the second row of modules YORK does not recommend lifting and moving assembled YORK STACK FAN as this may cause bending distortion and lead to component misalignment YORK STACK FAN ASSEMBLY ...

Page 9: ...4 required 1 in each corner Recommended torque setting of 18 ft lb Split Lock Washer or equivalent 4 required 1 in each corner Middle Connections Intake Side Shown Intake Side Panel Connection A series of 22 diameter holes 3 on center are provided to connect the front panel of the fan assembly to the customer s equipment The holes are sized for 1 4 sheet metal screws All installation hardware supp...

Page 10: ...aft The transition between the inlet funnel and impeller should be as shown there is a smooth feel to the profile when moving from one component to the other This sketch shows both the gap and overlap dimensions for all sizes Gap is adjusted by loosening the inlet funnel bolts and centering the funnel on the impeller Caution Never loosen the motor attachment bolts to make adjustments to the impell...

Page 11: ...acing A Minimum of one Impeller diameter FAN SPACING Location and Placement of Plenum Fans in Air Handlers Center the fan inlets in both the horizontal and vertical planes For inlet clearance see A minimum of one fan impeller diameter clearance is recommended A ...

Page 12: ... is measured from the tap located on the face of the inlet funnel to the piezometer ring in the throat The inlet tap is connected to the high pressure side of the transducer and the piezometer ring is connected to the low pressure side see diagram below A B Front Pressure Tap HIGH PRESSURE Piezometer Ring LOW PRESSURE A B MEASUREMENT OF AIRFLOW Several factors affect the accuracy of this method of...

Page 13: ...n when using the Piezo Ring For standard air ρ 0 075 lb ft3 CFM K Factor delta pressure K Factor value from chart Delta Pressure ΔP The differential in static pressure from the piezometer ring and the front pressure tap inches w g P To Piezo Ring To Front Panel ...

Page 14: ...y and has not shifted in transit Check fan electrical components Motor is wired for proper supply voltage Motor was properly sized for power Motor is properly grounded All leads are properly insulated Trial bump Turn on power just long enough to start assembly rotating Check rotation for agreement with rotation arrow Perform checklist again until unit is operating properly Verify fastener tightnes...

Page 15: ...FOR MORE INFORMATION CONTACT YOUR LOCAL JOHNSON CONTROLS BRANCH ...

Reviews: