23
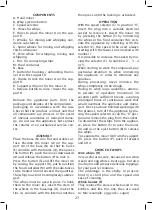
COMPONENTS
A. Hand mixer
B. Whip ejection button
C. Speed selector
D. Hoses for whips
E. Holes to place the mixer A on the sup-
port R
F. Whisks for mixing and whipping non-
dense substances
G. Spiral whisks for mixing and whipping
thick substances
H. Wire whisk for whipping, mixing and
whipping
L. Fins for connecting whips
M. Food container
N. Base
P. Button for hooking / unhooking the mi-
xer A to the support R
Q. Hooks to lock the mixer A on the sup-
port R
R. Support with joint for the mixer A
S. Release button to raise / lower the sup-
port R
Remove the appliance parts from the
package and dispose of the components
packaging in accordance with the law.
Check that the product is intact and that
all components are present. In the event
of obvious anomalies or transport dama-
ge, do not use the appliance, but contact
the retailer or an authorized service cen-
ter.
ASSEMBLY
Place the base (N) on a flat and stable sur-
face. Position the mixer (A) on the sup-
port (R) of the base (N) so that its holes
(E) coincide with the hooks (Q), then press
the button (P), push the mixer downwards
(A) and release the button (P) to lock it.
Press the button (S) and lift the mixer (A)
by raising the support (R), put in position
the food container (M) with the substances
to be treated (do not exceed the quantity).
The whips must not be completely submer-
ged.
The whips must be used in pairs. To hook
them to the mixer (A), insert the stem of
the whisks in the housings (D), make the
fins (L) coincide with the internal notches
then press until the locking is activated.
OPERATION
With the speed selector (C) in position “0”,
insert the plug into a suitable electrical
socket to receive it. Lower the mixer (A)
by pressing the button (S) by immersing
the whips in the food container (M). Acti-
vate the appliance by selecting, with the
selector (C), the speed to be used, always
starting with the lowest one marked with
number 1.
It is possible to increase the speed by mo-
ving the selector (C) to numbers 2 - 3 - 4
or 5.
When starting to work the compound, pay
particular attention to when immersing
the appliance, in order to minimize any
splashes.
During processing, never immerse the
whips completely in the dough.
Having to work large quantities, alterna-
te periods of operation (maximum 30
seconds) with sufficient breaks, avoiding
prolonged times of continuous work that
would overheat the appliance and dama-
ge it. Once you have finished working with
the product, turn off the appliance by pla-
cing the speed selector (C) on the “0” posi-
tion and remove the plug from the socket.
To disconnect the whips from the applian-
ce, press the button (S) to raise the mixer
(A) and use the eject button (B) to release
the whips.
To separate the mixer (A) from the support
(R), press the button (P), push it forward
and lift it.
CHOICE OF WHIPS
Wire whips (H)
Very useful accessory, because it can whip
cream and egg whites, beat eggs, but also
mix foams and prepare delicious toppings
for your pastry creations.
The advantage is the ability to process
food in a short time and the speed and
ease of cleaning.
Whisk beater (F)
They replace the classic whisk used in the
kitchen, and like this one, they are used
to: Mix (example: egg yolk + sugar)

