JOINT MAKING OPERATIONS
Determine Pin and Tail Cuts
SELECTION OF YOUR WORKPIECES
The type of your project involving joinery will usually determine which two sides should be
the pins and which two sides should be the tails. Normally, the front and back workpieces
in a frame or box will be pins. For example, in drawer construction the front and back
pieces are always pins. In a half-blind dovetail version the joint will be concealed plus its
greatest strength will be in the direction of the pull of the drawer. Selection may be based
more upon the final appearance of your project such as a jewelry box or humidor made
with decorative corner joints.
ASSIGNMENT OF TEMPLATE CUT LINES
The final step before making the cuts is to determine which series of template cut lines
(Red or Black) to assign to your pin and tail workpieces. You will need to use the full size
plan for the joint and one of your workpieces with a pencil mark placed at the center edge
of its width.
On variably spaced template patterns, you will also have the option of choosing between
two different symmetry marks center cuts to achieve two entirely different joint appear-
ances. On double inlay patterns, the assignment has been pre-determined by stock width
and is found on Symmetry Charts on their respective plan pages.
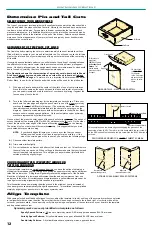
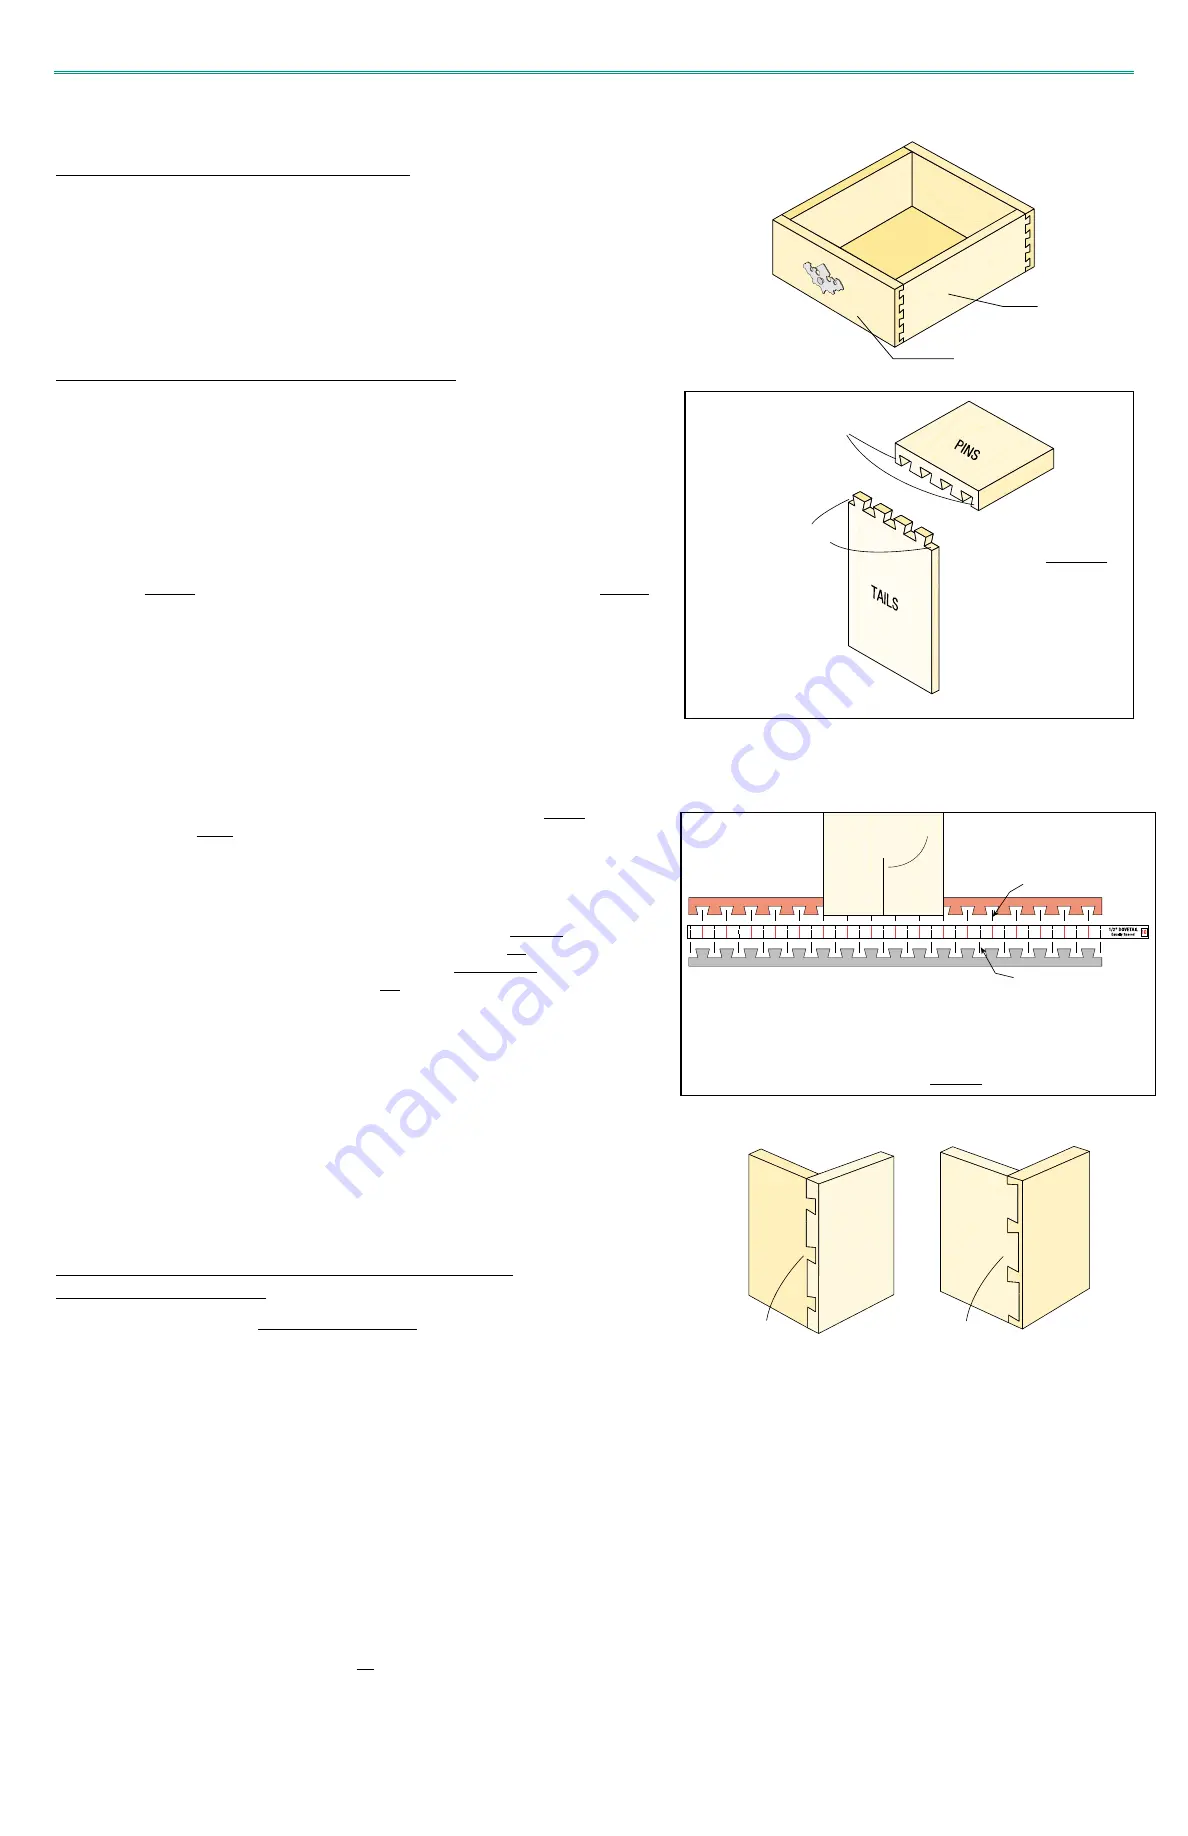
This illustration shows the characteristics of a properly cut pin board and tail board.
A tail board always begins and ends with open cuts while a pin board will always
have solid stock on its edges. Therefore, it is very important to determine which series,
Red or Black, to use for the tail boards and which series will be used for the pin boards.
1.
With a pencil, locate and mark the center of the width of one of your workpieces.
Since this is the same as the space between the fence and center of your cutter,
you can quickly locate and mark the center of your board by placing it against the
fence and up close to the bit.
2.
Turn to the full-sized plan diagram for the template you have chosen. Place your
board onto the plan page and align the pencil mark to one of the lower
symmetry
marks on the lower half (Black) of diagram. (The symmetry marks are the narrow
lines which extend between template and into the center of a cut groove on the
diagram).
Symmetry marks always coincide with template cut lines (Red or Black)
except on some variably spaced patterns. On these templates, upper
symmetry
marks are represented by yellow diamonds.
On one side of the plans the outer edges of the board will overlap grooves. The series of
cuts on that side of the drawing (RED or BLACK) will become the tail cuts. On the other
side of the plans the outer edges of the board will overlap shaded pins on the drawing.
The series of cuts on that side will become the pin cuts. It is suggested that you mark
your boards before you start cutting.
NOTE:
If your board edges fall onto or so close to a cut line that you cannot
determine which series of cut lines to assign for pins or tails; or, if the
size of the outside pins will be too small, you can take the following steps:
A)
Choose another template pattern.
B)
Trim board widths slightly.
C)
Pre-cut tail boards on first cut and after-cut tail boards on last cut. This will remove
the small sliver on each end. When cutting pin boards make sure that your first and
last cut is entirely into workpiece. This will give you a symmetrical joint with both
outside pins being slightly larger.
CHOOSING ANOTHER
SYMMETRY MARK
FOR
PATTERN VARIATION
If your selected template is a variably spaced pattern you have the option of obtaining a
strikingly different appearing joint simply by choosing an upper
symmetry mark on diagram
rather than a lower one. Doing this will generally reverse the assignment of the Red and
Black lines if aligned to a lower and will reverse the wide and narrow grooves from one
workpiece to the other. All variably spaced templates have a yellow diamond placed at its
top edge for centering alignment for this variation in joint pattern.
This illustration shows how placing the wide groove in the middle of your joint instead of
the narrow groove can dramatically change its appearance. This variation is accomplished
simply by aligning your pencil mark to the upper
symmetry mark.
Tail Board
Tail Board
Align Template
With carriage locked and
Rabbit still aligned to cursor, adjust the template in its slot until one of the symmetry marks you selected
is in alignment with the cursor hairline. Be sure that there will be enough cut lines to the left and right of cursor to make all the
cuts over your board width. You can quickly verify this by making a comparison of the center mark on your board to the template
and its position under cursor.
Symmetry marks are easily identified on templates as follows:
Equally Spaced Patterns: All lines are
symmetry marks, RED are upper and dashed BLACK are lower.
Variably Spaced Patterns: All yellow diamonds are upper, all dashed BLACK lines are lower.
Double-inlay Patterns:
All yellow diamonds are symmetry marks, upper and lower.
This example shows the board edges overlapping the grooves on the
upper side of plan (RED). Therefore, for this board width, the tail cuts will
be the RED series of cut lines and the pin cuts will be the BLACK series of
cut lines.
Tail boards are
always cut
VERTICALLY using
the
Vertical Push
Fixture
. Tail
boards always
have open cuts on
its edges.
Pin boards are
cut FACE DOWN
on the router
table. Pin boards
always have half
pins on its outer
edges.
PINS AND TAILS - HALF BLIND DOVETAIL
PENCIL MARK ALIGNED TO A LOWER SYMMETRY MARK
OPTIONS FOR VARIABLY SPACED PATTERNS
Narrow tails
(made with upper cuts)
Wide tails
(made with lower cuts)
12
Tail Board
Pin Board
Closed ends
Open ends
Pencil Mark at center of board
Upper Symmetry Mark
Lower Symmetry Mark


