background image

37

38

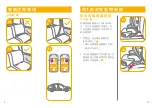
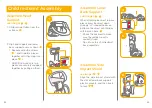
Without back support

see images 

25

 - 

31

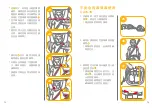
1. Adjust backrest to flat position, 

then one hand to detach 
backrest as 

25

 to use base 

assembly independently.


!


Please take good care of 

back support and head 
support.

2. Check whether the shoulder 

belt lay across child’s shoulder 
in red zone 

26

.


!


Must use shoulder belt 

positioning clip when use 
base independently.

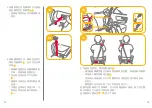
3. Insert the end of shoulder belt 

positioning Clip webbing into 
the hole on the base. 

27


!


Please check the direction of 

shoulder harness anchor as 

29

 to avoid hurting child back 

if shoulder harness anchor is 
in the opposite direction.


!


Pull the shoulder belt 

positioning clip webbing 
slightly to make sure the 
webbing fixed on the base.

25

27

26

29

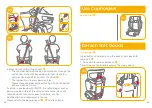
4. Make the webbing and clip 

wind round bar, then tension  
webbing. 

28


29


!


Slide shoulder harness 

anchor to adjust webbing 
length.

5. Slide the shoulder belt 

positioning clip to make sure 
the clip is close to child’s  
shoulder, 

30


-1

 buckle the 

vehicle safety belt. 

30


-3


!


To achieve the safest 

installation, we suggest the 
shoulder belt positioning 
clip should be level with the 
highest point of the child’s 
shoulder.


!


Through vehicle safety belt 

out from bottom of armrest.

30


-2


!


Ensure the vehicle safety 

belt is not slack or twisted.


!


The child restraint can not 

be used if the vehicle safety  
belt buckle (female buckle 
end) is too long to anchor 
the child restraint securely. 

30


-4

28

Summary of Contents for Trillo LX

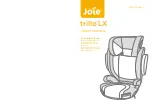
Page 1: ...2 3 15 36kg trillo LX child restraint CNS 11497 ECE R44...

Page 2: ...Joie 15 36kg 3 12 CNS 3972 ECE R16 CNS 11497 ECE R44 1 2 3 7 10 8 4 5 1 2 3 4 5 6 7 8 9 10 11 12 6 9 12 11...

Page 3: ...1 2 15 36kg 3 12 Joie PE...

Page 4: ...3 4 3 12 15 36 96 150 20 3 12 15 36 96 150 30 0 4 1 5 2 5 15 36kg ECE R44 04 UNIVERSAL SEMI UNIVERSAL 3 1 CNS 11497 ECE R44 2 3 4 3 1 CNS 11497 ECE R44 ISOFIX CNS 3972 2 ISOFIX ISOFIX 3...

Page 5: ...owers Business Park Rugeley Staffordshire WS15 1UZ www joiebaby com C1220 15 36kg 3 12 5kg 390mmx550mmx690mm 431 2 02 27973000 52603333 Chickabiddy Co Ltd 186 5 0800 001 256 02 25781188 04222671 www c...

Page 6: ...7 8 4 5 6 4 5 1 U 4 6 8 6 7 8 9 7 8 9...

Page 7: ...9 10 11 2 13 1 10 12 1 2 3 4 5 6 1 2 3 4 5 6 10 13 14 3 14 24 ISOFIX 1 ISOFIX 14 ISOFIX 2 15 15...

Page 8: ...11 12 16 17 3 16 17 19 18 20 3 1 2 4 4 18 19 20 20 3 20 1 20 2 20 20 4...

Page 9: ...13 14 22 21 21 22 24 23 24 25 31 1 25 2 26 3 27 29 25 27 26...

Page 10: ...15 16 4 28 29 5 30 1 30 3 30 2 30 4 29 28 31 6 31 31 14 17 30 1 2 3 4...

Page 11: ...17 18 32 12 32 33 33 33 1 30 33 1 PULL...

Page 12: ...X child restraint This child restraint is approved to CNS 11497 and UN ECE regulation 44 04 series of amendments Please read all the instructions in this manual before installing and using the product...

Page 13: ...ractor safety belts approved to CNS 3972 or UN ECE regulation 16 or other equivalent standards This child restraint is approved to CNS 11497 and UN ECE regulation 44 04 series of amend ments Child res...

Page 14: ...ll be properly secured DO NOT use this child restraint without the soft goods WARNING The soft goods should not be replaced with any besides the ones recommended by the manufac turer because the soft...

Page 15: ...ace your child restraint toward the rear of the vehicle DO NOT install this child restraint on the front vehicle seat To avoid burns never put hot liquids in your cupholders Emergency In case of emerg...

Page 16: ...E regulation 44 04 series of amendments for general use in vehicles fitted with ISOFIX anchorages systems and approved to CNS 3972 or fitted with three point seat belt and approved to other equivalent...

Page 17: ...e securely snapped together by pulling on them Assemble Lower Back Support see images 4 5 When attaching backrest to base please press backrest down strongly U shaped hooks on bottom of backrest will...

Page 18: ...31 32 8 9 7 The completely assembled child restraint is shown as 8 see images 9 Height Adjustment for Head Support Concerns on Installation see images 10 13 11 2 13 1 10 12 1 2 3 4 5 6 1 2 3 4 5 6...

Page 19: ...anchors hook latch connectors to vehicle anchors 14 NEVER put two latch connectors on one vehicle ISOFIX anchor unless specifically allowed by the vehicle manufacturer Installation with 3 point belt...

Page 20: ...be used if the vehicle safety belt buckle female buckle end is too long to anchor the child restraint securely 20 4 19 18 20 3 1 2 4 22 21 To ensure the correct head support height is obtained the bot...

Page 21: ...ion Pull the shoulder belt positioning clip webbing slightly to make sure the webbing fixed on the base 25 27 26 29 4 Make the webbing and clip wind round bar then tension webbing 28 29 Slide shoulder...

Page 22: ...ot in use If vehicle is equipped with ISOFIX the vehicle lower anchor points may be visible at the vehicle seat crease See your vehicle owner s manual for exact locations anchor identification and req...

Page 23: ...It may cause damage to the child restraint Do not twist the soft goods and inner padding to dry with great force It may leave the soft goods and inner padding with wrinkles Please hang dry the soft g...

Page 24: ......

Page 25: ...JK042_C1220 A Share the joy at joiebaby com gemm 0 0 13kg...

Reviews: