background image

BULLDOG MINI

1.0

54

Rev. 

TROUBLESHOOTING

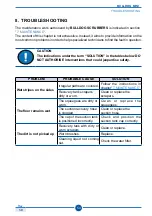
8. TROUBLESHOOTING

The maintenance work authorized by 

BULLDOG 

SCRUBBERS

 is indicated in section 

"7. MAINTENANCE"

.

The content of this chapter is not exhaustive. Instead, it aims to provide information on the 

most common problems in order to help specialized technicians to find the fault in question.

CAUTION
The indications under the term “SOLUTION” in the tables below DO 

NOT AUTHORISE interventions that could jeopardise safety.

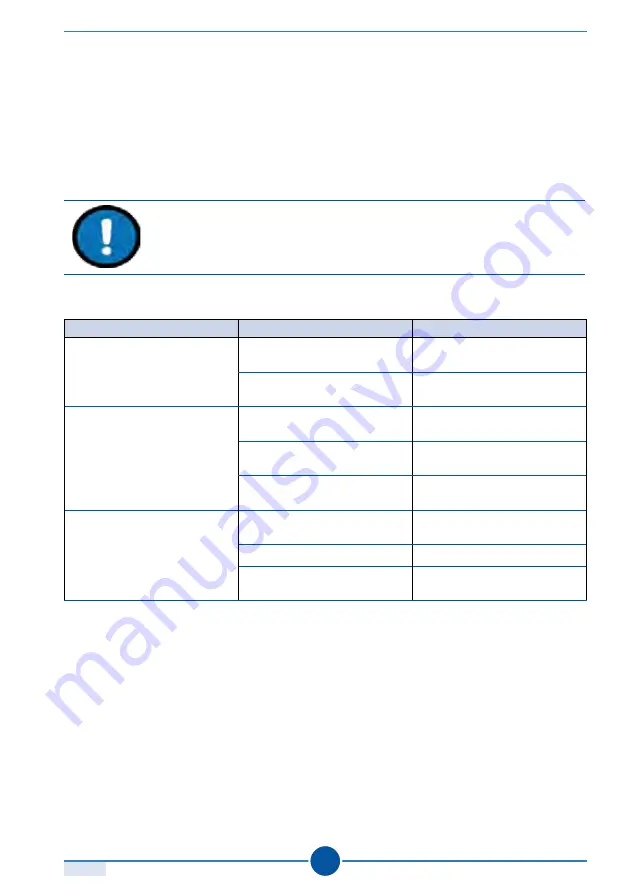
PROBLEM

PROBABLE CAUSE

SOLUTION

Wet stripes on the sides

Irregular paths are covered. Follow  the  instructions  in 

chapter 

"7. MAINTENANCE"

.


Recovery tank scrapers 

dirty or worn.

Clean or replace the 

scrapers.

The floor remains wet

The squeegees are dirty or 

worn.

Clean  or  replace  the 

squeegees.

The suction recovery hose 

is clogged.

Clean or replace the 

suction hose.

The cap of the suction tank 

is positioned incorrectly.

Check  and  position  the 

suction tank cap correctly.

The dirt is not picked up

Recovery tank with dirty or 

worn scrapers.

Clean or replace.

Worn brushes.

Replace.

Cleaning  liquid  not  coming 

out.

Check the water filter.

Summary of Contents for FCE BULLDOG MINI

Page 1: ...User and maintenance manual BULLDOG MINI COMPACT FLOOR SCRUBBER SWEEPER...

Page 2: ...Identification plate 4 2 4 Reference standards and conformity 5 2 4 1Declaration of conformity 6 2 5 Warranty 7 3 GENERAL SAFETY INSTRUCTIONS _______________ 8 3 1 Residual risks 8 3 2 General require...

Page 3: ...29 6 2 Charging the battery 31 6 2 1Battery charge level 32 6 3 Switching on the machine 33 6 4 Bi directional cleaning system 34 6 5 Starting up the appliance 35 6 6 Motor Protector 36 6 7 Instructio...

Page 4: ...ors 49 7 5 Water filter maintenance 50 7 6 Routine maintenance table 51 7 7 Disposal 52 7 7 1Differentiation and sorting of the materials 52 7 7 2Disposing of the lithium battery 53 8 TROUBLESHOOTING...

Page 5: ...TMOST ATTENTION TO ANY TEXT INDICATED BY THIS SYMBOL CAUTION Possibilitytocausedamagetotheapplianceand oritscomponents Be careful WARNING Warning or remark on key functions or useful information on th...

Page 6: ...s at any given moment without prior notice Any additions must be retained together with the manual and are to be considered integral parts of the manual 1 5 Confidentiality The technical information t...

Page 7: ...ility for damage to persons or property caused by Improper use of the appliance Total or partial failure to comply with the given instructions Appliance use not complying with the regulations in force...

Page 8: ...ication data for any assistance or spare parts request is applied to the appliance The plate contains the following data A Model B Serial number C Year of manufacture D Weight CAUTION Do not remove th...

Page 9: ...mity The machine described in this manual complies with the following standards EN 55014 1 06 A1 09 A2 11 EN 55014 2 15 EN 60335 1 12 A11 14 EN 60335 2 67 09 EN 61000 3 2 14 EN 61000 3 3 13 EN 62233 0...

Page 10: ...n Directives Standards and Technical Specifications specified in the Declaration necessary for the machine to be compliant with the essential requirements for sale and use in the European Union The De...

Page 11: ...incorrect daily maintenance The use of non original spare parts Damage due to natural events such as earthquakes floods fires or accidents Tampering with or modification of the machine Damages caused...

Page 12: ...perator should observe the safety regulations in force in the country in which the appliance is being used DANGER Follow all safety instructions indicated in this chapter for a safe use of the applian...

Page 13: ...the appliance if you notice any irregularities in its operation In the event of a fault have the appliance repaired exclusively by qualified technicians Use only original spare parts Do not pour water...

Page 14: ...ions in force The Customer is legally responsible for dangers generated during battery disposal Do not immerse the battery in water or sea water Do not burn or heat lithium batteries as they could exp...

Page 15: ...11 Rev GENERAL INFORMATION Do not transport or store the battery together with metal objects as for example hair pins necklaces etc Do not hit tread on or throw the battery Do not disposed of the bat...

Page 16: ...an cause certain hazards and in particular Prevent dangerous behaviours Warn the exposed persons of a risk or hazard Prescribe safe behaviours DANGER It is strictly prohibited to remove the safety sig...

Page 17: ...k cycle and following the criteria set forth by the regulations in force The sound pressure level may vary considerably according to the work environment WARNING Useappropriatepersonalprotectiveequipm...

Page 18: ...is not authorised and is dangerous improper use Thechoiceofmaterialsusedtomaketheappliancewasmadeaccordingtothespecificuse to which the appliance will be put Improper use can result in injury to pers...

Page 19: ...egee fastening knob 7 Detergent solution hose 26 Squeegee fastening magnets 8 Cover 27 Squeegee 9 Recovery tank 28 Suction recovery hose 10 Brushes 29 Recovery tank cap 11 Tank knob 30 Float 12 Transp...

Page 20: ...F 31 BULLDOG MINI 1 0 16 23 1 2 18 22 19 20 21 25 26 25 26 26 24 26 4 31 32 33 34 3 15 5 38 35 12 17 12 13 10 16 10 28 29 30 7 37 11 6 14 8 9 36 27 Rev GENERAL INFORMATION...

Page 21: ...working surface m2 1500 Degree of protection class IP7 Weighted acceleration value m s2 1 0 Noise level and vibration dBA 70 Voltage Volt 36 Motor power Watt 300 Brush rpm rev 1 650 Electrical isolat...

Page 22: ...e appliance and the floors The brushes can have different colours according to their use characteristics Brush colour Use GREY supplied All purposeforlightdirtofalltypesofflooring smooth or embossed B...

Page 23: ...ery in any liquid Do not use or leave the battery exposed to high temperatures as it might overheat catch fire or jeopardise its operation and duration Donotusethebatteryinenvironmentscharacterisedbyt...

Page 24: ...t be disposed of correctly following the national regulations in force The Customer is legally responsible for any hazards generated when the batteries are disposed of See section 7 7 Disposal 4 5 1 S...

Page 25: ...NGER Read the labels on the detergent bottle carefully Detergents can have harmful impacts on the environment and the human body in case of inhalation ingestion or contact with skin and mucous membran...

Page 26: ...disassembled Check the contents of the package making sure that all the components of the appliance are all present and in good condition WARNING Contact the Customer Service Centre if some component...

Page 27: ...the same as those indicated in the table below PACKING CONTENTS 1 Machine with standard grey brushes 2 Handle 3 Handle with suction unit 4 Squeegee assembly 5 1 fixing plate 2 screws fixing plate 2 A...

Page 28: ...F 32 BULLDOG MINI 1 0 24 1 2 4 9 5 3 6 7 8 Rev ASSEMBLING THE APPLIANCE...

Page 29: ...handle 2 into the support 5 3 Insert the pin 6 into the support 5 4 fasten the handle 2 using the screws 7 by tightening them firmly 5 Place the cap 8 into its seat on the tank 9 6 Connectthesuctionh...

Page 30: ...the battery proceed as follows 1 Install the battery 14 on the handle 2 2 Screw the knob 15 to fasten the battery 14 3 Insert the plug 16 into the socket 17 on the battery 14 WARNING If the battery 1...

Page 31: ...as to be installed before the appliance is used for the first time 1 Insert the squeegee 18 under the suction recovery tank 19 2 Connect the squeegee 18 to the springs 20 by pressing them slightly upw...

Page 32: ...brushes and detergents see chapter 4 TECHNICAL CHARACTERISTICS 6 1 How to use ELECTRICAL HAZARD Alwaysmakesurethattheapplianceisdisconnectedfromthebattery when preparing the machine for use 6 1 1 Fil...

Page 33: ...the detergent with water in a recipient 2 Pour the liquid obtained into the tank 1 6 1 2 Recovery tank The dirty liquid recovery is achieved by means of the rotation of the brushes 2 which attack the...

Page 34: ...AND USE Once full the recovery tank 5 must be emptied by removing it from its seat 1 Remove cover 6 2 Lift and remove the recovery tank 5 and empty it CAUTION The disposal of the dirty water must be c...

Page 35: ...an be left either inserted into the battery 8 or into the power socket without time limits or problems The battery 8 can be charged both removed from the appliance or fitted to it In order to charge t...

Page 36: ...ity Do not leave the battery exposed to sun rays as this can damage it irreparably CAUTION Using and storing the battery in cold places decreases its duration In this case the battery power can be res...

Page 37: ...esstheON OFFWATER button 14 the flashing blue LED 15 indicates the set work mode To dispense a large amount of water pre washing press the ON OFF WATER button 14 twice the fixed blue LED 15 indicates...

Page 38: ...This system allows the work position to be reversed thanks to the two way handle 13 Reversing the handle 13 from right to left and vice versa allows you to work in both directions and easily reach th...

Page 39: ...e support foot 20 before starting the appliance 2 Grab the two way handle 13 and lower it in one of the two possible directions A or B 3 Start the appliance by pressing the yellow safety lever 19 CAUT...

Page 40: ...otor fault poor supply of power overheating etc As a sudden stop occurs the button 21 comes out of its seat and the appliance stops working figure A To reset the appliance proceed as follows 1 Disconn...

Page 41: ...perfectly vertical Switch on the appliance DANGER Carry out the procedures with utmost care to prevent any risk of falling slipping or collisions Use personal protective equipment PPE if deemed neces...

Page 42: ...ards the corner as indicated in the figure 2 Once you have reached the corner turn the machine around and move onto the second strip to wash slightly overlapping the area that you have cleaned before...

Page 43: ...chine and start cleaning the floor 1 Use an all purpose concentrated non foaming and non acid detergent pH max 9 2 Fitthe supplied grey brushes for medium dirt or the black brushes option for heavy di...

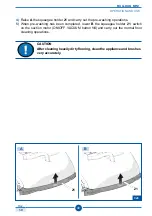
Page 44: ...y out the pre washing operations 5 When pre washing has been completed lower B the squeegee holder 21 switch on the suction motor ON OFF VACUUM button 16 and carry out the normal floor cleaning operat...

Page 45: ...ially if you need to clean non painted parquet floors Fit the grey brushes provided Use a non foaming detergent appropriate for parquet flooring Avoid wetting the floor too much especially in the case...

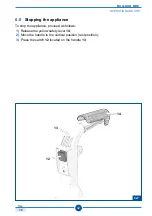
Page 46: ...4 Rev OPERATION AND USE 6 8 Stopping the appliance To stop the appliance proceed as follows 1 Release the yellow safety lever 14 2 Move the handle to the vertical position rest position 3 Press the sw...

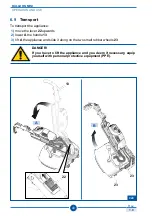
Page 47: ...To transport the appliance 1 move the lever 22 upwards 2 lower A the handle 13 3 lift A the appliance and slide it along on the two small rubber wheels 23 DANGER If you have to lift the appliance and...

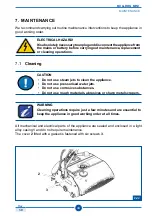
Page 48: ...tions 7 1 Cleaning CAUTION Do not use steam jets to clean the appliance Do not use pressurised water jets Do not use corrosive substances Do not use rough materials abrasives or sharp metal scrapers W...

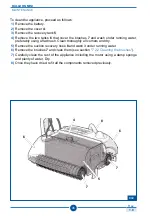
Page 49: ...and wash under running water preferably using a flat brush Clean thoroughly all corners and dry 5 Remove the suction recovery hose 8 and wash it under running water 6 Remove the brushes 7 and clean t...

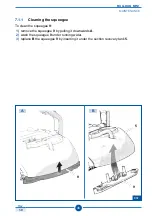
Page 50: ...ev MAINTENANCE 7 1 1 Cleaning the squeegee To clean the squeegee 9 1 remove the squeegee 9 by pulling it downwards A 2 wash the squeegee 9 under running water 3 replace B the squeegee 9 by inserting i...

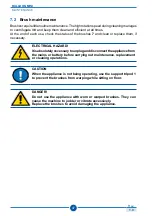
Page 51: ...m if necessary ELECTRICAL HAZARD Itisabsolutelynecessarytounpluganddisconnecttheappliancefrom the mains or battery before carrying out maintenance replacement or cleaning operations CAUTION When the a...

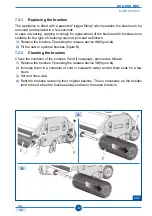
Page 52: ...d as follows 1 Remove the brushes 7 pressing the release device 10 figure A 2 Fit the new or optional brushes figure B 7 2 2 Cleaning the brushes Check the condition of the brushes 7 and if necessary...

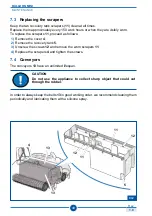
Page 53: ...ed as follows 1 Remove the cover 4 2 Remove the recovery tank 5 3 Unscrew the screws 12 and remove the worn scrapers 11 4 Replace the scrapers 4 and tighten the screws 7 4 Conveyors The conveyors 13 h...

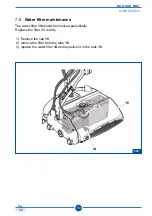
Page 54: ...TENANCE 7 5 Water filter maintenance The water filter 14 should be checked periodically Replace the filter if it is dirty 1 Remove the cap 15 2 remove the filter from the tank 16 3 replace the water f...

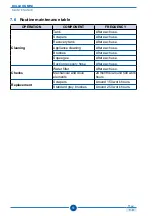
Page 55: ...r each use Recovery tank After each use Appliance cleaning After each use Brushes After each use Squeegee After each use Suction recovery hose After each use Checks Water filter After each use Mechani...

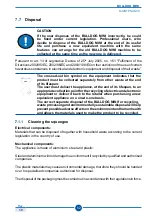
Page 56: ...ppliance at the end of its lifespan to an appropriatecollectionpointfortherecyclingofelectricandelectronic equipment or deliver it back to the retailer when purchasing a new equivalent appliance on a...

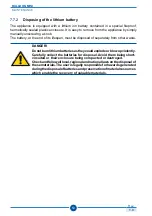
Page 57: ...nd of its lifespan must be disposed of separately from other waste DANGER Donotburnlithiumbatteriesastheycouldexplodeorblowupviolently Carefully collect the batteries for disposal Avoid them being sho...

Page 58: ...d jeopardise safety PROBLEM PROBABLE CAUSE SOLUTION Wet stripes on the sides Irregular paths are covered Follow the instructions in chapter 7 MAINTENANCE Recovery tank scrapers dirty or worn Clean or...

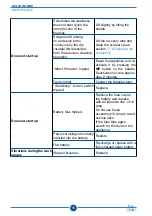
Page 59: ...appliance and re activate it by pressing the MP button on the handle Reactivation occurs approx after 2 minutes Faulty motor Contact the Manufacturer Start stop button switch tripped Replace Does not...

Reviews: