23
JO
NIX
steel
05
06
07
MIn
3 mm
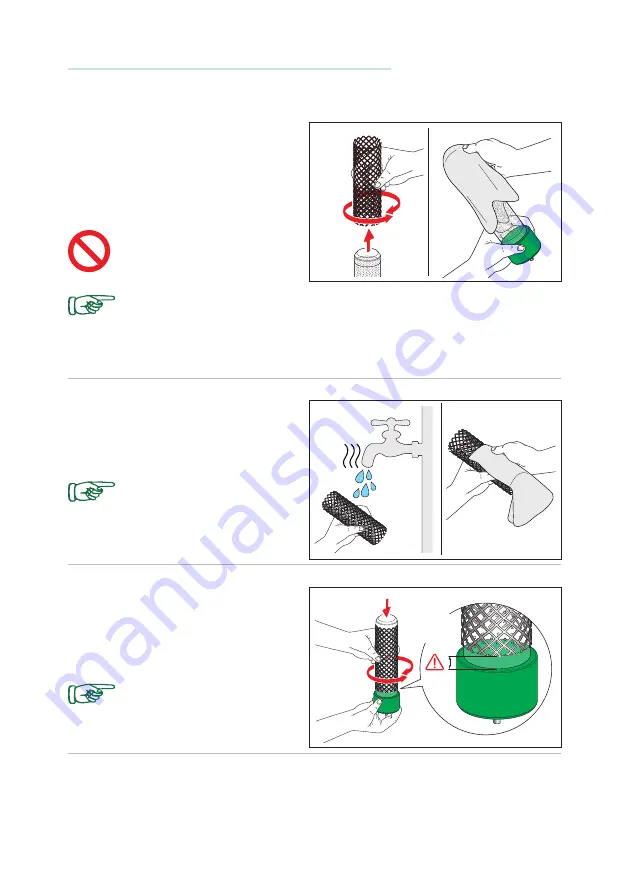
Fig. 05: Pull off the outer mesh from the
tube if you have not already done so in the
previous point. If this is difficult to do, turn
the mesh around the glass while pulling to
remove it.
Clean the glass using a damp cloth.
Do not use liquid cleaners or
sprays, soap or the like.
Check that the tube is in good conditions: there must not be any cracks or other
damage; otherwise it must be replaced. As soon as you notice a whitish layer on the
perforated metal plate inside the glass it means that the ionising tube needs replacing.
The tubes must usually be replaced within 18 months of use.
Fig. 06: Wash the mesh under running hot
water and dry it thoroughly with a cloth.
Fig. 07: Put the outer metal mesh back on
the glass tube so that it fully overlaps the
internal plate.
In any case ensure a minimum
distance of at least 3 mm from
the base of the tube.
Do not put back the mesh on
the ionising tube if it is even
partially wet.
Summary of Contents for steel 1C
Page 54: ...ELECTRICAL DIAGRAMS JONIX steel 1C...
Page 56: ......
Page 57: ......
Page 58: ......
Page 59: ......
Page 60: ......
Page 61: ......
Page 62: ......
Page 63: ...ELECTRICAL DIAGRAMS JONIX steel 2C...
Page 65: ......
Page 66: ......
Page 67: ......
Page 68: ......
Page 69: ......
Page 70: ......
Page 71: ...ELECTRICAL DIAGRAMS JONIX steel 4C...
Page 73: ......
Page 74: ......
Page 75: ......
Page 76: ......
Page 77: ......
Page 78: ......
Page 79: ...ELECTRICAL DIAGRAMS JONIX steel 2F...
Page 81: ......
Page 82: ......
Page 83: ......
Page 84: ......
Page 85: ......
Page 86: ......
Page 87: ...ELECTRICAL DIAGRAMS JONIX steel 4F...
Page 89: ......
Page 90: ......
Page 91: ......
Page 92: ......
Page 93: ......
Page 94: ......
Page 95: ......


