background image

Carrier Board- Bottom 


 QFIL Download Switch 

 UART Debug Port 

 VPH_PWR to sensor board 

 System Data Cable 2 to Sensor Board 

 System Data Cable 1 to Sensor Board 

 WLAN Module/QC6174 

Summary of Contents for J-Reality Kit

Page 1: ...1 J Reality Kit Quick Guide Document Revision 0 3 2018 01 16 ...

Page 2: ...2 The Kit 1 for Developer SD820 SOM Module Carrier Board 18650 Battery ...

Page 3: ...3 The Kit 2 for Developer It can be used for camera developing SD820 SOM Module Carrier Board 18650 Battery Signal Cable x 2 Power Cable x 1 Sensing Board Camera Modules x 3 the main camera is IMX378 ...

Page 4: ...USB QC3 0 Adapter 2 Type C Cable Connector 1 USB Type C Male Connector 2 USB 2 0 Type A Male 3 Micro USB OTG Adapter 4 Mouse Connector 1 Micro USB B 5Pin Male Connector 2 USB 2 0 A Female 5 Micro HDMI to HDMI cable 6 Monitor ...

Page 5: ...one Jack Brightness Up Key Fan Connector Brightness Down Key Micro HDMI USB Type C Volume Down Key VBAT Connector Pin Volume Up Key Micro USB OTG GPS Antenna Connector 2nd Battery Pack Connector RGB LED Main Battery Pack Connector SD820 Module ...

Page 6: ...6 Carrier Board Bottom QFIL Download Switch UART Debug Port VPH_PWR to sensor board System Data Cable 2 to Sensor Board System Data Cable 1 to Sensor Board WLAN Module QC6174 ...

Page 7: ...7 The Connection of PCBA 1 ...

Page 8: ...8 The Connection of PCBA 2 ...

Page 9: ...9 The Connection of PCBA 2 To Connect and disconnect the battery from top side of connecter ...

Page 10: ...nnection of Signal Cable1 and Signal Cable2 are Fixed Please follow the picture below to assembly and do not change 1 The label side show Cable1 and Cable 2 are connected to sensing board 2 The place of Cable 1 and 2 cannot be exchanged ...

Page 11: ...11 ...

Page 12: ...11 ...

Page 13: ...12 The Connection of PCBA 4 ...

Page 14: ...13 1 Power on 1 Connect the battery on the 5 pin connector 2 Press the power key for 3 seconds 3 The LED indicator will light green after 20 seconds ...

Page 15: ...14 4 If there is no green light after 20 seconds It may be caused by the low capacity battery Please measure the capacity by multi meter or try to charge the battery ...

Page 16: ...5 2 Power off 1 Press the power key for 3 seconds 2 The system will automatically shut down We don t recommend to disconnect the battery directly because it will increase the risk to damage the connector ...

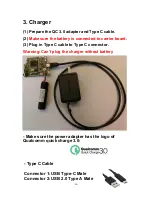
Page 17: ...he battery is connected to carrier board 3 Plug in Type C cable to Type C connector Warning Can t plug the charger without battery Make sure the power adapter has the logo of Qualcomm quick charge 3 0 Type C Cable Connector 1 USB Type C Male Connector 2 USB 2 0 Type A Male ...

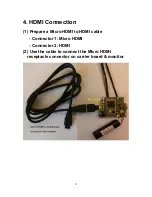
Page 18: ...17 4 HDMI Connection 1 Prepare a Micro HDMI to HDMI cable Connector 1 Micro HDMI Connector 2 HDMI 2 Use the cable to connect the Micro HDMI receptacle connector on carrier board monitor ...

Page 19: ...18 3 If turning on the system successfully you can see the boot up image as below ...

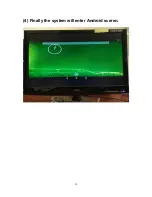
Page 20: ...19 4 Finally the system will enter Android screen ...

Page 21: ...epare a Micro USB OTG Adapter Cable Connector 1 Micro USB B 5 Pin Male Connector 2 USB 2 0 A Female 2 Prepare a mouse and plug in OTG Adapter 3 Connect to the micro USB connector on board 4 Use the mouse to control the system ...

Page 22: ...21 6 Turn on Camera 1 Click menu icon 2 Tap camera icon to open camera function ...

Reviews: