16
139467_03 GF 370 DV II June 2015
• Label B - apply to the rating plate in the space indi-
cated on the plate.
• Small valve label - apply to valve body
• Conversion instructions
5. Fuel Conversion
The GF
370
DV II gas stove is shipped from the factory
equipped to burn Natural gas. Propane fuel conver-
sion kit 156800 is included with the stove to enable
use with LP gas if necessary. The kit contains all the
components needed to complete the task and ensure
safe operation, including labels that must be affixed
to the stove.
CAUTION: Before proceeding with this conversion,
the gas supply must be shut off prior to disconnecting
the electrical power.
This conversion kit shall be installed by a qualified
service agency in accordance with the manufacturer’s
instructions and all applicable codes and requirements
of the authority having jurisdiction. If the informa-
tion in these instructions is not followed exactly, a fire,
explosion, or production of carbon monoxide may result
causing property damage, personal injury or loss of life.
The qualified service agency is responsible for the proper
installation of this kit. The installation is not proper and
complete until the operation of the converted appliance
is checked as specified in the manufacturer’s instructions
supplied with the kit.
Cet équipement de conversion sera installé par une
agence qualifiée de service conformément aux instruc-
tions du fabricant et toutes exigences et codes appli-
cables de l’autorisés avoir la juridiction. Si l’information
dans cette Instruction n’est pas suivie exactement, un
feu, explosion ou production de protoxyde de carbone
peut résulter le dommages causer de propriété, pert ou
blessure personnelle de vie. L’agence qualifiée do service
est esponsable de l’installation propre de cet équipe-
metn. L’installation n’est pas propre et complète jusqu’à
l’operation de l’appareil converi est chéque suivant les
critères établis dans les instruction de propriétaire provi-
sion nées avel l’équipement.
Fuel Conversion Procedure
1. Turn off gas supply to the stove and disconnect
from electrical power source.
2. Remove the glass frame. See fig. 18.
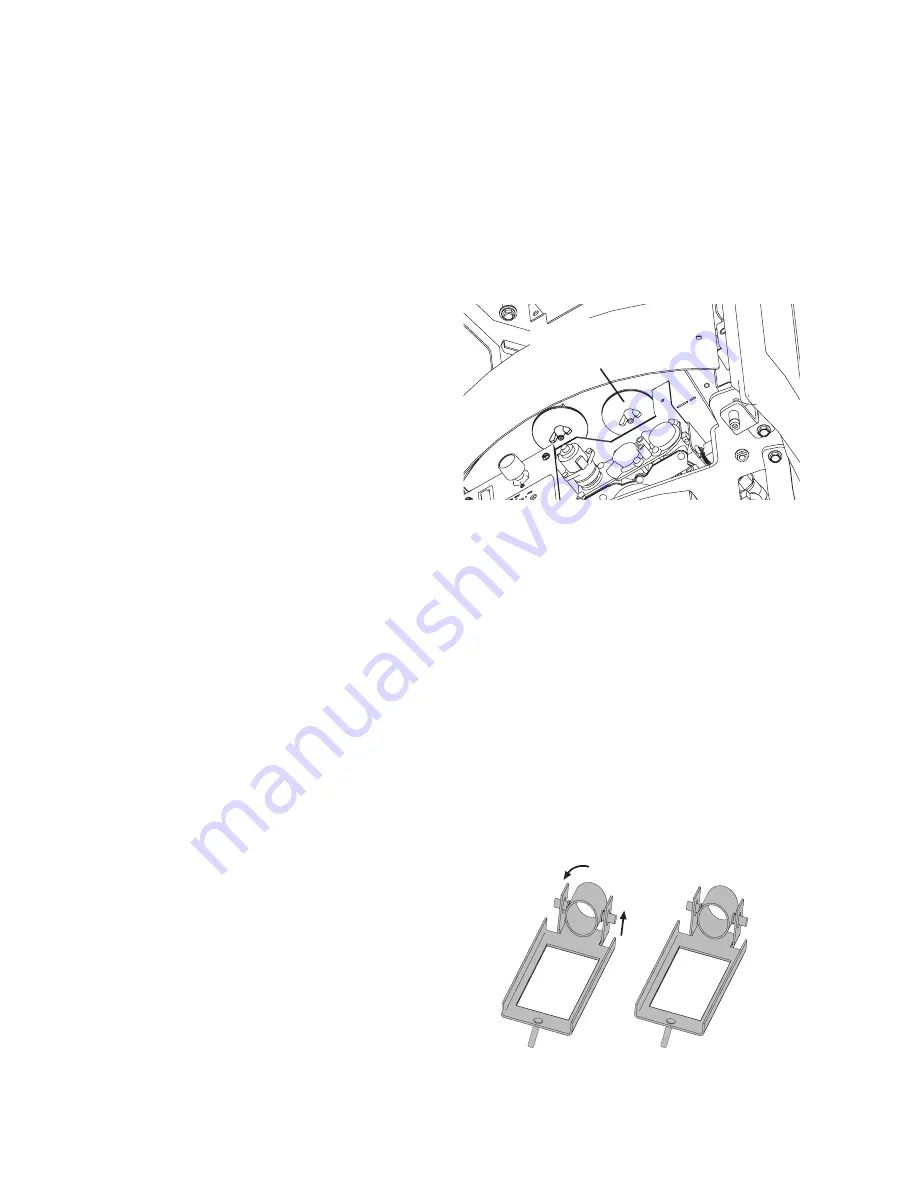
3. Loosen the primary air shutter wingnut and push
the stem all the way back. Fig. 21.
4. Pull the Burner Plate forward to disengage it from
the burner orifice and lift it out of the firebox.
5. Locate the main burner injector. See fig. 23 on
page 17. Slide the Air Shutter out of the way and
use a 1/2” open end wrench or deep-well socket to
remove the burner orifice from the brass orifice
holder. Replace with the orifice supplied in the
kit. Tighten securely.
6. Change the Air Shutter position: Lift the shutter
tube up in its hinge pin slots and turn the tube
over, so that the appropriate fuel type indicator
(LP or NG) is oriented facing you. See fig. 22. Push
the shutter all the way back over the injector.
7. Change the Dual-fuel Pilot Orifice. Use a 7/16”
wrench to just loosen the pilot base enough to
push the orifice lever to the left for LP, exposing
the red indicator. Retighten the base. See fig. 23.
Figure 21.
Figure 22. Primary air shutter orientation must be
changed for fuel type.
Conversion Kit (LP #156800, NG #156801)
Tools required:
• 1/2” & 13 mm open end wrench or deep-well socket
• Torx T20 or slotted screwdriver
• 7/16” open end wrench
• 4 mm allen wrench
Conversion Kit Contents:
• 1 regulator tower labeled for the appropriate fuel
• 2 regulator tower Torx screws
• 1 burner injector (#38 mm for NG, #53 for LP)
• Label A - to be completed and applied to the base
of the valve compartment
• 1/4” nut driver
Figure 21. Air Shutter location.


