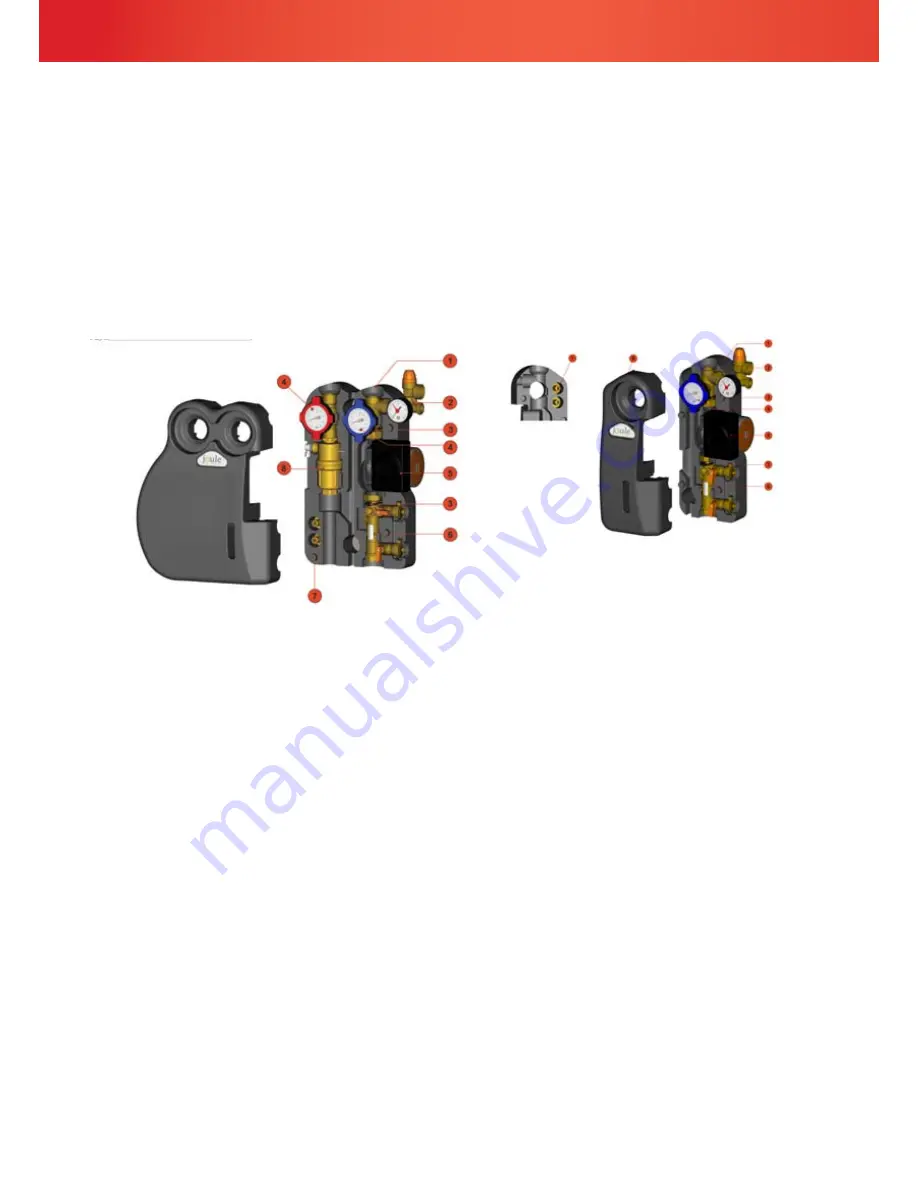
The Joule product range offers both a single stream and a dual stream pump station.
The flow rate required on a system is typically 1 litre per minute, per square metre
installed. Therefore a 2-12 litre pump station will be sufficient for systems up to 12m².
1. Insulating box (back) in EPP
2. Safety unit consisting of: manometer 0/10 bar, solar safety valves cali-
brated to 6 bars, 3/4” connection for expansion vessel
3. Security clips
4. Shutoff valves with integrated thermometers and check-valves
5. Solar pump
6. Visual flow balancing valve with filling and drain group
7. Hose connection
8. Insulating EPP box (cover)
Connections of flow and return pipe work to the pump station are made vis the ¾” flat
face thread connection on all points apart from the connection directly underneath the
pump. This connection is to be made with 22mm smooth tube.
When locating the pump station consideration should be given to future access for
maintenance. It is best practice to locate the pump as far downstream the system as
possible away from the collectors to help reduce the amount of high temperature fluid
that comes in contact with the pump station. If the distance between the collector
and heat store is short (>5m) then running extra pipe work over and back inside the
attic space to increase the linear distance between pump station and collectors is
recommended.
Pump Station
44
Summary of Contents for Navitas In-roof
Page 1: ...NAVITAS IN ROOF joule navitas solar in roof flat panel installation manual INSTALL...
Page 2: ...Installer Loyalty Scheme Coming Soon 2...
Page 12: ...Overview of materials Single row R1 double multiple row R2 12...
Page 13: ...13 NAVITAS IN ROOF installation manual...
Page 14: ...Overview of materials Single row R1 14...
Page 15: ...15 NAVITAS IN ROOF installation manual...
Page 16: ...Overview of materials Double multiple row R2 16...
Page 17: ...Overview of tools 17 NAVITAS IN ROOF installation manual...
Page 18: ...Mounting Single row R1 18...
Page 19: ...19 NAVITAS IN ROOF installation manual...
Page 20: ...Mounting Single row R1 20...
Page 21: ...21 NAVITAS IN ROOF installation manual...
Page 22: ...Mounting Single row R1 22...
Page 23: ...23 NAVITAS IN ROOF installation manual...
Page 24: ...Mounting Single row R1 24...
Page 25: ...25 NAVITAS IN ROOF installation manual...
Page 26: ...Mounting Single row R1 26...
Page 27: ...27 NAVITAS IN ROOF installation manual...
Page 28: ...Mounting Single row R1 28...
Page 29: ...29 NAVITAS IN ROOF installation manual...
Page 30: ...Mounting Single row R1 30...
Page 31: ...31 NAVITAS IN ROOF installation manual...
Page 32: ...Mounting Single row R1 32...
Page 33: ...33 NAVITAS IN ROOF installation manual...
Page 34: ...In roof installation Double multiple row R2 34...
Page 35: ...35 NAVITAS IN ROOF installation manual...
Page 36: ...In roof installation Double multiple row R2 36...
Page 37: ...37 NAVITAS IN ROOF installation manual...
Page 38: ...In roof installation Double multiple row R2 38...
Page 39: ...39 NAVITAS IN ROOF installation manual...
Page 40: ...In roof installation Double multiple row R2 40...
Page 41: ...41 NAVITAS IN ROOF installation manual...
Page 42: ...In roof installation Double multiple row R2 42...
Page 47: ...47 NAVITAS IN ROOF installation manual...
Page 48: ...48...
Page 49: ...49 NAVITAS IN ROOF installation manual...
Page 50: ...Commissioning 50...
Page 54: ...54...


