5
QUICK SET-UP
Journey Toilet Lift
STEP 3
Install the Toilet Bolts to the Lift
This part can be a bit tricky. You are installing the bolts that will position your lift in
the right spot on your toilet.
1. Raise your lift. You should have enough battery juice to raise it, if not, complete
step 5 and retry).
2. Remove the plastic cover over the “rear support”. The rear support is the cross-
bar that connects the two sides of the lift. The “rear support cover” can be slid
upward to remove it. We recommend sliding one end first, then the other.
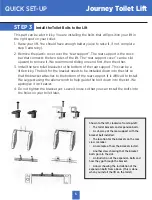
3. Install the two toilet brackets to the bottom of the rear support. This can be a
little tricky. The bolt for the bracket needs to be installed down into the slot so
that the bracket attaches to the bottom of the rear support. It is difficult to install.
We suggest using the allen wrench to help guide the bolt down into the slot. We
apologize it isn’t easier.
4. Do not tighten the bracket yet. Leave it loose so that you can install the bolts into
the holes on your toilet later.
Shown to the left, clockwise from top-left:
• The toilet brackets and expansion bolts.
• A cut-away of the rear support with the
bracket bolt installed.
• The location for the brackets on the rear
cross member
• An example of how the brackets install.
• Another view showing that the bracket
bolts go into the slot.
• An illustration of the expansion bolts and
how they go through the bracket.
• Arrows showing the installation of the
expansion bolts from above. (This is done
when you install the lift on the toilet).


