background image

7


GB 

7

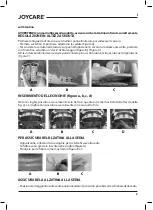
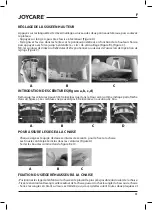
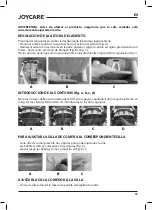
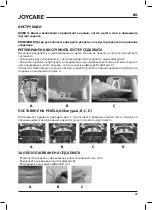
SEAT HEIGHT ADJUSTMENT 

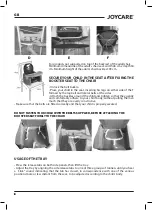
Press the release tabs on both side panels, then lift the tray. 

• Press on the lock A, then pull the seat outwards (Figure A). 

• Slide the seat into the slits on the rear panel, to the chosen height, firmly press 

until you hear a “click”, indicating that it’s locked (Figure B), (Figure C). 

NB: the child seat belts must be positioned above the seat during the adjustment operation (Figure C).

A

B

C

INSERT THE STRAPS (figure a, b, c, d)

Please note the straps only can insert into the square hole (as arrow shown in the figure a), the 

straps can not insert to any other holes.

A

B

C

D

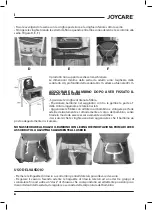
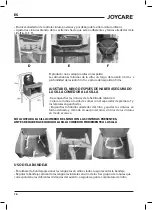
TO SECURE BOOSTER SEAT

- Each booster seat with 2 straps for securing it on chair

- The buckles have been inserted into the straps (figure A)

- Adjust the buckles  (figure B and C).

A

B

C

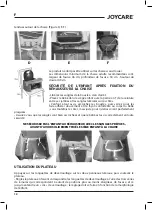
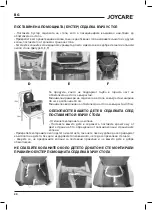
FASTEN THE BOOSTER SEAT TO THE CHAIR 

• Place the booster seat on the chair, positioning it as close as possible to the chair’s seatback. 

• Attach it by wrapping the rear belt around the chair, doing the same with the lower belt under the 

chair. 

• Tighten the belts by pulling the ends until both are tight and stretched around the chair. (Figure D, E, F)

Summary of Contents for JC-1224 GHIOTTONE

Page 1: ...HIOTTONE Manuale d uso Alzatina da tavola User manual Baby booster seat Mode d emploi Rehausseur Bébé Manual de instrucciones Silla de comer portatil plegable УКАЗАНИЯ ЗА УПОТРЕБА сгъваема бустер помощна седалка за кола ...

Page 2: ... montata correttamente prima dell uso ATTENZIONE Primadell uso verificaresemprelasicurezzaelastabilitàdelrialzosediasullasediaadulto Non utilizzare l alzabimbo se qualsiasi parte è rotta strappata o mancante Non utilizzare accessori o parti di ricambio diverse da quelli approvati del costruttore Il colore o la forma del prodotto indicato nelle istruzioni può differire rispetto a quello acquistato ...

Page 3: ...ino devono essere posizionate sopra la seduta durante la operazione di regolazione Figura C A B C INSERIMENTO DELLE CINGHIE figure a b c d Nota le cinghie possono essere inserite solo nel foro quadrato come mostrato dalla freccia nella fig a Le cinghie non possono essere inserite in nessun altro foro A B C D PER ASSICURARE L ALZATINA ALLA SEDIA Ogni alzatina è dotata di due cinghie per poterla fis...

Page 4: ...erali ai lati Agganciare le fibbie con all interno il bambino e stringere per farle aderire delicatamente e comodamente al corpo del bambino senza tirarle in modo da essere eccessivamente costrittive Assicurarsi che le cinghie siano ben agganciate e che il bambino sia posto adeguatamente in sicurezza NON ASSICURARE AL RIALZO IL BAMBINO CON LE CINGHIE IN DOTAZIONE PRIMA DI AVER ASSICURATO LA ALZATI...

Page 5: ... seguito riportate CURA E MANUTENZIONE Solo un adulto deve effettuare operazioni di pulizia e manutenzione e controllo periodico che non vi siano rotture e parti mancanti La scocca in plastica deve essere pulita solo con un panno morbido inumidito con acqua e sapone neutro Non usare solventi Tutteleindicazionieleimmaginisibasanosulleultimeinformazionidisponibilialmomentodellastampaepossono essere ...

Page 6: ...that have not been authorized by the manufacturer The colour and form of the product may be different from those shown in photos or drawings WARNING Always secure Booster Seat to chair using the straps provided To use exclusively on a chair where the dimensions of the seat are superior to those of the elevator This product is designed for children who can remain seated themselves up to a maximum a...

Page 7: ...ease note the straps only can insert into the square hole as arrow shown in the figure a the straps can not insert to any other holes A B C D TO SECURE BOOSTER SEAT Each booster seat with 2 straps for securing it on chair The buckles have been inserted into the straps figure A Adjust the buckles figure B and C A B C FASTEN THE BOOSTER SEAT TO THE CHAIR Place the booster seat on the chair positioni...

Page 8: ... so that they gently and comfortably adhere to your child body without pulling them so much that they are overly constrictive Make sure that the belts are fitted correctly and that your child is properly secured DO NOT FASTEN YOUR CHILD WITH THE BELTS SUPPLIED BEFORE ATTACHING THE BOOSTER SEAT FIRMLY TO THE CHAIR USAGE OF THE TRAY Press the release tabs on both side panels then lift the tray Adjus...

Page 9: ...res below CARE AND MAINTENANCE Only an adult should perform cleaning maintenance and periodic inspection for possible cracks and missing parts The plastic shell should be cleaned only with a soft cloth dampened with water and mild soap Do not use any solvents Specifications and designs are based on the last information available at the time of printing and subject to change without notice ...

Page 10: ...cle si des pièces sont cassées endommagées ou perdues Ne pas utiliser d accessoires non autorisés par le fabricant La couleur et la forme du produit peuvent différer de celles figurant sur les photos ou dessins AVERTISSEMENT fixez toujours le rehausseur à la chaise à l aide des sangles prévues à cet effet Le rehausseur ne doit pas déborder du siège Veillez à ce que le siège de la chaise soit plus ...

Page 11: ... b c d Remarque les ceintures peuvent être insérées que dans le trou carré comme indiqué par la flèche dans un figure a Les ceintures ne peuvent pas être insérées en aucun autre trou A B C D POUR ASSURE LE SIEGE A LA CHAISE Chaque siège est équipé de deux ceintures de sécurité pour le fixer a la chaise Les boucles ont déjà été inclus dans les ceintures Figure A Serrer les boucles comme dans la fig...

Page 12: ...ement et de façon confortable au corps du bébé sans toutefois les tirer mais juste pour qu elles soient parfaitement plaquées Assurez vous que les sangles sont bien accrochées et que le bébé est assis correctement en toute sécurité NE SÉCURISEZ PAS L ENFANT AU RÉHAUSSEUR AVEC LES SANGLES PRÉVUES AVANT D AVOIR SOLIDEMENT FIXÉ LE SIÈGE ENFANT À LA CHAISE UTILISATION DU PLATEAU Appuyez sur les langue...

Page 13: ...CAUTIONS ET ENTRETIEN Seul un adulte doit effectuer les opérations de nettoyage et d entretien ainsi qu un contrôle périodique afin de s assurer qu aucune pièce ne manque ou ne soit cassée La coque en plastique doit être nettoyée uniquement à l aide d un chiffon doux imbibé d eau et de savon neutre N utilisez aucun solvant Toutes les informations et les images sont basées sur les dernières informa...

Page 14: ...verificar SIEMPRE la seguridad y la estabilidad del silla de comer apoyada sobre una corriente silla No se debe utilizar el artículo si alguna parte está rota deteriorada o perdida No se debe usar accesorios no autorizados por el fabricante El color y la forma del producto pueden ser diferentes de los de las fotos o dibujos ADVERTENCIA Sujete siempre el asiento elevador a la sillita utilizando las...

Page 15: ...nturas tienen que estar apoyadas sobre el asiento durante la operación de regulación Fig C A B C INTRODUCCION DE LAS CINTURAS fig a b c d Nota las cinturas deben ser introducidas SOLO en el agujero cuadrado como muestra la flecha en la Fig A Las cinturas NO pueden ser introducidas en los otros agujeros A B C D PARA AJUSTAR LA SILLA DE COMER A LA CORRESPONDIENTE SILLA Cada silla de comer presenta d...

Page 16: ... la hebilla de retención Colocar al niño en la silla de comer con el separador de piernas a T y los laterales enganchados Enganchar la hebillas alrededor del niño y ajustar las cinturas en forma delicada y cómoda al cuerpo del niño sin tirar de las cinturas en modo excesivo NO AJUSTAR A LA SILLA COMEDOR EL NINO CON LAS CINTURAS PRESENTES ANTES DE HABER ASEGURADO LA SILLA COMEDOR FIRMEMENTE A LA SI...

Page 17: ...entada abajo CUIDADO Y MANTENIMIENTO Solo un adulto debe efectuar las operaciones de limpieza mantenimento y controles periódicos de que non hayan partes rotas o piezas faltantes La estructura en plástico debe ser limpiada solo con un paño humedecido con agua y jabón neutro NO usar solventes Las especificaciones y planes están basado en la última información disponibile en el momento de impresion ...

Page 18: ...или липсващи Никога не използвайте аксесоари които не са били оторизирани от производителя Цветът и формата на продукта може да се различава от тези показани в снимките или чертежите ВНИМАНИЕ Винаги поставяйте бустер помощната седалка стабилна към столчето с помощта на предвидените презрамки Да се използва изключително за столчета чиито размери са по големи от тези на седалката Този продукт е пред...

Page 19: ...лката в процепите на задния панел до избраната височина натиснете докато чуете изщракване което показва че тя е заключена фигура B фигура C Забележка Предпазните колани за детето трябва да бъдат позиционирани над седалката по време на настройката фиг C A B C Поставяне на ремъци Фигура A B C D Моля имайте предвид ремъците могат да поставят в квадратна дупка като стрелката е показано на фигурата рем...

Page 20: ... седалката на стола за възрастни ширина 46 см х дълбочина 34 см Минимална височина на облегалката на стола за възрастни 49 см ОБЕЗОПАСЕТЕ ВАШЕТО ДЕТЕ В СЕДАЛКАТА СЛЕД ПОСТАВЯНЕТО Й ВЪРХУ СТОЛА Отключете катарамата на колана Поставете вашето дете в седалката поставете краката му от двете страни на Т то образувано от поясния колан и страничните колани Прикрепете катарамите около детето и затегнете т...

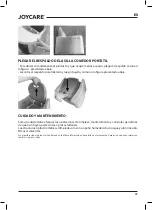
Page 21: ...ГЪВАНЕ НА ОБЛЕГАЛКАТА За по практично съхранение на седалката и за да заема по малко пространство сгънете облегалката на седалката както е показано по долу Повдигнете облегалката на седалката за да я отключите и след това я спуснете като в снимките по долу ГРИЖА И ПОДДРЪЖКА Само възрастен трябва да извършва почистването поддръжката и периодичната проверка за евентуални пукнатини и липсващи части П...

Page 22: ...22 BG ...

Page 23: ...23 ...

Page 24: ...JOYCARE S R L Socio unico Sede legale e amministrativa Via Massimo D Antona 28 60033 Chiaravalle AN ITALY Tel 39 071 890151 Fax 39 071 2809336 www joycare it Made in China REV02 NOV2015 ...

Reviews: