background image

1. 

Before Using the Phone 

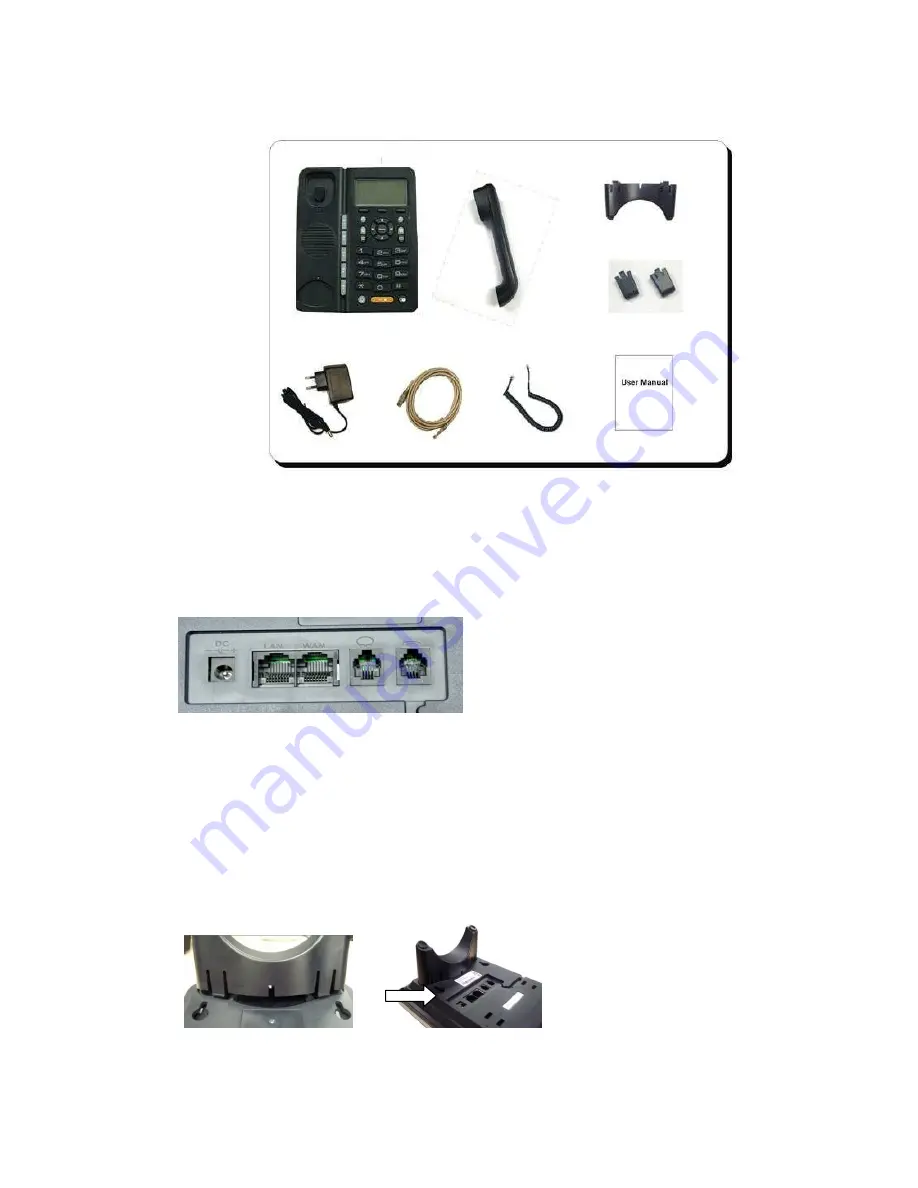
1-1.Package Contents 


1-2.Installation 

Connecting Network and Power Supply 

Connect WAN port of 3190IB to router. Connect LAN port of the phone to your PC with Ethernet cable 

Plug in attached power adapter to the phone’s power jack -- ”DC”.  


Connecting Handset and Headset(optional) 

Connect the handset to the phone with attached coiled cord through handset jacks(one jack on the back of the phone and another on the 
handset) 
Connect headset to the headset jack on the back of the phone(Optional. Only if you have a headset and need to use it). 

Assembly Base and Brackets 

You could choose one of below two ways to install 3190IB VoIP phone 

Desktop installation 

Assembly table bracket to base unit as shown below


Wall Mounting Installation 

To install the phone on the wall, you need to put two pothooks on the wall first. Then assemble two wall mount brackets to the phone. In 
this way, the phone could be hung on the wall. The two supporting frames could balance the bottom of the phone 

Summary of Contents for WELL 3190

Page 1: ...R SUPPLY 2 CONNECTING HANDSET AND HEADSET OPTIONAL 2 ASSEMBLY BASE AND BRACKETS 2 2 PHONE OPERATIONS 3 2 1 TO MAKE A CALL 3 2 2 PHONEBOOK MANAGEMENT 3 2 3 HOLD MUTE AND VOLUME ADJUSTMENT 4 2 4 REJECT A CALL 4 2 5 CALL TRANSFER 4 2 6 THREE PARTY CONFERENCE 4 2 7 CALL FORWARD 5 3 CONFIGURATION THROUGH PHONE INTERFACE 5 3 1 DISPLAY CONTRAST 5 3 2 BACKLIGHT INTENSITY 5 3 3 RING TYPE 5 3 4 LCD DISPLAY ...

Page 2: ...ack of the phone and another on the handset Connect headset to the headset jack on the back of the phone Optional Only if you have a headset and need to use it Assembly Base and Brackets You could choose one of below two ways to install 3190IB VoIP phone Desktop installation Assembly table bracket to base unit as shown below Wall Mounting Installation To install the phone on the wall you need to p...

Page 3: ...responding soft key LCD displays Dial to dial out the number Then you could choose to pick up the handset or use Hands Free function by not picking up the handset In off hook Pick up the handset input number press or corresponding soft key LCD displays Dial to dial out the number Dial out a number from Memory Keys M1 M5 To dial out the stored number in M1 or other memory key s press M1 or other me...

Page 4: ...ate list to get access to your desired number then press Half Attended Transfer 1 During a call press 2 Do one of the following steps Enter the number to which you want to transfer the call Press transfer soft key then press Get access to your desired number as LCD indicates then press to transfer Press transfer soft key then press Select the appropriate list to get access to your desired number t...

Page 5: ...uration Screen Set Brightness Edit Use or to select on or off Then press corresponding soft key to Save the setting or Quit 3 3 Ring Type To change the incoming ring type Press Select Configuration Ringer Set Ringer Type Edit Use or to select ringer type then press corresponding soft key to Save or Quit To set distinctive incoming ringing tones for contacts Press Enter Use or to select the ringer ...

Page 6: ... as below Choose VOIP on the left column to make VOIP configuration SIP Line Select Choose SIP 1 or SIP 2 click Load to load corresponding SIP settings Register Status Indicate current registration status of the chosen SIP Server Name Input your server name You could leave the server name If you choose to configure it make it different between two SIPs Otherwise one SIP would not be able to regist...

Reviews: