9)
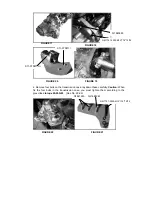
Park Brake Light switch:
control the 4 turning lights on or off. Pull the
park-brake-light switch out and the 4 turning lights illuminate together. (See figure 6)
10)
Horn Switch:
control the horn. Press the horn button down and hold, the horn buzz.
(See figure 7)
11)
Spot light switch:
control the 4 spot- lights on or off.
Indicating and gauges
12)
Speedometer:
Indicates the speed vehicle is moving at. It warns you to drive at
proper speed. (See figure 8)
13)
Tachometer:
Indicates the RPM of engine. (See figure 8)
14)
Coolant temperature indicator:
indicate the temperature of coolant, if the
temperature is above 102
0
C/215
0
F. and the Stop engine immediately. Check coolant
lever and add if low, see authorized JOYNER dealer if temperature indicator stay on and
overflow tank is full of coolant. (See figure 8)
15)
Voltmeter
: Indicates battery is charging. Check battery if voltmeter registers a
charge that is lowers than normal. See your authorized JOYNER dealer if battery is good
and voltmeter still register low charge (See figure 8)
16)
Fuel level gauge:
The fuel gauge displays approximately how much fuel you have in
the fuel tank. Always park the vehicle on level ground to get an accurate reading. The
fuel tank is empty when the fuel gauge-needle points to 0 and full when the needle points
to 1. (See figure 8)
17)
Oil pressure gauge
: Indicates oil pressure. If the needle point to red area, stop
engine immediately. Check oil level and add if low. See authorized Joyner dealer if
needle stays on and engine is full of oil. (See figure 8)
18)
Reverse gear light:
indicate reverse gear engaged if illuminated. (See figure 9)
19)
Battery charge light:
if it is off, battery charging, if on, check battery connection.
(See figure 9)
20)
Coolant temperature light:
indicate coolant temperature is above 102
0
C. (See
figure 9)
21)
Oil pressure light:
Indicates low/high oil pressure when illuminated, see authorized
JOYNER dealer if necessary. (See figure 9)
Park Brake Light switch
Horn Switch
FIGURE 4
FIGURE 5
FIGURE 7
FIGURE 6
Summary of Contents for JNSZ1100SVB
Page 6: ...Warranty policy...
Page 7: ......
Page 8: ......
Page 9: ......
Page 10: ......
Page 11: ......
Page 12: ......
Page 13: ......
Page 14: ......
Page 15: ......
Page 41: ...13 ENGINE WIRING DIAGRAM...
Page 96: ...95 46 ELECTRIC INJECTION SYSTE...
Page 97: ...96...
Page 98: ...97...
Page 99: ...98...
Page 100: ...99...
Page 101: ...100...
Page 102: ...101...
Page 103: ...102...
Page 104: ...103...
Page 105: ...104...
Page 106: ...105...
Page 107: ...106...
Page 108: ...107...
Page 109: ...108...
Page 110: ...109...
Page 111: ...110...
Page 112: ...111...
Page 113: ...112...
Page 114: ...113...
Page 115: ...114...
Page 116: ...115...
Page 117: ...116...
Page 118: ...117...
Page 119: ...118...
Page 120: ...119...
Page 121: ...120...
Page 122: ...121...
Page 123: ...122...
Page 124: ...123...
Page 125: ...124...
Page 126: ...125...
Page 127: ...126...
Page 128: ...127...
Page 129: ...128...
Page 130: ...129...
Page 131: ...130...
Page 132: ...131...
Page 133: ...132...
Page 134: ...133...
Page 135: ...134...
Page 136: ...135...
Page 137: ...136...
Page 138: ...137...
Page 218: ...217 4 Attach tie rod and front wheel...
Page 225: ...224 DEALER PRE DELIVERY INSPECTION...

