background image

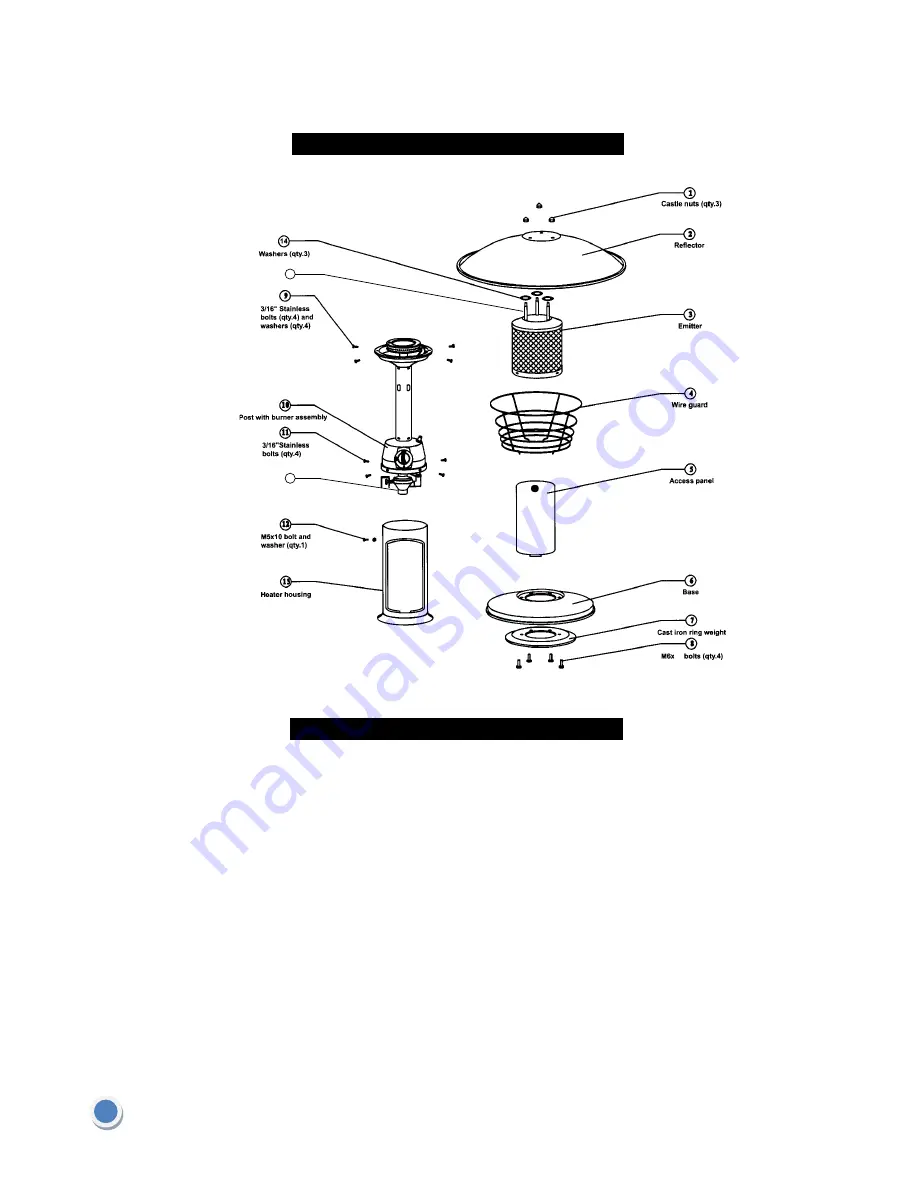
This outdoor/tabletop heater requires some assembly. Check over the contents to make sure all the  

parts are available for assembly.

Contents:

1.  Castle nuts (qty. 3)

2.  Reflector

3.  Emitter

4.  Wire guard

5.  Access panel

6.  Base

7.  Cast iron ring weight

8.  M6X15mm bolts (qty. 4)

9.  3/16" Stainless bolts (qty. 4) and washers (qty. 4)

10.  Post with burner assembly

11.3/16" Stainless bolts (qty. 4)

12. M5X10mm bolt and washer (qty. 1)

13.Heater housing

14. Washers (qty. 3)

15.

Regulator

16. 

Pins and Nuts(qty.3)

Tools required for assembly:

1.Phillips screwdriver

2. Adjustable wrench 

3. Spray bottle with soap solution for leak test

Contents Breakdown

Package Contents

4

15

16

Regulator

Pins and Nuts(qty.3)

15

Summary of Contents for Paramount PH-T-107-MK

Page 1: ...this manual carefully before assembling using or servicing this heater Keep this manual for future reference Tabletop Patio Heater R US For customer service parts or warranty issues Call 1 800 561 55...

Page 2: ...sed extensively throughout this manual Always heed these precautions as they are essential when using any mechanical or fueled equipment DANGER DANGER indicates an imminently hazardous situation which...

Page 3: ...hese If no local codes exist follow National Fuel Gas Code ANSI Z223 1 In Canada installation must conform to local codes If no local codes exist follow the current National standards of CANADA CAN CG...

Page 4: ...r ignition sources or while heater is hot to touch This heater is red hot during use and can ignite flammables too close to the burner Keep flammables at least 2 feet from sides 3 feet from top Keep g...

Page 5: ...eight 8 M6X15mm bolts qty 4 9 3 16 Stainless bolts qty 4 and washers qty 4 10 Post with burner assembly 11 3 16 Stainless bolts qty 4 12 M5X10mm bolt and washer qty 1 13 Heater housing 14 Washers qty...

Page 6: ...ter housing 13 with base 6 and weight 7 and use 4 M6X15mm bolts 8 to attach Tighten the bolts as shown below Place the burner assembly 14 on the heater housing 15 and attach with 4 3 16 bolts 11 Fix t...

Page 7: ...See below Place 3 washers 14 over pins on emitter 3 Place reflector 3 on top of pins and washers Fasten the reflector 3 with 3 castle nuts 1 Close the access panel 5 and lock by rotating the handle 9...

Page 8: ...least 5 minutes or more to let the gas dissipate before relighting to avoid gas explosion Repeat steps 2 to 4 1 Turn the control knob to ON position 2 Press and turn the control knob to OFF position...

Page 9: ...e d n i l y c e c a l p e r d n a F F O e v l a v r e d n i l y c n r u T w o l s i e r u s s e r p s a G Outdoor temperature is less than 40 F and tank is less than 1 4 full Use a full cylinder e g...

Page 10: ...ering Service Warranty Repair to gas passages and associated components 1 YEAR LIMITED WARRANTY CUSTOMERS IN CANADA IMPORTANT Only return this product to the store if it was purchased within 90 days I...

Reviews: